

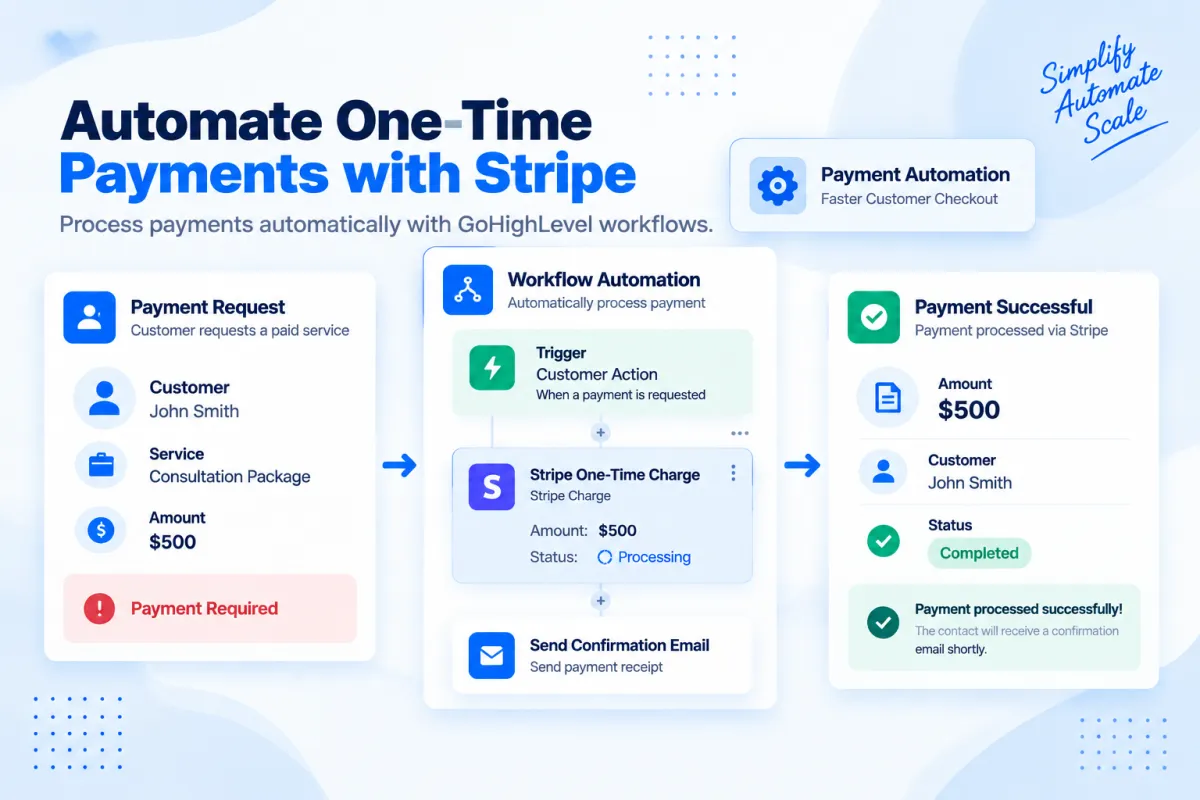
Stripe One-Time Charge Action in GoHighLevel: Step-by-Step Payment Automation Guide
How to Process One-Time Payments Automatically Using the Stripe One-Time Charge Action in GoHighLevel
Introduction
Collecting payments is one of the most important parts of any business process. Whether you are selling a service, collecting a consultation fee, charging for a product, or accepting a one-time payment from a customer, the payment process needs to be simple, reliable, and connected with your customer management system.
Many businesses still handle payment requests manually. A team member sends a payment link, waits for confirmation, updates the CRM, and follows up with the customer. This process can create delays and increase the chance of missed updates.
GoHighLevel helps businesses simplify payment workflows by connecting payment processing with automation. With the Stripe One-Time Charge Action in GoHighLevel, businesses can automatically create payment requests through workflows and process one-time charges when specific conditions are met.
This allows businesses to build smoother customer journeys where payment actions happen automatically after events such as form submissions, appointment bookings, or sales milestones.
In this guide, we will explain what the Stripe One-Time Charge Action in GoHighLevel is, how it works, how to set it up, practical use cases, and best practices for creating effective payment automation workflows.
What Is the Stripe One-Time Charge Action in GoHighLevel?
The Stripe One-Time Charge Action in GoHighLevel is a workflow action that allows businesses to charge a contact a single payment through Stripe as part of an automated workflow.
Instead of manually creating payment requests every time a customer needs to pay, businesses can use workflow automation to trigger a one-time charge based on specific actions.
For example:
A customer books a consultation.
↓
Workflow starts.
↓
Stripe One-Time Charge Action runs.
↓
Customer is charged the required amount.
This helps connect payment collection with the rest of your GoHighLevel automation system.
The action is designed for one-time payments, meaning it is useful when a customer needs to make a single payment rather than a recurring subscription.
Examples include:
Consultation fees
Setup fees
One-time service payments
Product purchases
Deposits
Custom charges
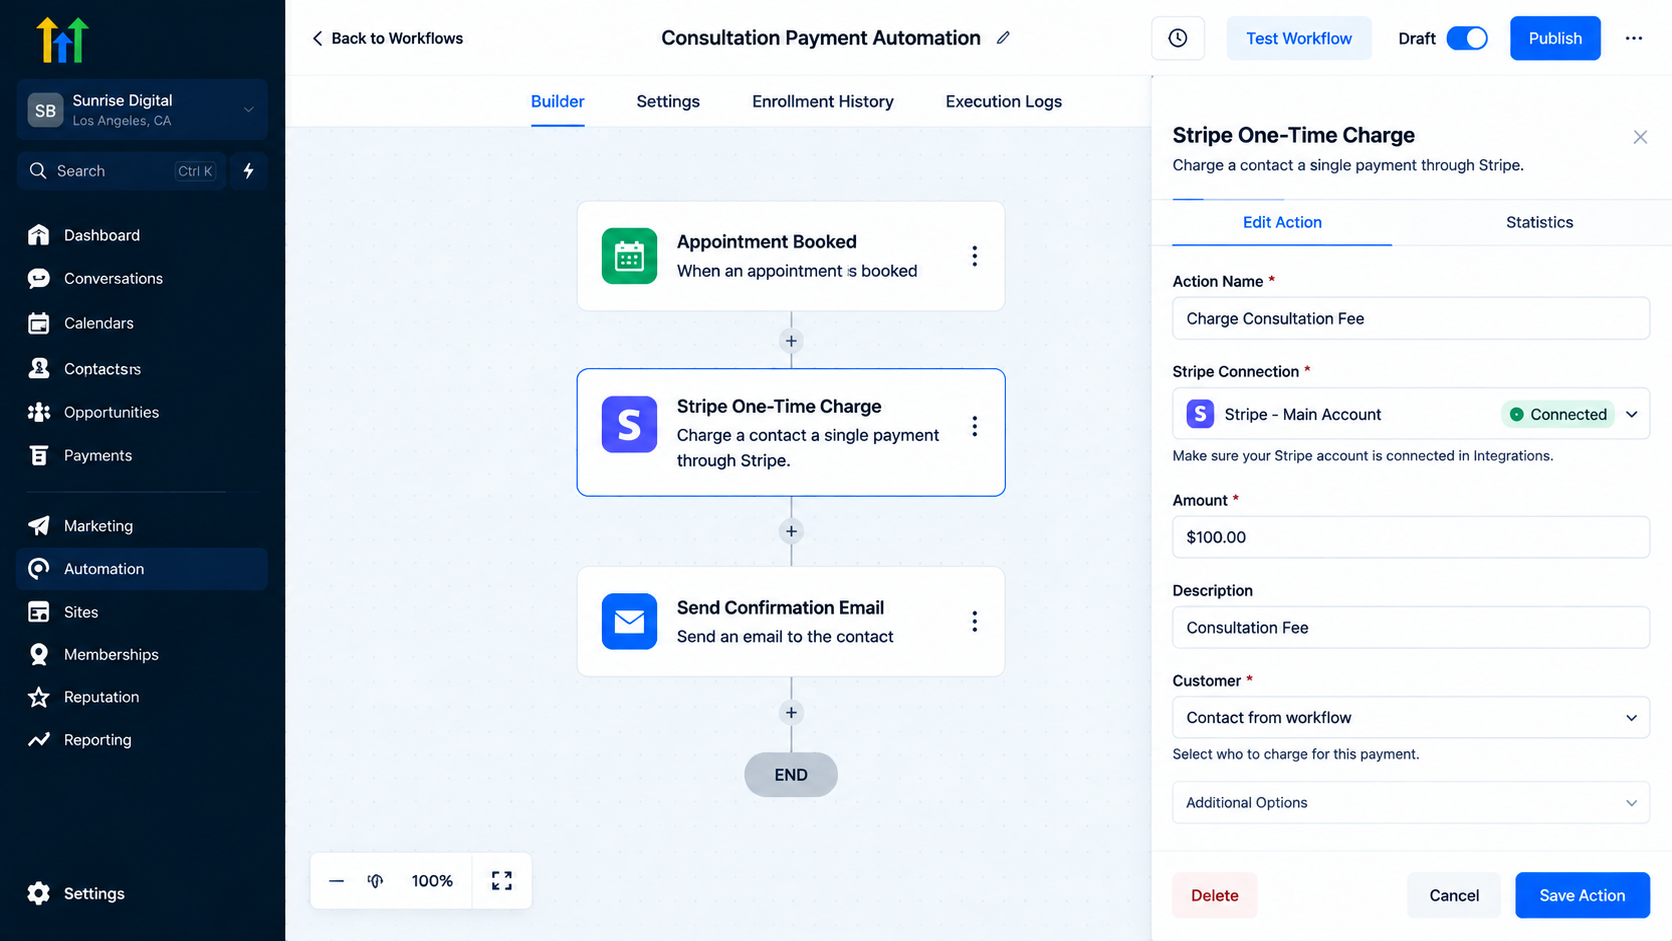
GoHighLevel workflow builder displaying the Stripe One-Time Charge action settings to process consultation fees after an appointment is booked
Why Automate One-Time Payments in GoHighLevel?
Manual payment processes often require several steps:
Contacting the customer
Sending payment information
Waiting for payment confirmation
Updating records
Starting the next business process
Automation helps reduce these repetitive tasks.
Faster Payment Collection
When payment actions are connected directly to workflows, customers can move through the payment process faster.
Instead of waiting for a team member to send payment instructions, the workflow can handle the next step automatically.
Reduce Manual Work
Businesses can save time by allowing workflows to manage payment-related actions.
For example:
Customer submits order form
↓
Workflow creates payment charge
↓
Customer completes payment
↓
Follow-up workflow starts
This reduces the need for manual updates.
Create Better Customer Experiences
A smooth payment process creates less friction for customers.
When customers receive payment requests at the right time, the buying process becomes easier and more organized.
Connect Payments With CRM Automation
One of the biggest benefits of using GoHighLevel workflows is that payment events can become part of a larger customer journey.
For example:
Payment completed
↓
Add customer tag
↓
Send confirmation message
↓
Move opportunity stage
↓
Start onboarding workflow
How the Stripe One-Time Charge Action Works
The Stripe One-Time Charge Action works inside the GoHighLevel Workflow Builder.
A typical workflow structure may look like this:
Trigger Event
↓
Stripe One-Time Charge Action
↓
Payment Confirmation
↓
Next Workflow Steps
The trigger determines when the payment request should happen.
Common triggers may include:
Form submission
Appointment booking
Opportunity stage change
Customer action
Once the workflow reaches the Stripe One-Time Charge Action, the configured payment process runs.
The exact workflow behavior depends on your Stripe connection, payment settings, and automation design.
Requirements Before Using Stripe One-Time Charge Action
Before creating payment automation, make sure your account is properly configured.
Connect Stripe With GoHighLevel
Stripe must be connected with your GoHighLevel account before using Stripe payment-related features.
A connected payment processor allows GoHighLevel to communicate with Stripe for payment processing.
Define Your Payment Amount
Before creating the workflow action, decide:
How much the customer should be charged
What the payment represents
When the charge should occur
For example:
Consultation Fee: $100
Service Setup Fee: $500
Product Purchase: $250
Create a Clear Workflow Goal
Payment automation works best when it supports a specific business process.
Before adding the action, decide:
Why is the payment being collected?
What happens after payment?
Which workflow steps should follow?
Step-by-Step: How to Add Stripe One-Time Charge Action in GoHighLevel
Step 1: Open Workflow Builder
Navigate to:
Automation → Workflows
Create a new workflow or open an existing workflow where you want to add payment automation.
Your workflow should already have a trigger that determines when the payment should happen.
Example:
Trigger: Appointment Booked
Step 2: Select Your Workflow Trigger
The trigger starts the automation process.
Examples:
New customer submits a form
Customer books a service
Opportunity reaches a specific stage
Choose a trigger that matches your payment process.
Example:
A customer books a strategy call.
↓
Workflow starts.
↓
Payment request is created.
Step 3: Add the Stripe One-Time Charge Action
Inside the workflow builder:
Click the "+ Action" button.
Search for the Stripe payment action.
Select "Stripe One-Time Charge."
Configure the payment details.
This action should be placed where you want payment processing to occur.
Example:
Appointment Booked
↓
Stripe One-Time Charge
↓
Send Confirmation Email
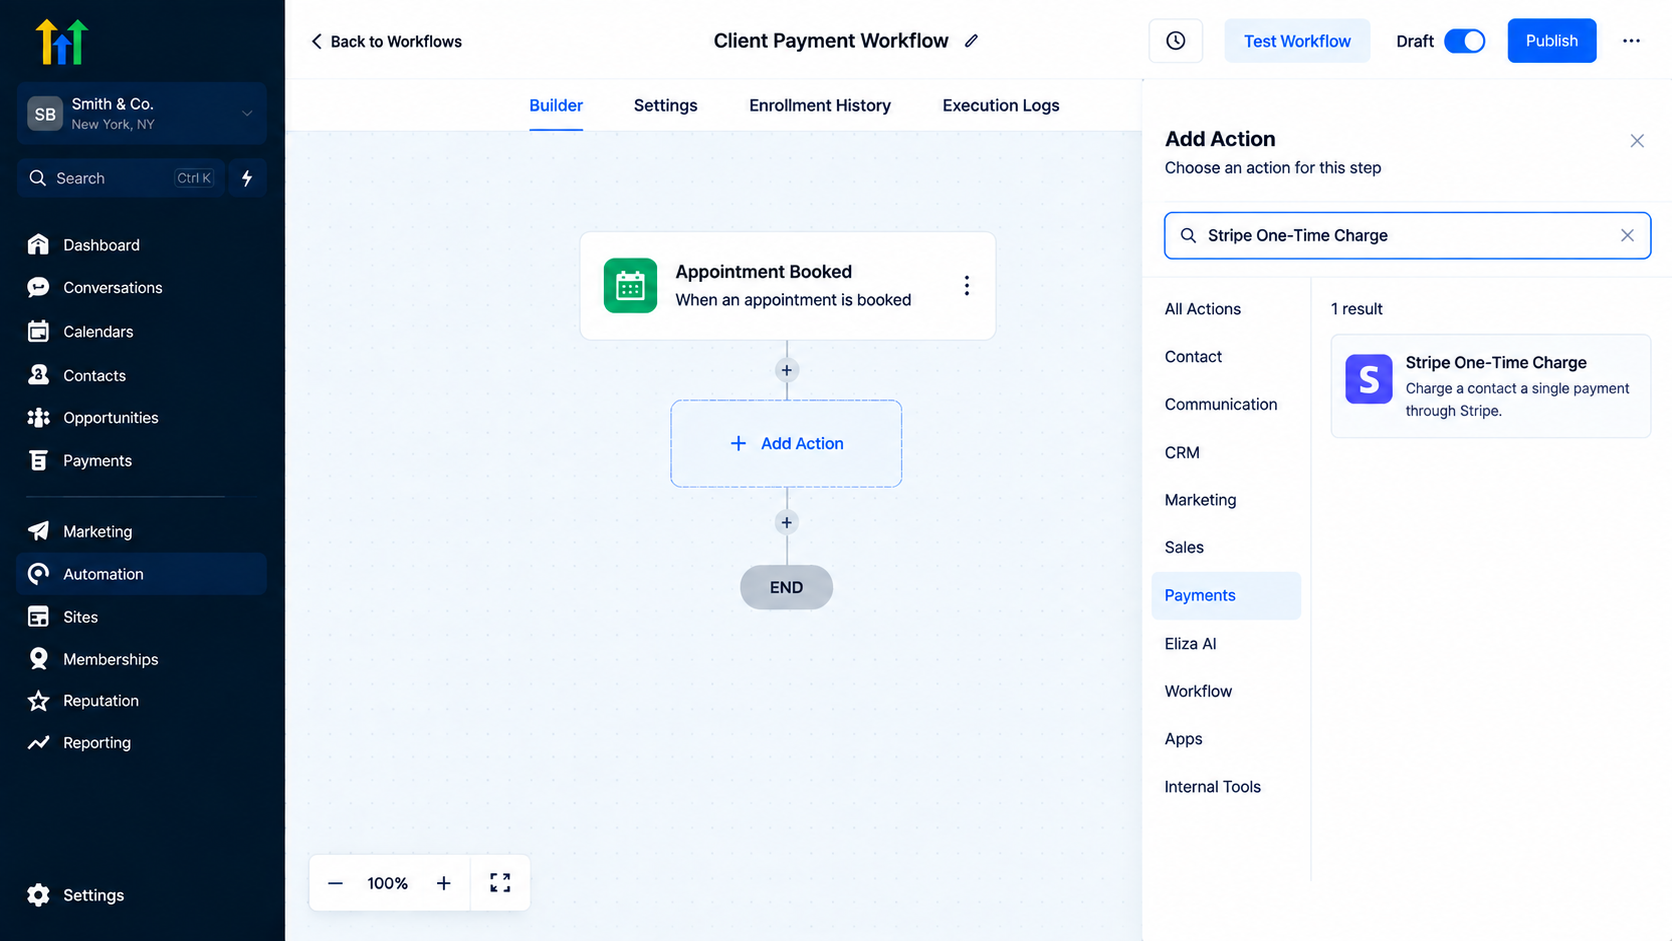
GoHighLevel workflow builder showing the sidebar action menu searching for and selecting Stripe One-Time Charge to process client payments.
Step 4: Configure Payment Details
Set up the required payment information.
This may include:
Payment amount
Charge details
Stripe connection
Customer information
Make sure the payment details match your actual offer or service.
Incorrect payment settings can create customer confusion.
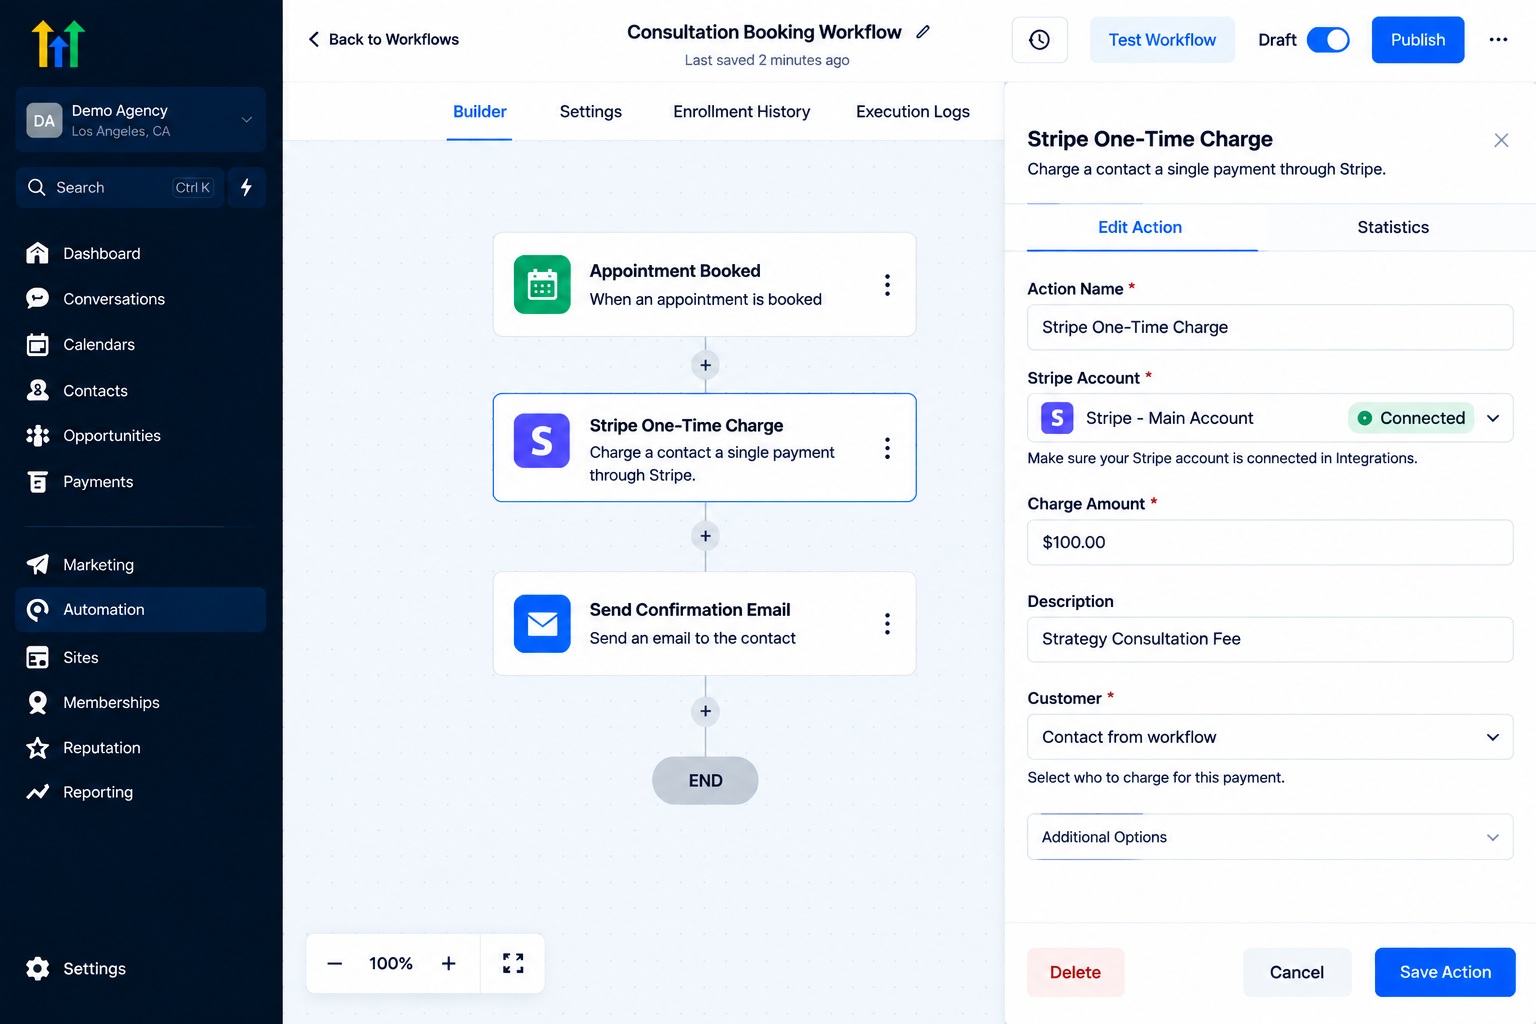
Step 5: Add Follow-Up Actions
After the payment action, you can continue building your workflow.
Examples:
Send Confirmation Message
After successful payment:
↓
Send email confirmation
Update CRM Information
After payment:
↓
Add customer tag
↓
Update opportunity stage
Start Onboarding
After payment:
↓
Send welcome information
↓
Begin onboarding workflow
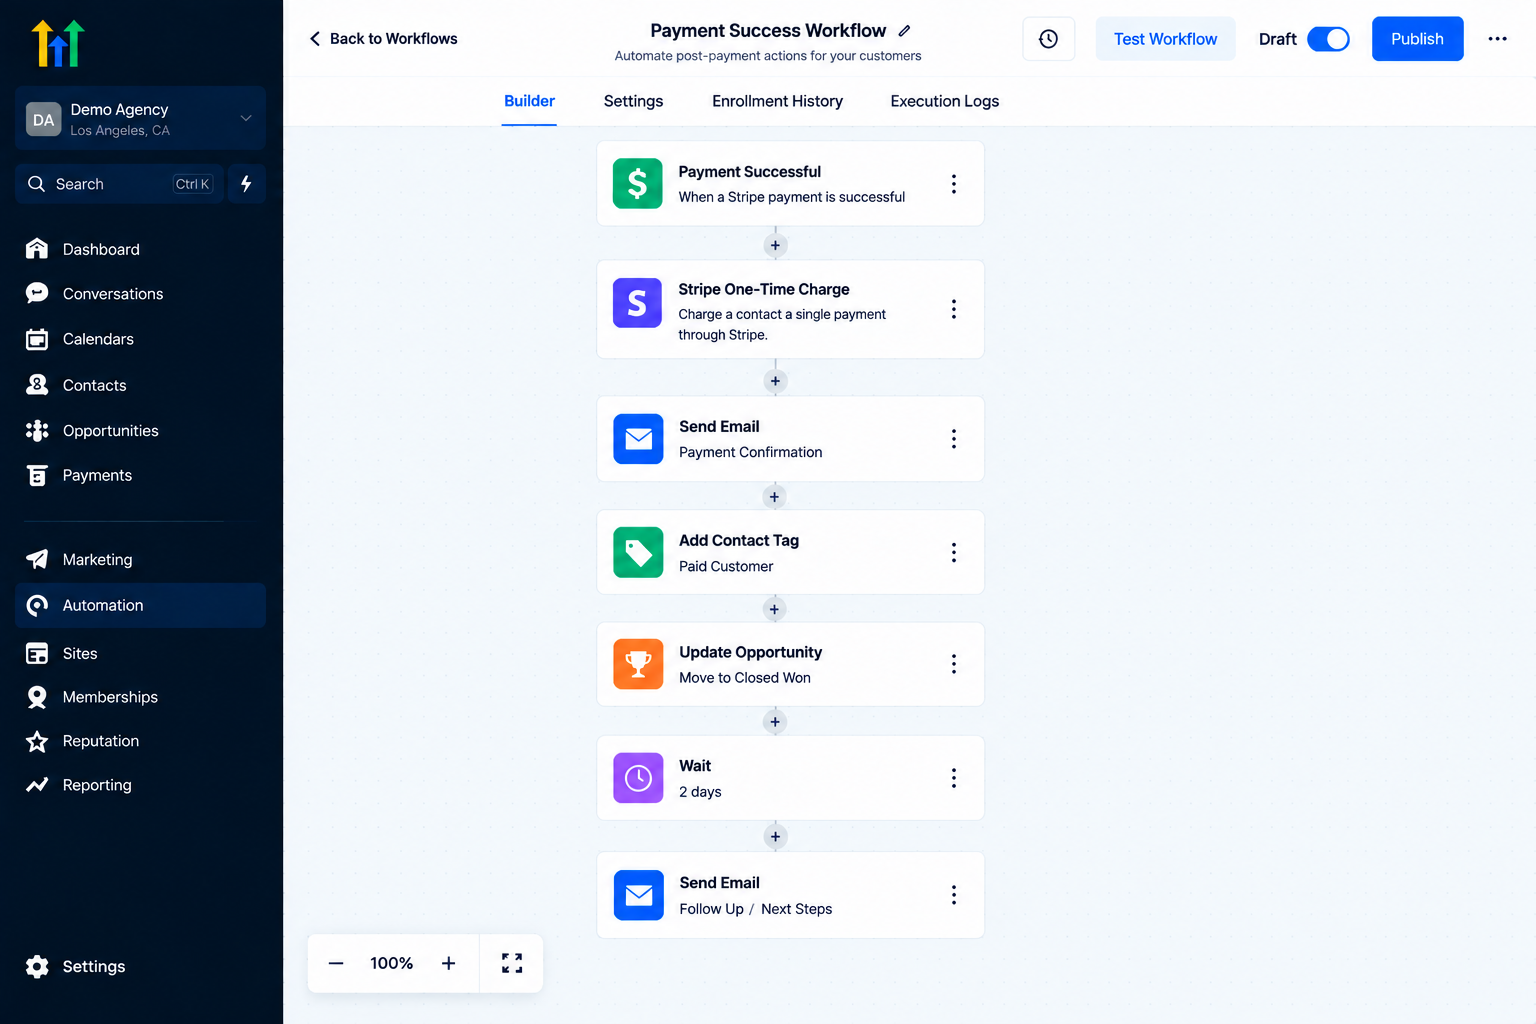
GoHighLevel workflow builder showing a complete Payment Success automation sequence with payment triggers, contact tags, and follow-up emails
Step 6: Test the Workflow
Testing is an important step before activating payment automation.
Check:
Workflow trigger works correctly
Payment action runs correctly
Customer receives the correct information
Follow-up actions happen as expected
A test helps identify problems before real customers experience them.
Step 7: Activate the Workflow
After testing:
Review workflow steps
Confirm payment settings
Publish the workflow
Once active, contacts who meet the trigger conditions will move through the automated payment process.
Practical Use Cases for Stripe One-Time Charge Automation
1. Service Businesses
Many service providers collect one-time payments before starting work.
Examples:
Consulting services
Marketing services
Design projects
Professional services
Workflow example:
New Client Inquiry
↓
Payment Request
↓
Client Payment
↓
Service Onboarding
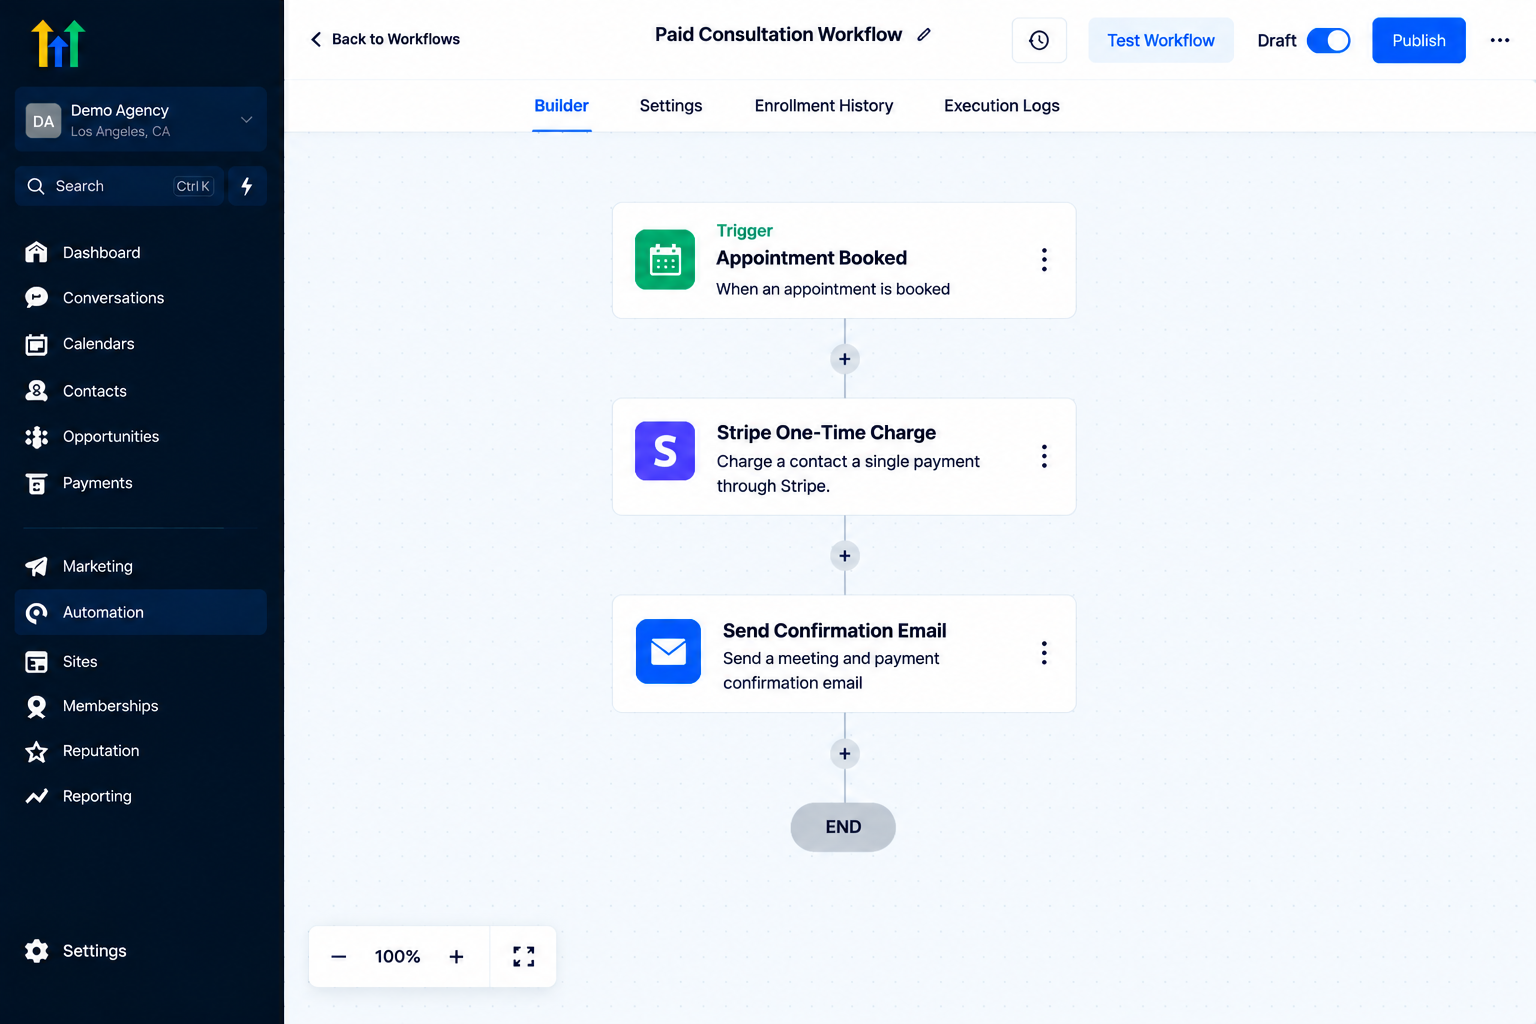
2. Paid Consultations
Businesses that charge consultation fees can automate payment collection.
Example:
Customer books consultation.
↓
Workflow sends one-time charge.
↓
Payment received.
↓
Meeting confirmation sent.
This creates a smoother booking experience.
3. Product Sales
Businesses selling individual products can use one-time payment automation for specific purchases.
Example:
Customer selects product.
↓
Workflow processes payment.
↓
Customer receives confirmation.
4. Deposits and Initial Payments
Some businesses require an upfront deposit before beginning work.
Example:
Project Approved
↓
Charge Deposit
↓
Start Project Workflow
This keeps payment collection connected with project progress.
Best Practices for Using Stripe One-Time Charge Action
Keep Payment Workflows Simple
Avoid creating overly complicated payment workflows.
A clear structure is easier to manage:
Trigger
↓
Payment
↓
Confirmation
↓
Next Step
Clearly Communicate Payment Information
Customers should understand:
What they are paying for
The payment amount
What happens after payment
Clear communication improves the customer experience.
Test Before Launching
Always test payment workflows before using them with customers.
Review every step carefully.
Connect Payment With CRM Actions
A payment should usually trigger the next business process.
Examples:
Update opportunity
Add tag
Start onboarding
Send confirmation
This creates a complete automated customer journey.
Common Mistakes to Avoid
1. Incorrect Payment Amount
Always verify the charge amount before activating your workflow.
2. Skipping Testing
Payment workflows should always be tested before going live.
3. Missing Follow-Up Actions
A payment should usually lead to another step, such as confirmation or onboarding.
4. Poor Customer Communication
Customers should know why they are receiving the payment request.
5. Using Automation Without a Clear Goal
Every payment workflow should have a defined purpose.
Frequently Asked Questions(FAQ's)
1. What is the Stripe One-Time Charge Action in GoHighLevel?
It is a workflow action that allows businesses to process a single payment through Stripe automatically.
2. Do I need Stripe connected to use this action?
Yes, Stripe must be connected before using Stripe payment automation features.
3. Can I use this for recurring payments?
No, this action is designed for one-time charges, not recurring subscriptions.
4. Can payment automation trigger other workflows?
Yes, payment actions can be combined with other workflow steps such as notifications, tags, and CRM updates.
5. What businesses can use Stripe One-Time Charge automation?
It can be used by service providers, agencies, consultants, and businesses that collect one-time payments.
Conclusion
The Stripe One-Time Charge Action in GoHighLevel helps businesses simplify payment collection by connecting one-time charges with automated workflows.
Instead of manually requesting payments and updating customer records, businesses can create automated processes that collect payments and continue the customer journey automatically.
The key to successful payment automation is creating a clear workflow structure. Define when the payment should happen, configure the correct charge details, test the process, and connect payment completion with the next CRM action.
When used correctly, Stripe payment automation can reduce manual tasks, improve customer experiences, and create a more organized sales and service process inside GoHighLevel.
Need Expert Help with GoHighLevel?
New to GoHighLevel and ready to get started? Buy your GoHighLevel account here and launch with confidence.
Already know what you need and want our team to handle everything, from complete setup and customization to funnels, workflows, automations, CRM, and pipelines? Click here.