
GoHighLevel Product Access Onboarding Automation Step by step Guide
How to Deliver Personalized Product Onboarding When Access Is Granted in GoHighLevel
Introduction
Giving a customer access to a course, membership, or digital product is only the beginning of the customer experience. What happens immediately after access is granted can determine whether the customer knows what to do next or feels lost.
The Product Access Granted trigger in GoHighLevel allows businesses to respond automatically when a contact is granted access to a specific product. Instead of manually sending every welcome message or onboarding instruction, you can use a workflow to deliver timely communication, organize follow-ups, and create a more consistent customer experience.
In this guide, you'll learn what the trigger does, how to configure it, how to build a product onboarding workflow, how to personalize the experience, how to test it, and which common mistakes to avoid.
What Is the Product Access Granted Trigger in GoHighLevel?
The Product Access Granted trigger starts a GoHighLevel workflow when a customer is granted access to a specific product.
GoHighLevel currently lists Product Access Granted under its Courses workflow triggers alongside events such as New Signup, Product Started, Product Completed, Lesson Started, and Offer Access Granted.
The important distinction is that this trigger is based on access being granted, rather than simply assuming that a purchase occurred.
For example, imagine you sell an online course called "Marketing Fundamentals." When a customer receives access to that product, the Product Access Granted trigger can start a workflow that:
Sends a welcome email.
Provides getting-started instructions.
Adds an appropriate tag.
Updates CRM information where needed.
Waits before sending another onboarding message.
Notifies an internal team member.
Continues the customer through additional workflow steps.
You can also use product filters so the workflow responds to the particular product you want to automate. HighLevel's documentation specifically describes how to select a product as a trigger filter.
This makes the trigger useful for event-based product onboarding: access is granted → workflow starts → onboarding actions happen.
Why Automate Product Onboarding?
Without automation, product onboarding can become repetitive. Someone on your team may need to confirm access, send instructions, explain the first step, and remember to follow up.
A workflow can handle those repetitive steps consistently.
Faster customer onboarding
A customer can receive the appropriate onboarding communication as part of the automated workflow after access is granted.
A consistent first experience
Instead of relying on someone to remember each step, you can define the onboarding sequence once and let the workflow follow it.
Less manual work
Automating repetitive communications and internal tasks allows your team to spend less time performing routine onboarding work.
Timely instructions
Customers can receive the information they need at appropriate points instead of receiving everything in one manual message.
Personalized communication
Product-specific filters and workflow logic can help you create different experiences for customers accessing different products. HighLevel specifically identifies customizable responses and product filtering as benefits of this trigger.
How to Set Up the Product Access Granted Trigger
Once you understand the event that starts the automation, you can build the workflow.
1. Open GoHighLevel
Log in to GoHighLevel and open the correct sub-account where you want to create the product onboarding automation. From the main dashboard, navigate to Automation and open Workflows to build the automation.

2. Open Workflows
Navigate to your workflows and create a new workflow. You can build the automation from scratch or use another available workflow creation method.

3. Add the trigger
Inside the Workflow Builder, select Add New Trigger. Search for and select Product Access Granted. HighLevel's documentation confirms that this trigger can be added from the trigger selection menu.

4. Give the trigger a descriptive name
Use a name that makes the workflow's purpose immediately clear. For example: Course A – Product Onboarding
A descriptive name becomes especially useful when your account contains multiple onboarding workflows.
5. Configure the product filter
If the available trigger configuration includes product filtering, select the specific product that should activate the workflow. For example:
Product: Marketing Fundamentals
This means the workflow is designed around granting access to the selected product.

6. Save the trigger
After configuring the Product Access Granted trigger and selecting the appropriate settings or product filter, save the trigger to add it to your workflow. At this point, the trigger defines when the workflow should start.
7. Add your onboarding actions
The trigger only starts the workflow. The actions you add afterward determine what happens to the customer. That's where your onboarding strategy comes into play.
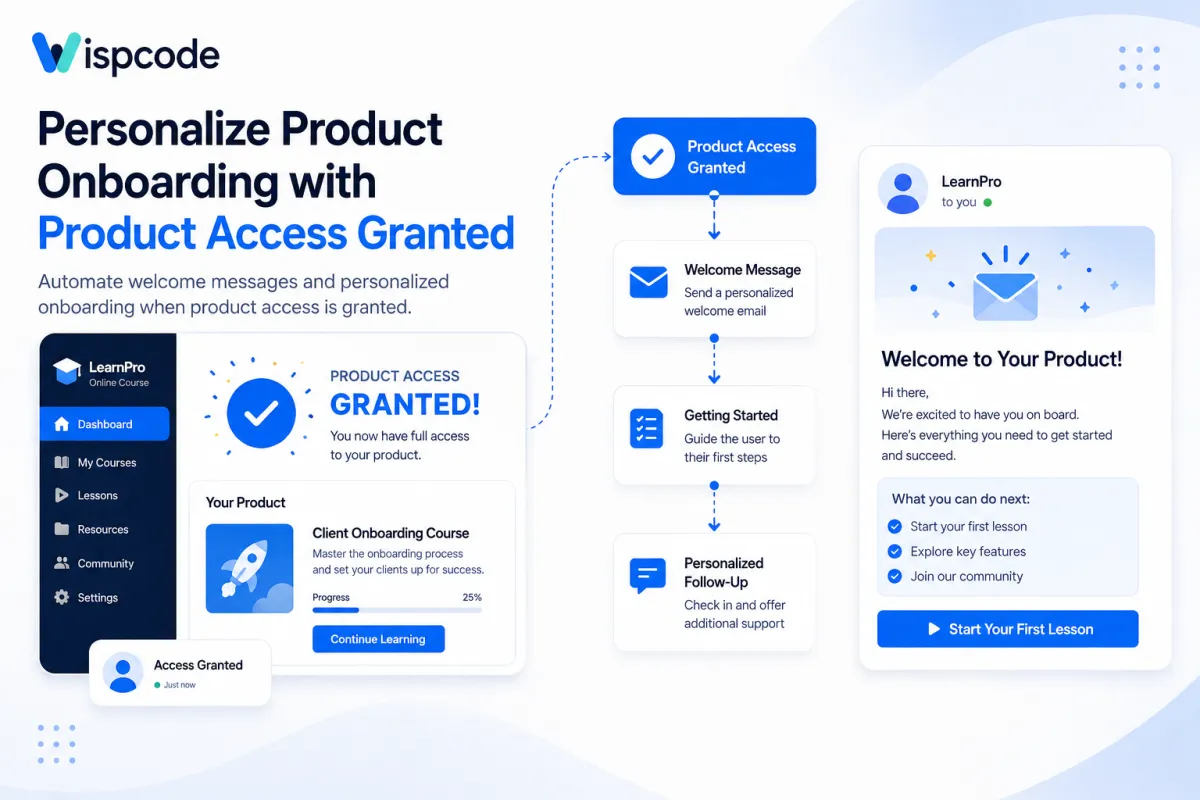
Example: Product Access Onboarding Workflow
Here's a simple example for an online course:
Trigger: Product Access Granted
↓
Action: Send Welcome Message
↓
Wait: Appropriate Delay
↓
Action: Send Getting Started Information
↓
Wait: Appropriate Delay
↓
Action: Send Follow-Up Communication
↓
Action: Internal Notification or Other Supported Step
Step 1: Product Access Granted
The workflow begins when the customer receives access to the selected product.
Step 2: Send Welcome Message
The customer receives a welcome email explaining that access is available and providing the next step.
Step 3: Wait
Add an appropriate delay before the next communication.
Step 4: Send Getting Started Information
The next message can explain how to begin using the product.
Step 5: Follow Up
After another appropriate delay, send a follow-up message to help the customer continue.
Step 6: Notify the Team
If human support is part of your onboarding process, an internal notification or task can alert the appropriate team member.
This structure gives you a foundation that can be expanded as your onboarding requirements become more sophisticated.
Personalize the Onboarding Experience
Automation becomes more valuable when the customer doesn't feel like they're receiving a generic sequence.
Welcome the Customer
Start with a clear message acknowledging that access has been granted.
For example, your email can explain:
What product they now have access to.
Where they should go next.
What they should do first.
Where they can get help.
The first message should answer the customer's immediate question: "I have access. What do I do now?"
Explain How to Get Started
Don't make customers search through a large amount of information to determine their first step.
If the product has a recommended starting point, make that clear in the onboarding communication.
For a course, that could mean directing the learner toward the first module. For a digital resource library, it could mean explaining how to locate the most important resources.
Deliver Relevant Information
The onboarding content should relate directly to the product the customer received.
This is one reason product filtering can be useful. Instead of sending identical instructions for every product, you can create workflows around specific products.
Create Timed Follow-Ups
You don't necessarily need to send every onboarding message immediately.
A wait step can separate the welcome communication from the next message.
For example:
Access Granted → Welcome Email → Wait → Getting Started Email → Wait → Follow-Up
This gives the customer time to interact with the product before receiving another message.
Notify the Internal Team
Automation isn't only useful for customers.
An internal notification or task can help a team member know that a customer has received access and may require support or follow-up.
This can be particularly useful for products that include a human onboarding component.
Best Practices for Product Onboarding Automation
A well-designed workflow should make onboarding simpler, not more confusing.
Follow these best practices:
Start with a clear welcome message. Tell the customer what happened and what to do next.
Give one clear next step. Avoid forcing customers to choose among too many options.
Avoid information overload. Spread onboarding information across the journey when appropriate.
Use delays strategically. Give customers time to consume the information.
Keep messages relevant. Product-specific onboarding is more useful than generic communication.
Test every workflow path. Don't assume the automation will behave exactly as intended.
Review workflow execution history. Use execution data to identify problems.
Update onboarding content. If your product changes, your onboarding sequence should change with it.
Keep human support available. Automation should support your team, not replace help when customers need it.
Also consider what should happen when the same product access event occurs more than once. HighLevel's documentation notes that the trigger can activate each time access is granted, so redundant onboarding should be considered when designing the workflow.
How to Test the Workflow Before Publishing
Testing is essential before allowing a product onboarding workflow to run for real customers.
1. Use a test contact
Grant product access to an appropriate test contact using a supported access method.
2. Confirm the trigger
Check whether the Product Access Granted trigger responds to the access event.
3. Verify workflow actions
Make sure the expected actions execute in the correct order.
4. Check the welcome communication
Review the email or other communication for incorrect links, missing information, or formatting problems.
5. Verify personalization
Confirm that any personalization used by the workflow displays the intended information.
6. Confirm delays
Make sure wait steps occur where you intended them to.
7. Review workflow execution
Check the workflow's execution/history information to determine whether the contact progressed through the automation successfully.
8. Fix problems before activation
If anything behaves unexpectedly, correct the workflow and test it again.
HighLevel's documentation recommends testing the workflow and validating its functionality before enabling the Publish toggle.
Common Product Onboarding Automation Mistakes
Confusing product access with a purchase
A purchase and product access are related concepts, but they are not necessarily the same workflow event. HighLevel provides separate payment-related triggers, including Payment Received and Order Submitted, as well as course-related Product Access Granted.
Choose the trigger according to the event you actually want to automate.
Sending too much information immediately
A customer who has just received access doesn't necessarily need five emails at once.
Break the onboarding experience into logical stages.
Using incorrect personalization
Before relying on personalization, verify that the information you're referencing is actually available to the workflow and contact.
Skipping testing
A workflow that looks correct in the builder can still produce an unexpected customer experience if it isn't tested.
Making the workflow unnecessarily complicated
Start with the basic journey:
Access → Welcome → Wait → Guidance → Follow-Up
Add complexity only when there's a real business reason.
Forgetting repeat access events
Because the Product Access Granted trigger can fire when access is granted, consider what should happen if access is granted again. HighLevel specifically recommends using conditions or cooldown periods where necessary to prevent redundant actions.
Failing to monitor execution
Don't simply publish the workflow and forget about it. Review execution history and customer feedback to identify problems and improve the onboarding sequence.
Frequently Asked Questions
What does the Product Access Granted trigger do in GoHighLevel?
The Product Access Granted trigger starts a workflow when a customer is granted access to a product. You can then use workflow actions to automate onboarding communications, internal processes, CRM updates, and other supported steps. Product filters can be used to focus the automation on a specific product.
How do I create a product onboarding workflow in GoHighLevel?
Open Automation > Workflows, create a workflow, select Product Access Granted as the trigger, configure the relevant product filter, save the trigger, and add your onboarding actions. Test the workflow before publishing it.
Can I automatically welcome customers when product access is granted?
Yes. A Product Access Granted workflow can be configured to send a welcome communication after the access event. HighLevel's documentation specifically provides a welcome-email onboarding example using this trigger.
Can I personalize messages after product access is granted?
Yes, personalization can be incorporated into the workflow where the required contact information and supported personalization features are available. Product filters can also help create different onboarding workflows for different products.
What is the difference between Product Access Granted and a purchase trigger?
Product Access Granted responds to the event of product access being granted. Payment and order triggers respond to payment or checkout-related events. HighLevel lists these as separate workflow triggers, so select the event that matches the automation you actually need.
Conclusion
A strong onboarding experience doesn't have to depend on manual follow-ups. With the Product Access Granted trigger in GoHighLevel, you can start a workflow when a customer receives access to a product and then guide them through a structured onboarding journey.
Start with something simple: welcome the customer, explain the first step, introduce a strategic delay, and follow up with useful information. From there, you can add internal notifications, CRM updates, tags, and other supported workflow actions as your process grows.
Most importantly, test the automation before publishing it. A simple, reliable onboarding workflow is usually a better starting point than a complicated sequence that is difficult to maintain.
Need Expert Help with GoHighLevel?
New to GoHighLevel and ready to get started? Buy your GoHighLevel account here and launch with confidence.
Already know what you need and want our team to handle everything, from complete setup and customization to funnels, workflows, automations, CRM, and pipelines? Click here.