

Private Channel Access Granted Trigger in GoHighLevel: Step-by-Step Guide
How to Personalize Member Experiences When Private Channel Access Is Granted Using the Private Channel Access Granted Trigger in GoHighLevel
Introduction
Giving someone access to a private community channel is more than a permission change. It can be the beginning of a personalized member experience.
For example, when a premium member gets access to a private channel, you may want to welcome them, explain what they can expect, notify your team, or start a relevant onboarding sequence. Doing these tasks manually can become difficult as your community grows.
That is where the Private Channel Access Granted workflow trigger in GoHighLevel can help.
The trigger fires when access to a private channel is granted, allowing you to start follow-up automation based on that event. HighLevel officially lists Private Channel Access Granted as a Communities workflow trigger, alongside its corresponding Private Channel Access Revoked trigger.
In this guide, we'll explain how the trigger works, how to build a practical workflow around it, and how to use it to create more personalized member experiences.
What Is the Private Channel Access Granted Trigger in GoHighLevel?
The Private Channel Access Granted trigger starts a workflow when a member is granted access to a private channel inside a HighLevel Community.
Private channels are designed for restricted discussions and participation. Only approved members can access them, and users who are not members of a private channel do not see it in the channel list.
HighLevel also provides a workflow action called Grant Private Channel Access, which can grant a member access to a specific private channel. If the member is not already part of the associated community group, HighLevel's documented behavior is to add them to the group and then grant access to the selected channel.
The important distinction is:
Grant Private Channel Access is an action that can give someone access.
Private Channel Access Granted is a trigger that can start another workflow when that access is granted.
This makes the trigger useful for building automation around the member's next steps.
Why Does Private Channel Access Personalization Matter?
A member who receives access to a private channel should ideally know what to do next.
Imagine a community with several membership levels:
General members have access to the main community.
Premium members receive a premium private channel.
Coaches or mentors have access to an internal channel.
Beta users receive access to a private feedback channel.
Simply granting access does not explain the purpose of the new space.
A workflow can help bridge that gap.
For example, after premium-channel access is granted, your automation could send a personalized welcome email explaining the channel and directing the member toward the appropriate next step.
This creates a smoother experience without requiring an administrator to manually contact every member.
It also gives you a more consistent onboarding process as your community grows.
How the Private Channel Access Workflow Works
A simple automation can follow this structure:
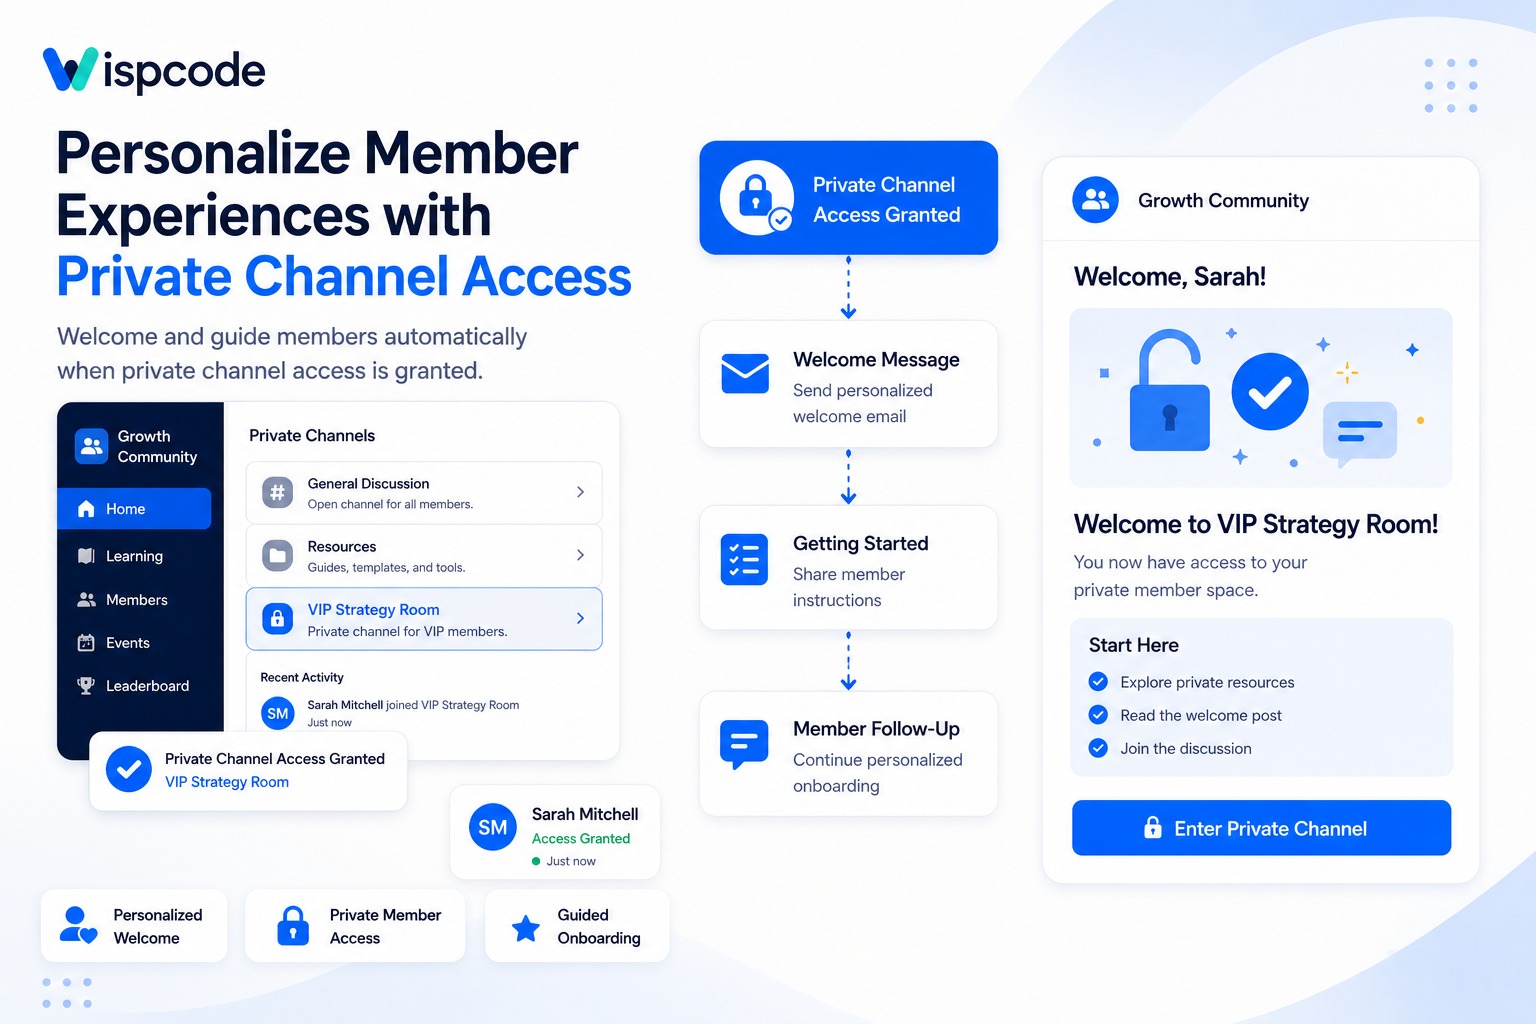
Private Channel Access Granted → Welcome Communication → Member Instructions → Follow-Up
The exact actions you add depend on your business process.
For example:
A member receives access to the private channel.
The Private Channel Access Granted trigger fires.
The workflow sends a welcome email.
The workflow can perform additional CRM actions as appropriate.
A follow-up communication can be sent later.
HighLevel's workflow system supports subsequent actions after the Communities trigger, while the specific automation you build should reflect the experience you want members to have.
Step-by-Step: Build a Personalized Private Channel Onboarding Workflow
Step 1: Create Your Private Channel
Before building the workflow, make sure the appropriate private channel exists.
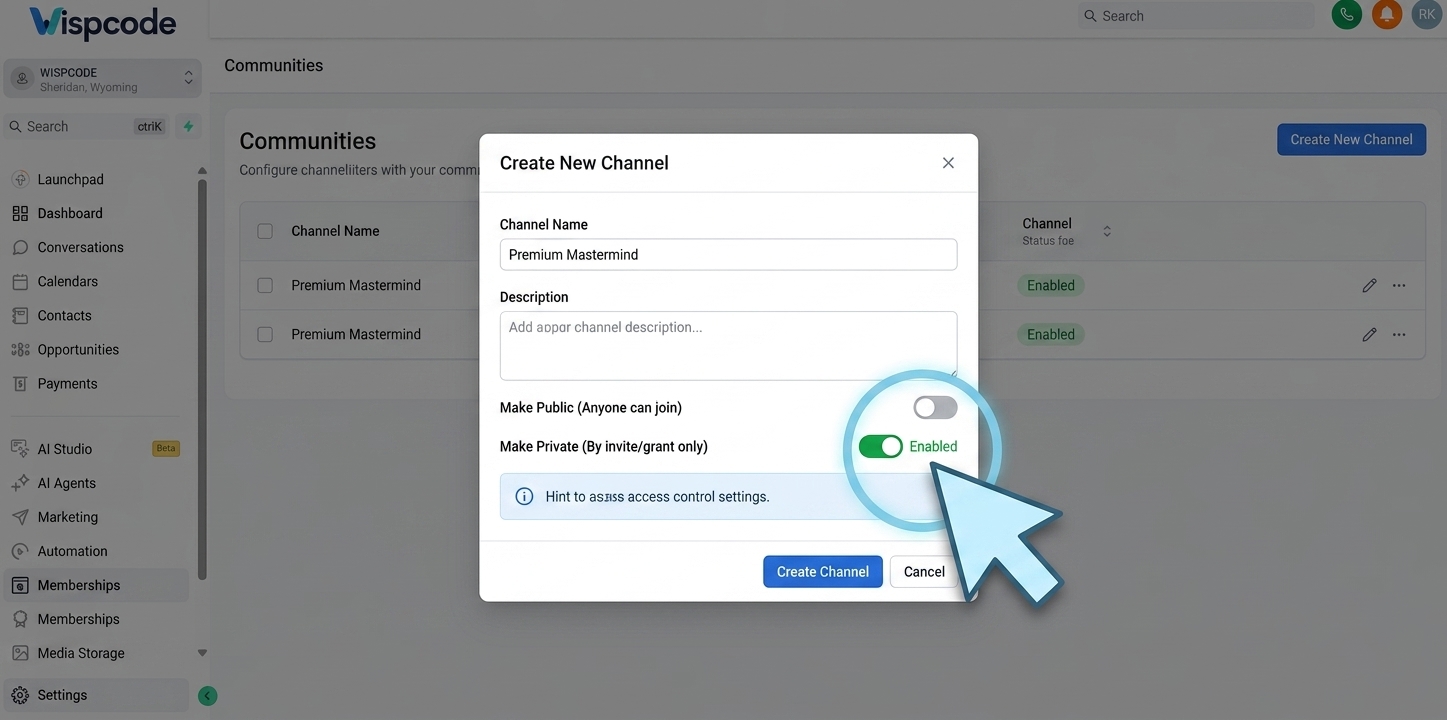
In HighLevel, go to your Communities area and open the relevant group. You can create a channel and enable the option to make it private. HighLevel's current documentation also explains that private channels can be managed through their member settings.
Think carefully about the purpose of the channel before creating it.
For example:
Premium Members
VIP Coaching
Beta Testers
Leadership
Customer Support
Advanced Training
A clearly defined channel makes your later automation easier to manage.
Step 2: Create a New Workflow
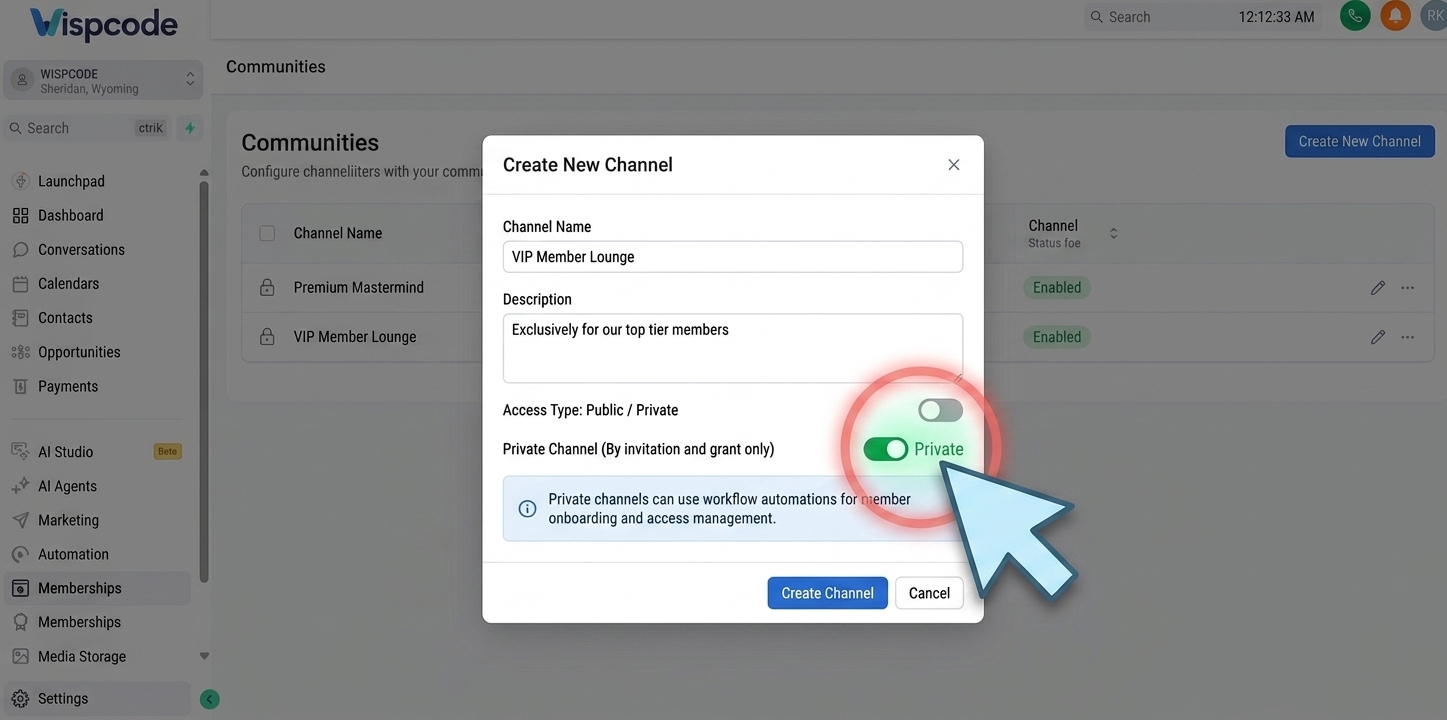
Open the Workflow Builder in your HighLevel sub-account and create a new workflow.
Give the workflow a descriptive name, such as:
Premium Channel – Member Onboarding
Using a clear name becomes increasingly important when your account contains many workflows.
Step 3: Add the Private Channel Access Granted Trigger
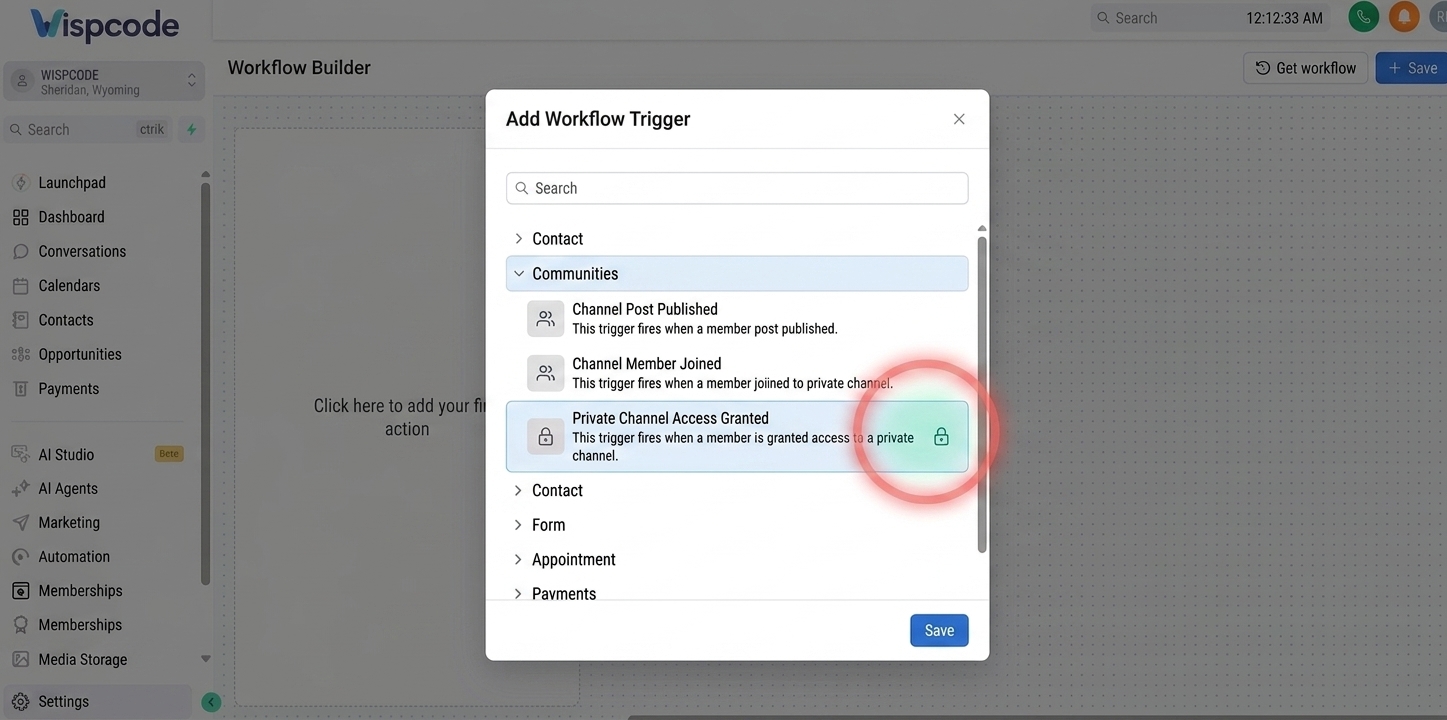
Add a workflow trigger and select:
Private Channel Access Granted
HighLevel identifies this as a Communities workflow trigger that fires when access to a private channel is granted.
Configure the trigger according to the private-channel access scenario you're automating.
The goal is simple: you want this workflow to enter the automation when the relevant private-channel access event occurs.
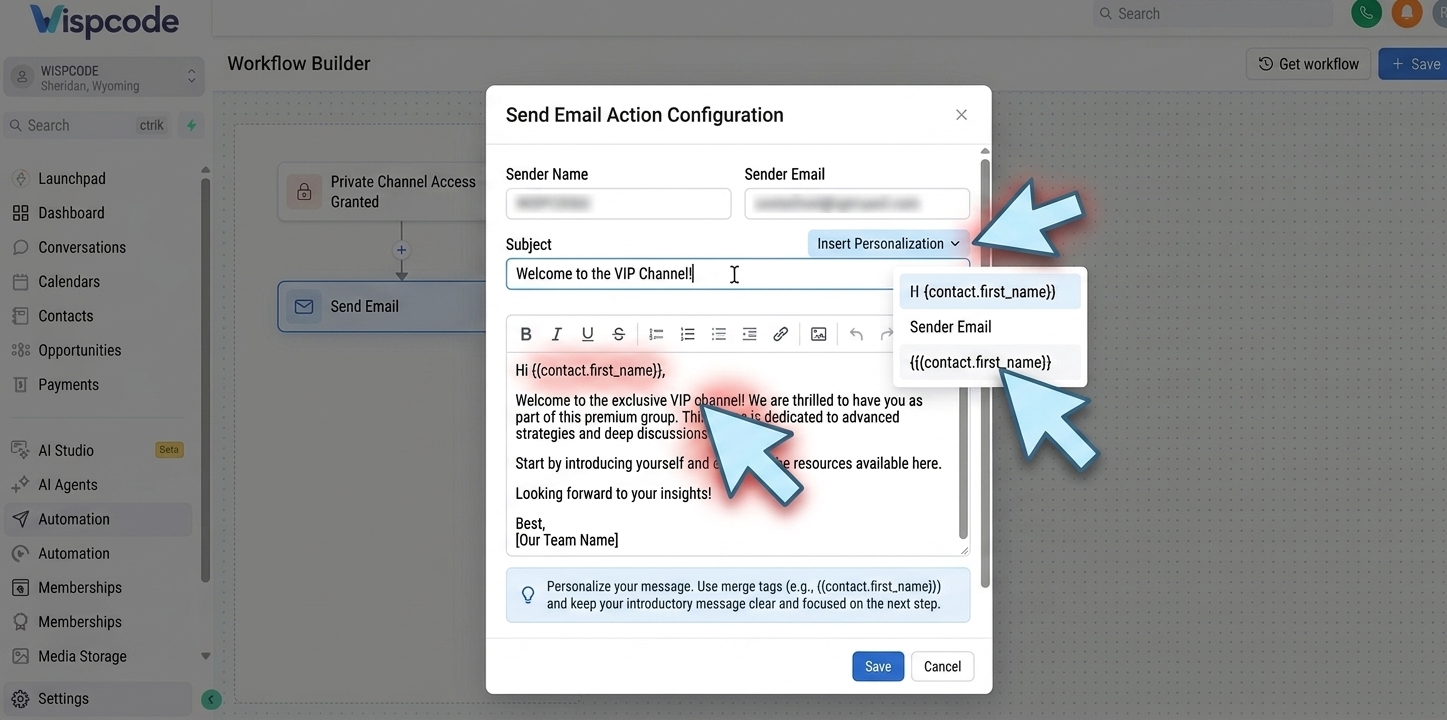
Step 4: Add the First Personalized Action
Once the trigger is configured, decide what the member should receive immediately after gaining access.
A welcome email is a practical starting point.
For example, the message could explain:
Welcome to the private channel
What the channel is used for
What type of content or conversations members can expect
Where to begin
What they should do next
Keep the message focused. The goal is not to explain everything about your community in one email.
Instead, give the member enough information to confidently take the next step.
Step 5: Add Follow-Up Automation
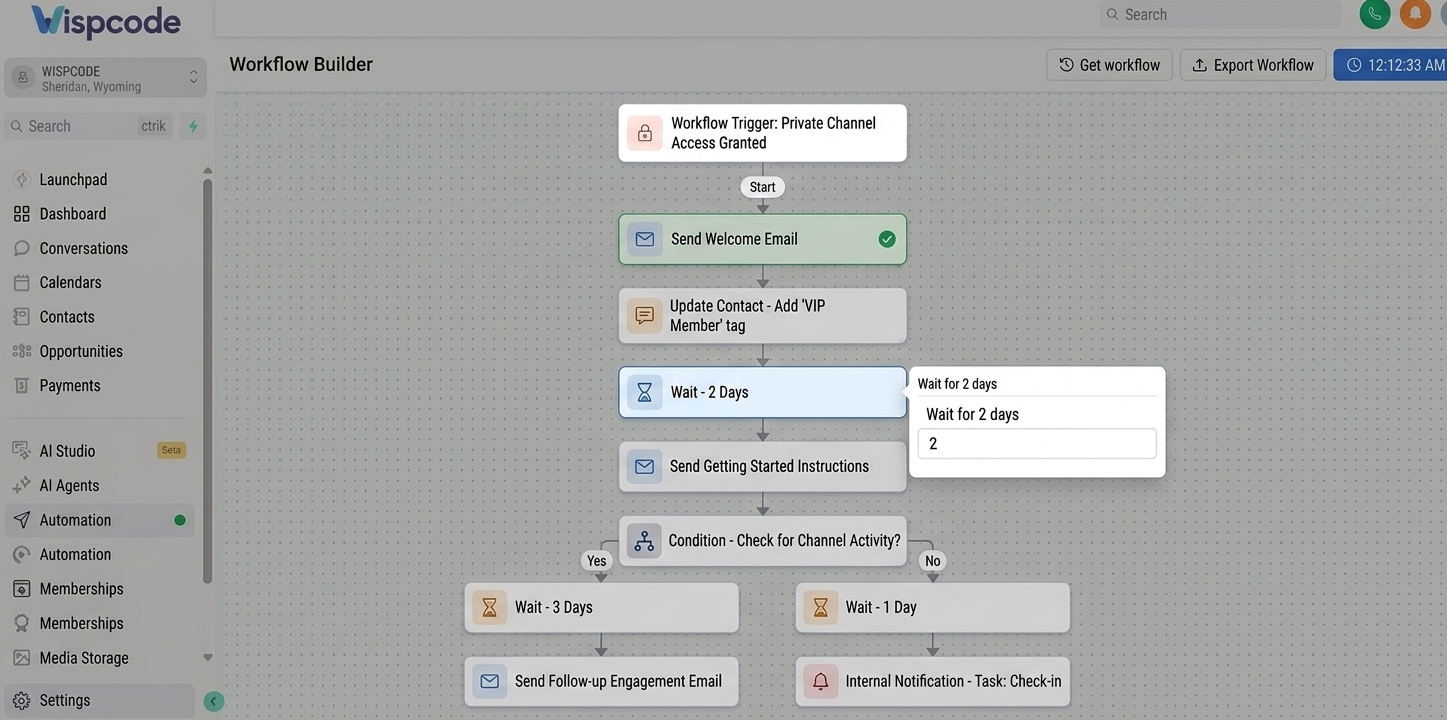
After the initial welcome message, you can design the rest of the onboarding journey around your business process.
For example:
Private Channel Access Granted
↓Send Welcome Email
↓Wait
↓Send Getting Started Email
↓Continue Member Follow-Up
You can also use appropriate workflow actions to update CRM information or notify your internal team when needed.
The important principle is to avoid creating automation simply because an action is available. Every step should have a purpose.
Practical Use Cases
1. Premium Membership Community
Suppose your community has a private channel for premium customers.
When a customer's access is granted, the workflow can send a welcome message explaining that the private channel is their dedicated space for premium discussions and resources.
This creates a clear transition from general membership to premium membership.
2. Coaching Program
A coaching business could create a private channel for a specific coaching cohort.
Once a participant receives access, an automated workflow can provide onboarding instructions, explain where discussions happen, and tell the member what to do first.
The channel becomes part of a structured onboarding experience rather than simply another community destination.
3. Beta Tester Community
Private channels can also be useful for controlled discussions with beta users.
When someone receives access to the beta channel, the workflow could send instructions explaining the purpose of the channel and how the member should participate.
This helps establish expectations from the beginning.
4. Role-Based Community Access
A business may have separate private channels for different groups, such as mentors, partners, or internal contributors.
When someone receives access to one of these channels, the workflow can provide information relevant to that particular audience.
This is where channel-specific automation becomes especially useful.
5. Private Course Access
HighLevel now also supports Private Channel visibility for courses within Communities. With this configuration, only members of the selected private channel can see and access the course.
This opens up useful possibilities for membership-based learning.
For example, you could have a private channel for a premium group and configure a course so that only members of that channel can see it.
The access model can therefore connect community membership with targeted educational content.
A Simple Workflow Example
Let's put everything together.
Imagine you operate a community called Business Growth Hub.
You create a private channel called Advanced Strategies for premium members.
Your workflow could look like this:
Trigger:
Private Channel Access Granted
Action 1:
Send a personalized welcome email
Action 2:
Explain what members can find inside the private channel
Action 3:
Provide their recommended starting point
Action 4:
Wait before sending another communication
Action 5:
Send a follow-up message encouraging the member to engage
The exact actions and timing should depend on your onboarding strategy.
The important idea is that the access event becomes the starting point for a relevant member journey.
Best Practices for Personalizing the Experience
Keep the First Message Simple
Don't overwhelm a new member with a long list of instructions.
Start with the most important information:
Where am I? What is this channel for? What should I do next?
You can provide additional information later.
Match the Message to the Channel
A message for a premium customer should not necessarily be identical to a message for a beta tester.
Make the communication relevant to the reason the member received access.
Use Clear Workflow Names
As your automation library grows, names such as "Workflow 12" quickly become difficult to manage.
Instead, use names like:
Premium Channel – Welcome
Beta Channel – Onboarding
Coaching Channel – New Member
VIP Channel – Access Follow-Up
Test Before Activating
HighLevel recommends testing Community access workflows in a controlled environment before activating them.
Create a test scenario and confirm that:
The correct channel access is granted.
The expected workflow starts.
The member receives the intended communication.
Any additional workflow actions behave as expected.
Testing is particularly important when several workflows interact with the same community.
Avoid Duplicate Communication
If you already have another onboarding workflow triggered by group access, course access, an offer, or another event, make sure the member does not receive overlapping messages.
The goal is a coordinated experience—not multiple automated emails saying essentially the same thing.
Common Mistakes to Avoid
Mistake 1: Confusing the Trigger With the Action
Remember the difference:
Trigger: Private Channel Access Granted
Action: Grant Private Channel Access
The action can grant access; the trigger reacts to the access-granted event.
Mistake 2: Treating a Private Channel Like a Public Channel
Private channels are specifically designed to restrict visibility and participation.
HighLevel documents that users who are not members of a private channel will not see it in the channel list.
Therefore, don't send instructions that assume every community member can see the channel.
Mistake 3: Giving Members Access Without Explaining What Comes Next
Access alone doesn't create a great onboarding experience.
A short welcome message can make the purpose of the channel much clearer.
Mistake 4: Over-Automating
Not every access event needs a five-email sequence.
Start with the minimum useful journey and expand it only when there is a clear reason.
Frequently Asked Questions(FAQ's)
1. What does the Private Channel Access Granted trigger do?
It starts a workflow when access to a private channel is granted. HighLevel lists it as a Communities workflow trigger.
2. Is Private Channel Access Granted the same as Grant Private Channel Access?
No. Grant Private Channel Access is a workflow action used to give a member access to a private channel. Private Channel Access Granted is the trigger that fires when access is granted.
3. Can private channels be used for premium members?
Yes. HighLevel private channels are designed for restricted member discussions and can be used to separate premium or specialized audiences from the broader community.
4. Can private channels control access to courses?
Yes. HighLevel's current Communities functionality allows course visibility to be set to Private Channel, meaning only members of the selected private channel can view the course.
5. What happens if a member is not already part of the community group when private-channel access is granted?
According to HighLevel's documentation for the Grant Private Channel Access action, if the member is not already part of the group, they are added to the group and then the selected private channel.
Conclusion
The Private Channel Access Granted trigger gives you a useful automation starting point for member experiences inside GoHighLevel Communities.
Instead of treating private-channel access as the final step, you can use that event to begin a thoughtful onboarding journey, welcoming members, explaining what they have access to, guiding them toward the right next step, and coordinating relevant follow-up.
The key is to keep the automation purposeful.
Create the right private channel, configure the access event correctly, build a simple onboarding sequence, test it carefully, and personalize the communication around why the member received access.
When done well, private-channel automation turns a simple permission change into a more organized and engaging member experience.
Need Expert Help with GoHighLevel?
New to GoHighLevel and ready to get started? Buy your GoHighLevel account here and launch with confidence.
Already know what you need and want our team to handle everything, from complete setup and customization to funnels, workflows, automations, CRM, and pipelines? Click here.