
Copy a Whole Account Setup in One Click
How to Deploy a Snapshot in GoHighLevel
Building a full GoHighLevel account from scratch takes hours. You set up pipelines, workflows, calendars, funnels and custom fields, then you turn around and do it all again for the next client. Snapshots exist so you never have to. A snapshot is a saved copy of an account setup that you can drop into any sub-account in a few clicks.
This guide walks through deploying a snapshot the practical way, from creating one out of a working account to pushing it into a brand new client. If you run an agency on GoHighLevel, this is one of the highest leverage skills to get right, because a clean snapshot turns a full day of setup into a five minute task. The steps below use the standard agency view, so you can follow along in your own account as you read.
What a snapshot copies, and what it leaves behind
Think of a snapshot as the blueprint of an account, not the house itself. It captures the assets you build, and it deliberately skips the data that belongs to one specific client.
A snapshot usually includes:
Workflows, triggers and campaigns
Funnels, websites and forms
Calendars and their availability settings
Custom fields, custom values and pipelines
Email and SMS templates
It does not carry over contacts, conversations, appointments, reputation data, payment connections or third party integrations. That is by design. You want the structure to travel between accounts while each client keeps their own records. Knowing this split upfront saves a lot of confusion later, because it explains why a freshly deployed account looks complete but empty.
Where snapshots fit in your workflow
Most agencies keep a small library of snapshots rather than one giant template. You might have a lightweight base that every client gets, plus a few industry versions layered on top for dentists, gyms or home service businesses. This keeps each deployment focused, since a client only receives the assets that actually match their business.
That structure also makes updates far easier to manage. When you improve your base setup, you push it to the accounts on that base without forcing unrelated changes onto everyone else. A little planning here pays off every single time you onboard, because you are choosing from ready made building blocks instead of deciding what to build from a blank account.
Step 1: Create the snapshot you want to deploy
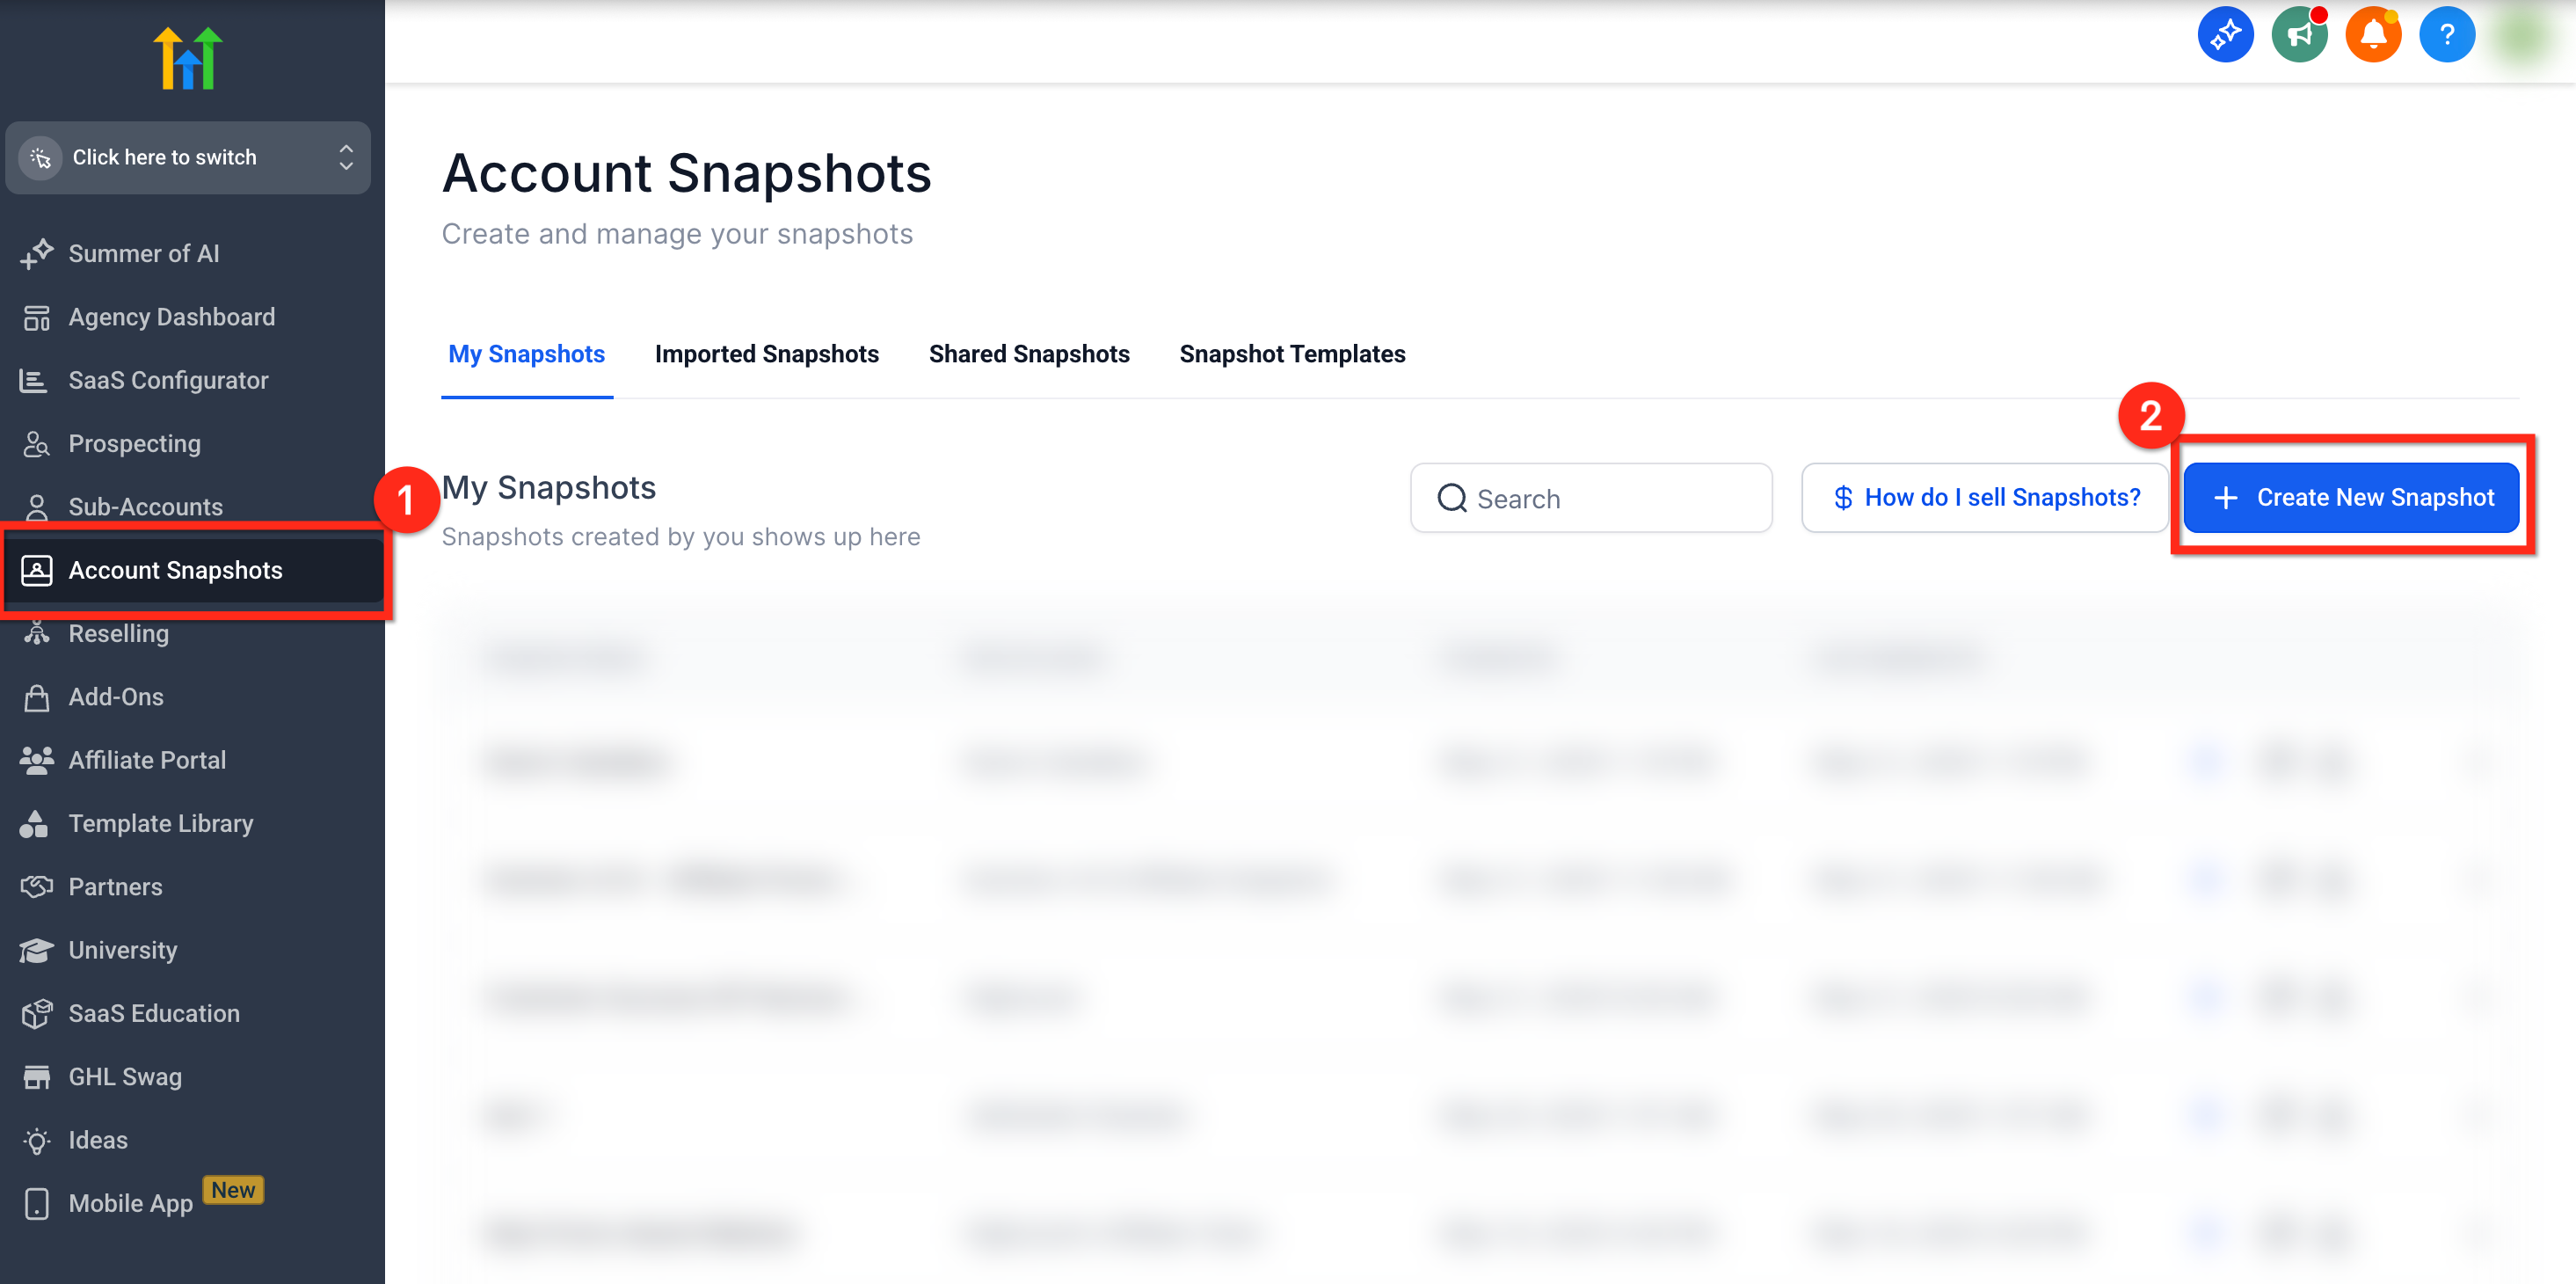
Before you can deploy anything, you need a snapshot to deploy. Switch to the agency view and open Account Snapshots, then click Create New Snapshot in the top right.
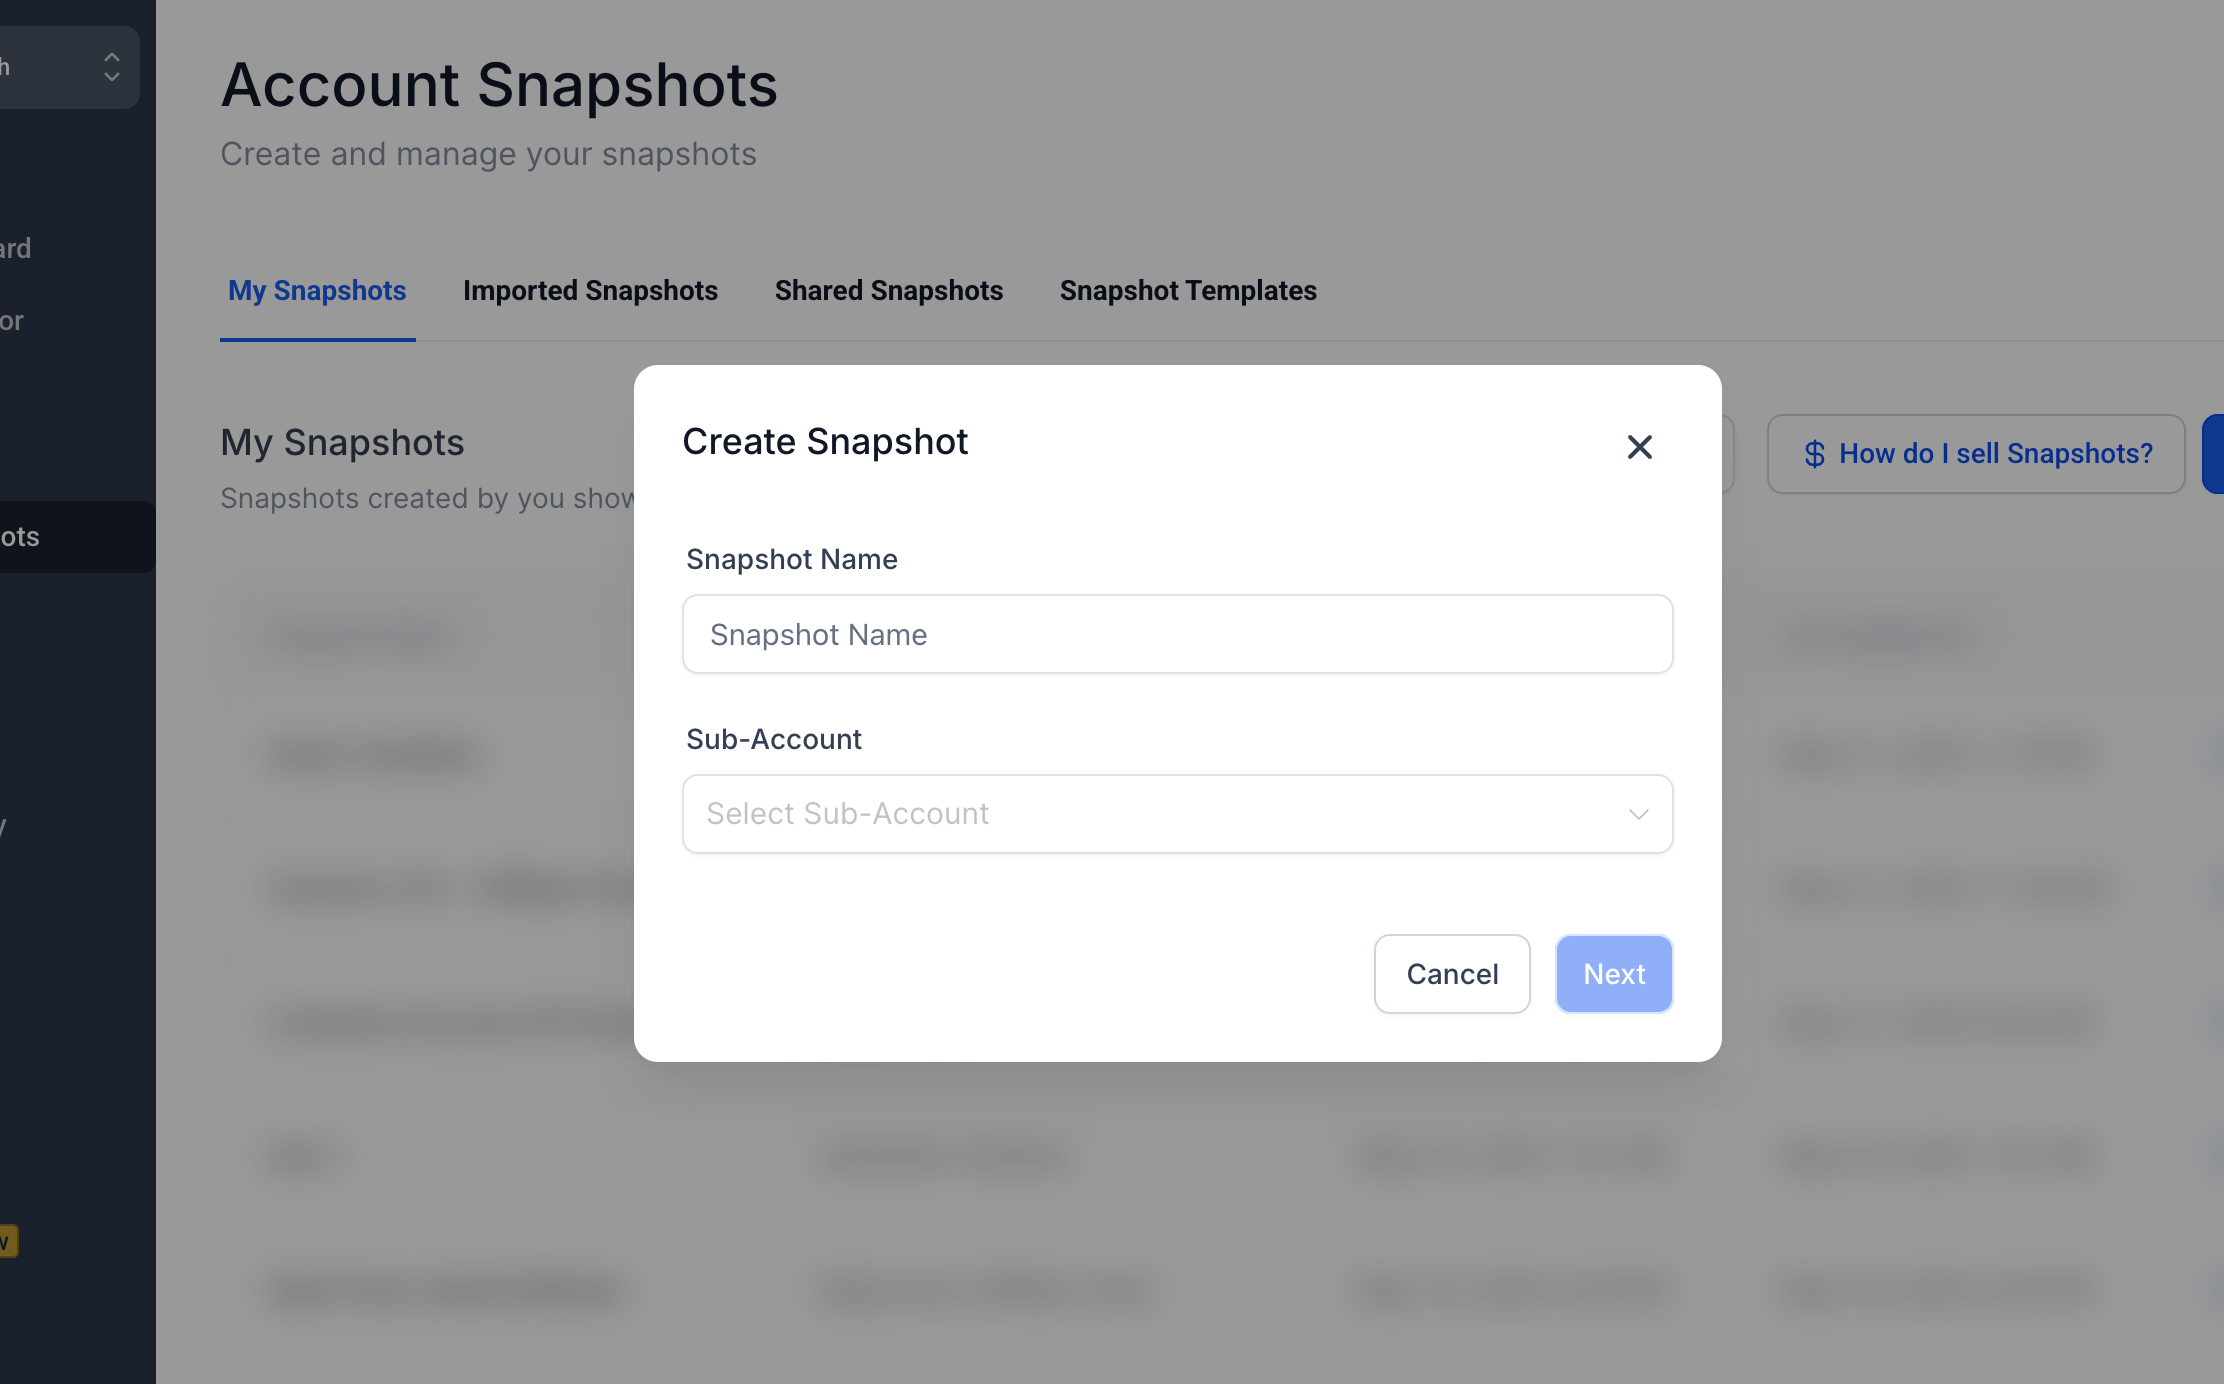
Give it a name that describes the use case rather than the client, something like Dental Starter or Local Service Base. Clear naming matters more than it seems, because once you have a dozen snapshots the list gets crowded fast.
Naming the snapshot and choosing the source sub-account that holds the assets you want to copy.
Next, pick the source sub-account. This is the account that already contains the polished setup you want to reuse. GoHighLevel reads everything from that account and lets you choose exactly which assets to capture, so you can keep a snapshot lean by leaving out anything a new client would not need.
Step 2: Open the sub-account you are deploying to
With a snapshot ready, move to the account that will receive it. Go to Sub-Accounts in the agency view and find the client you want. Click the three dot icon on the right of that row, then choose Manage Client.
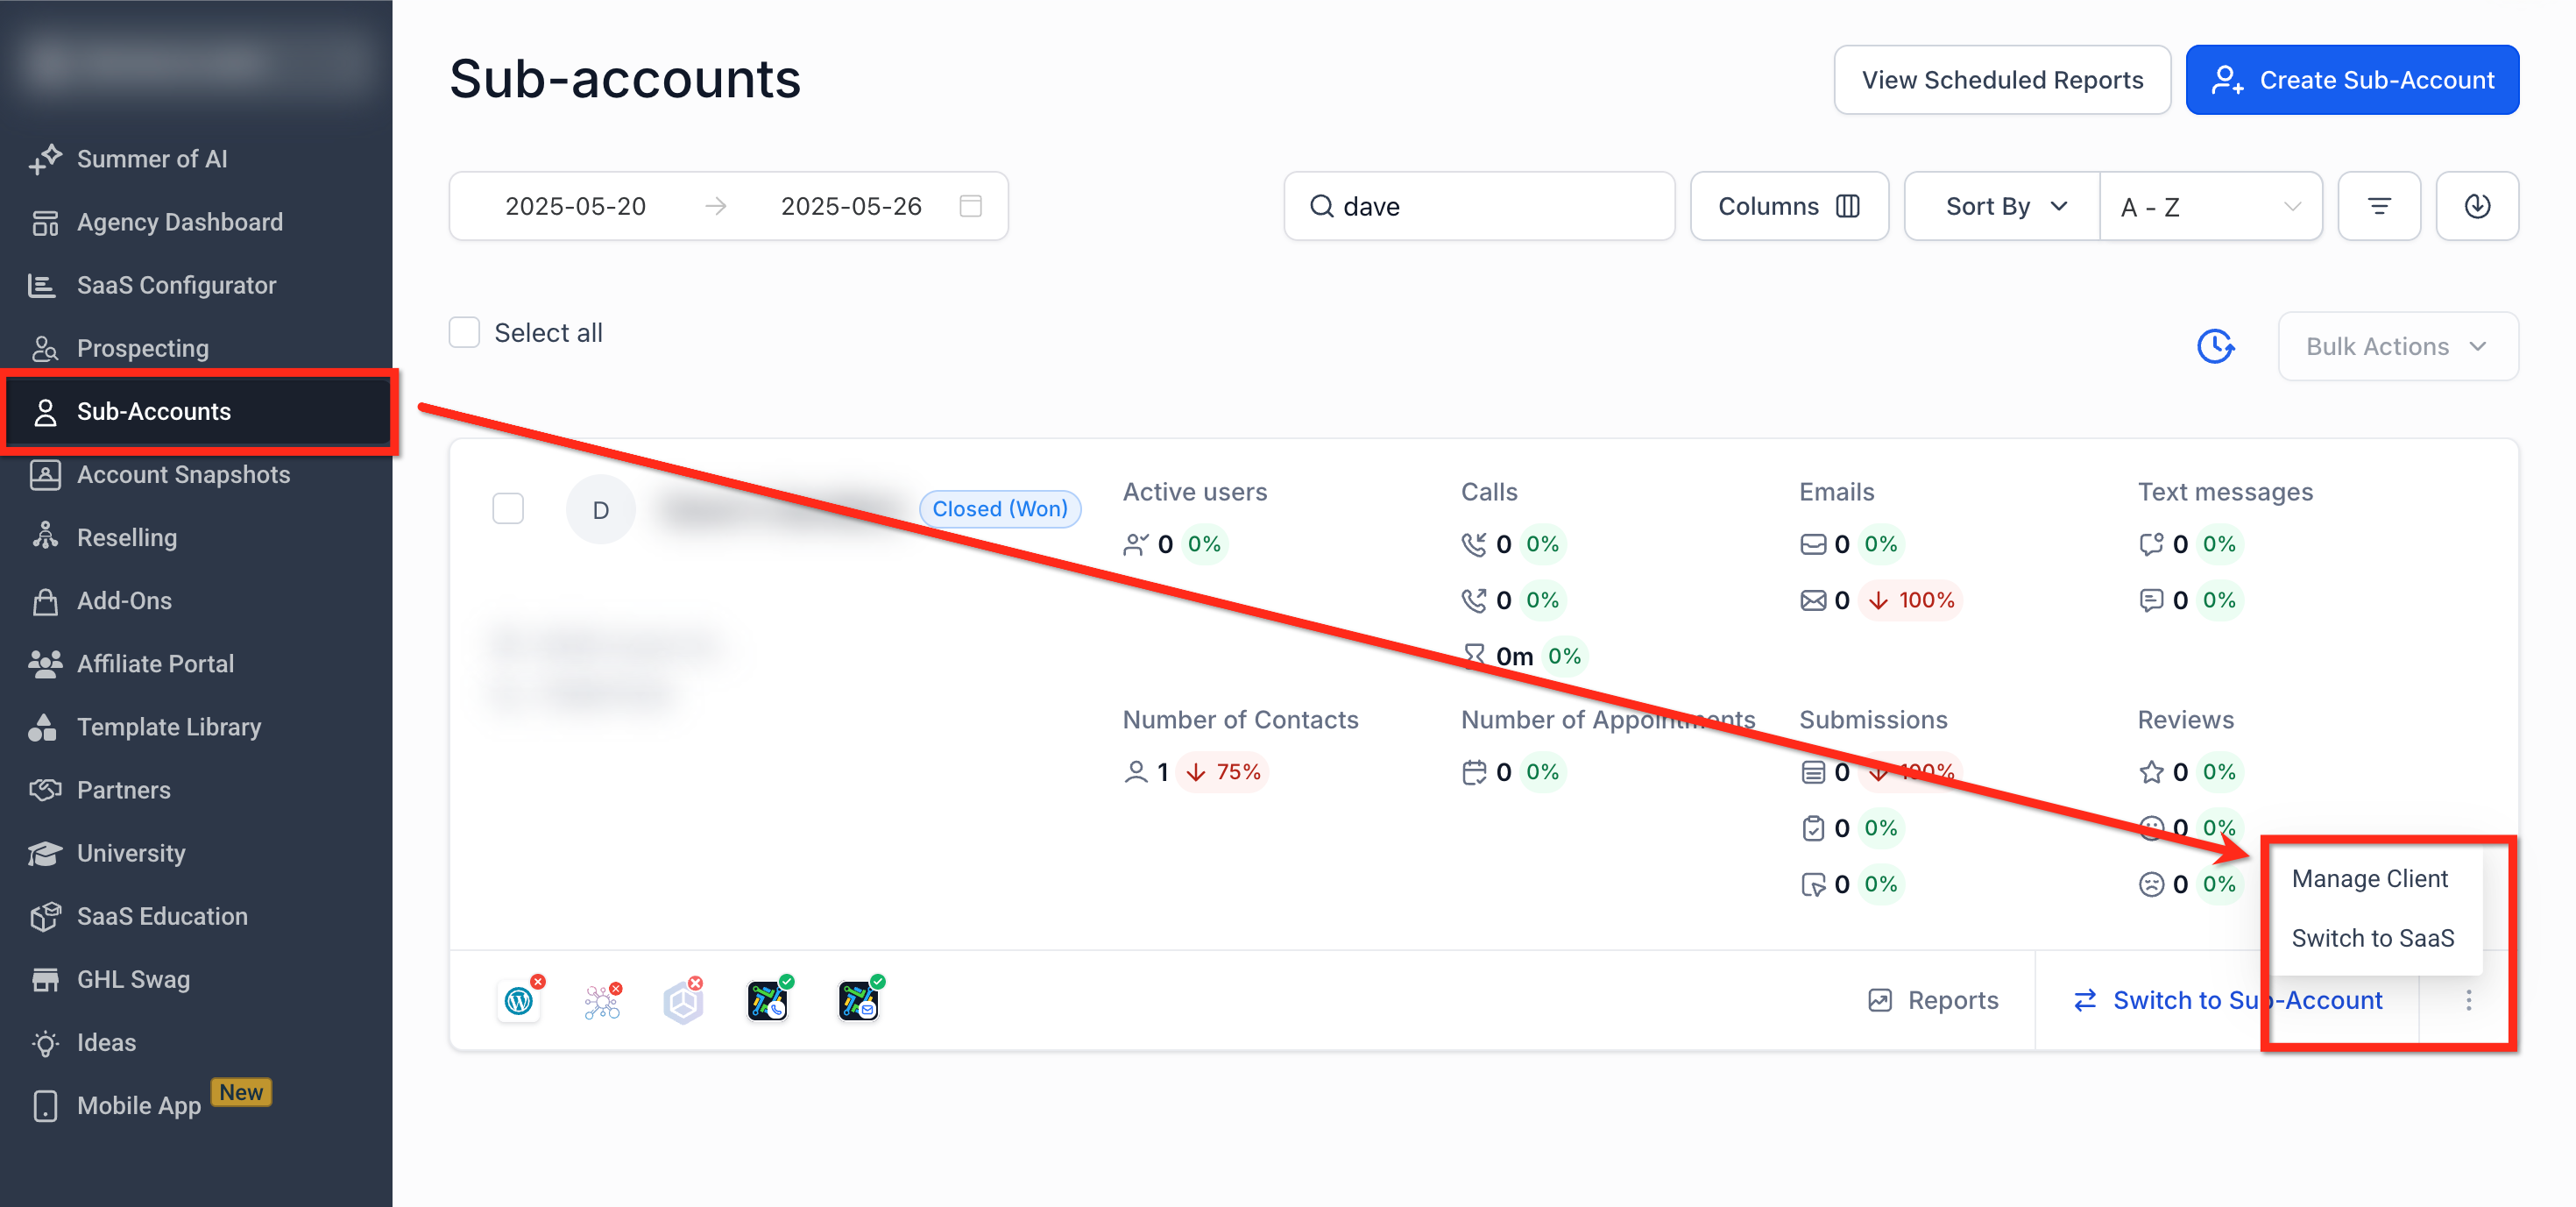
This opens the client account in a management view where the deployment controls live. If you are setting up a brand new client, you can also load a snapshot at the moment you create the sub-account, which is often the cleaner path for a fresh build.
Step 3: Load the snapshot from the Actions menu
Inside Manage Client, look to the upper right for the blue Actions button. Open it and select Load Snapshot. A Load Snapshot window opens with a dropdown labelled Pick a Snapshot, where you choose the snapshot you created earlier.
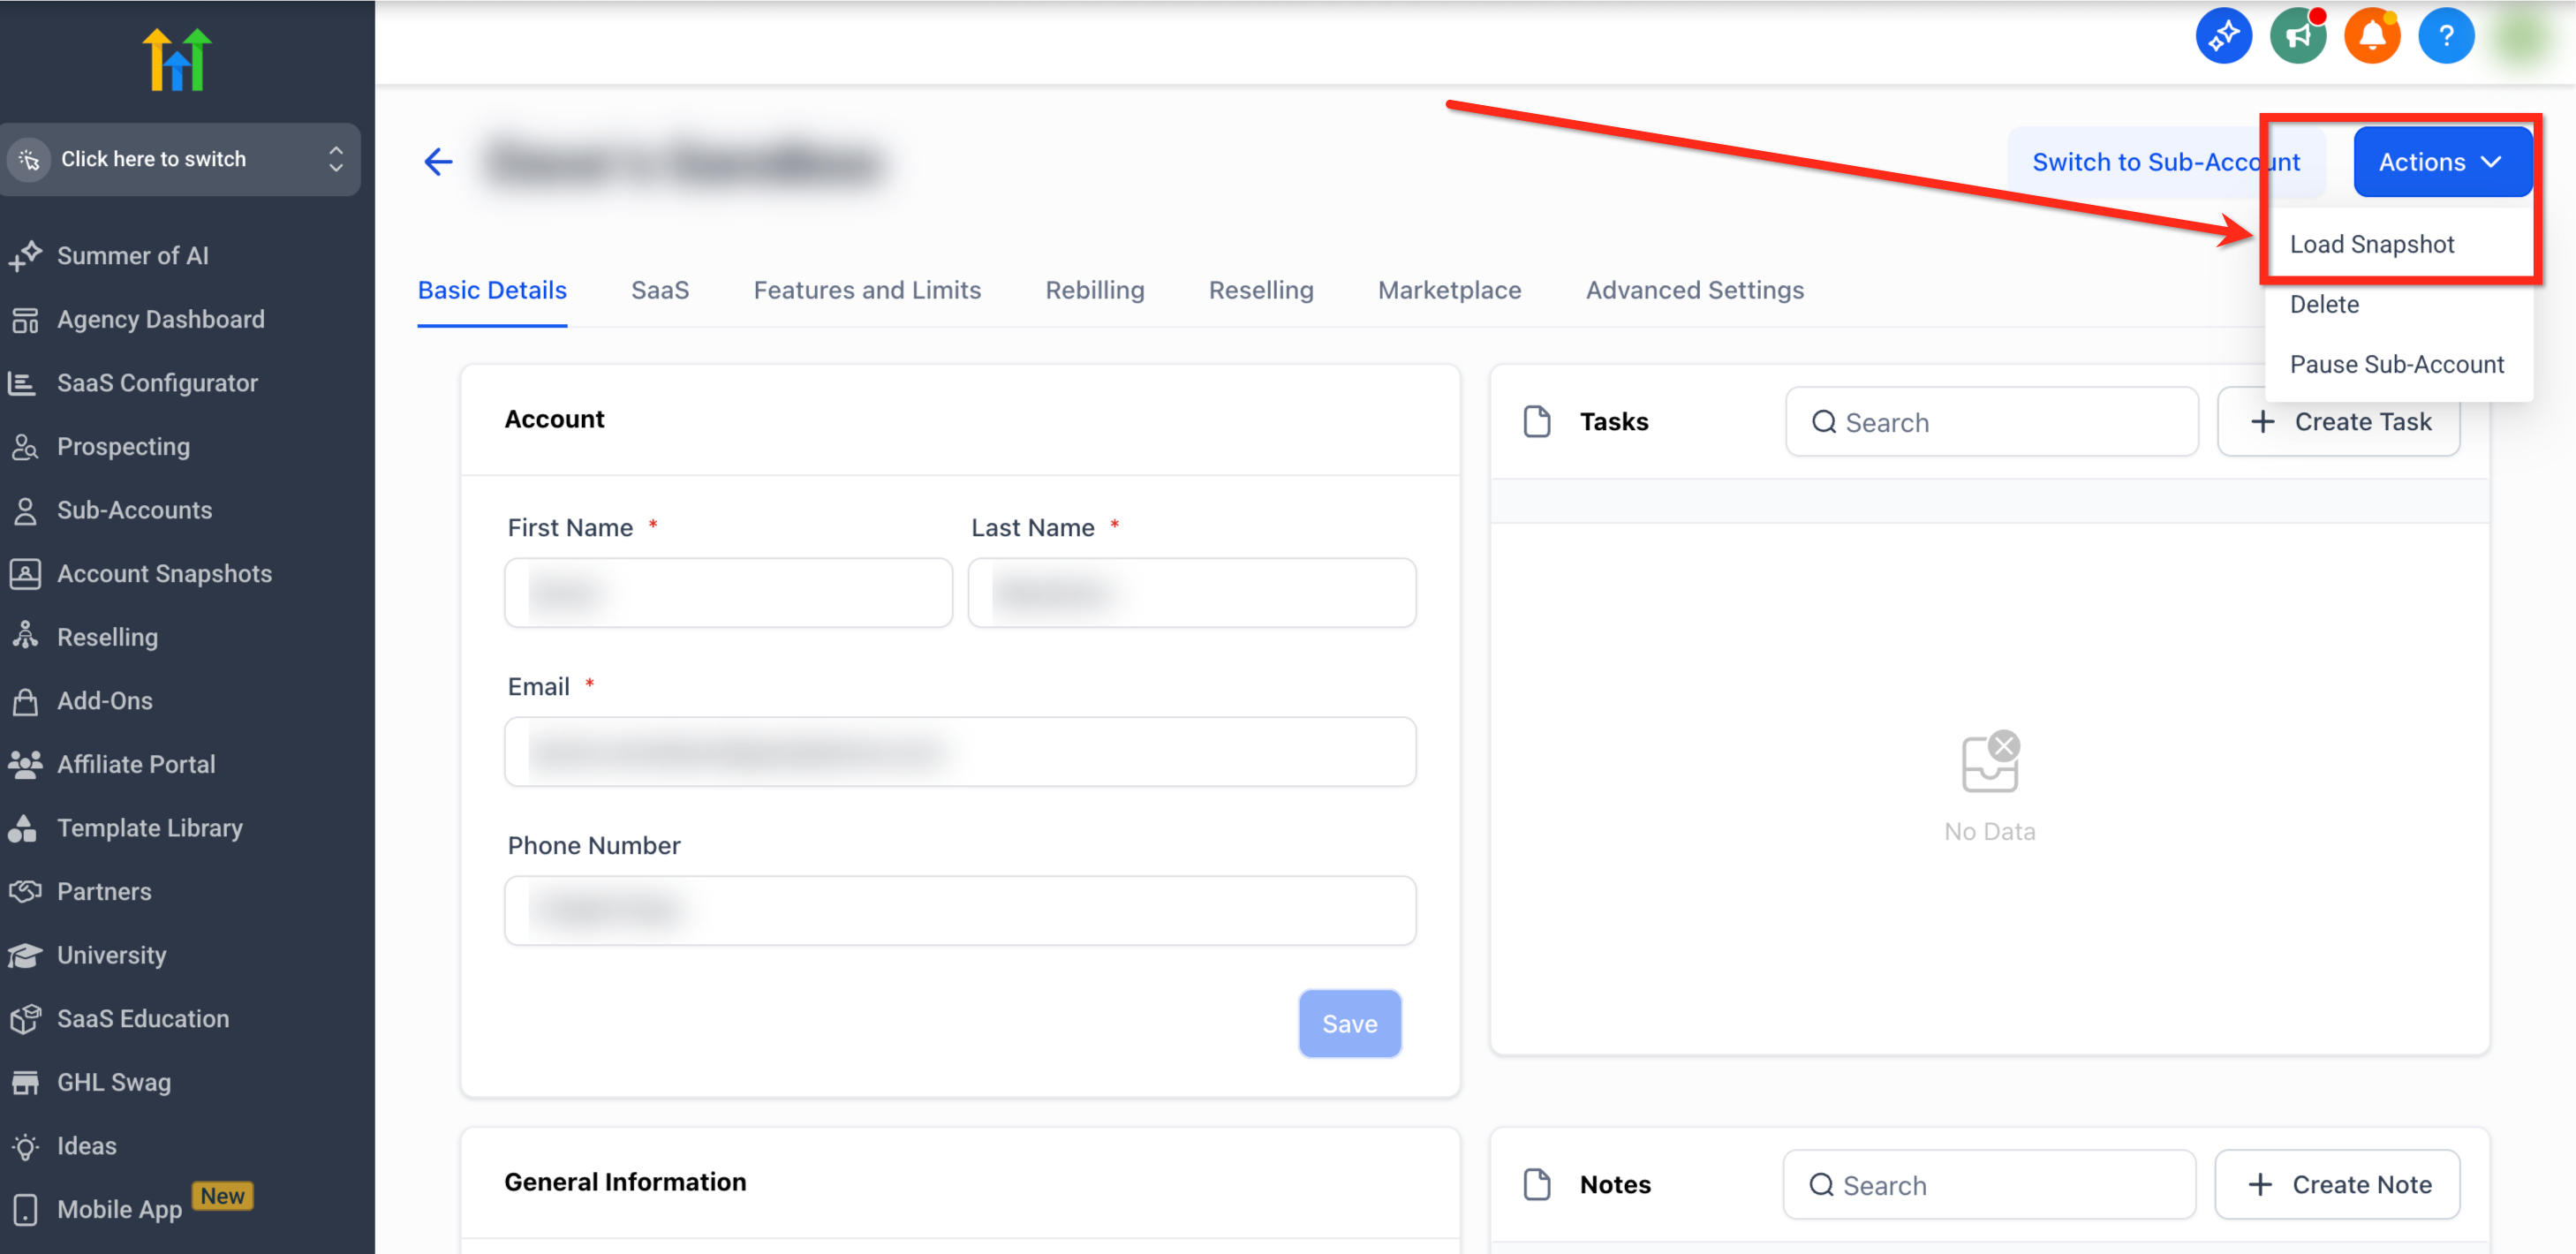
GoHighLevel then reads the contents and prepares the deployment, walking you through selecting assets and checking for conflicts before anything is written to the account.
Step 4: Choose which assets to push
The next screen lists every asset group in the snapshot, from calendars and campaigns to custom fields and forms. You can push everything with Select All, or expand a category and pick individual items.
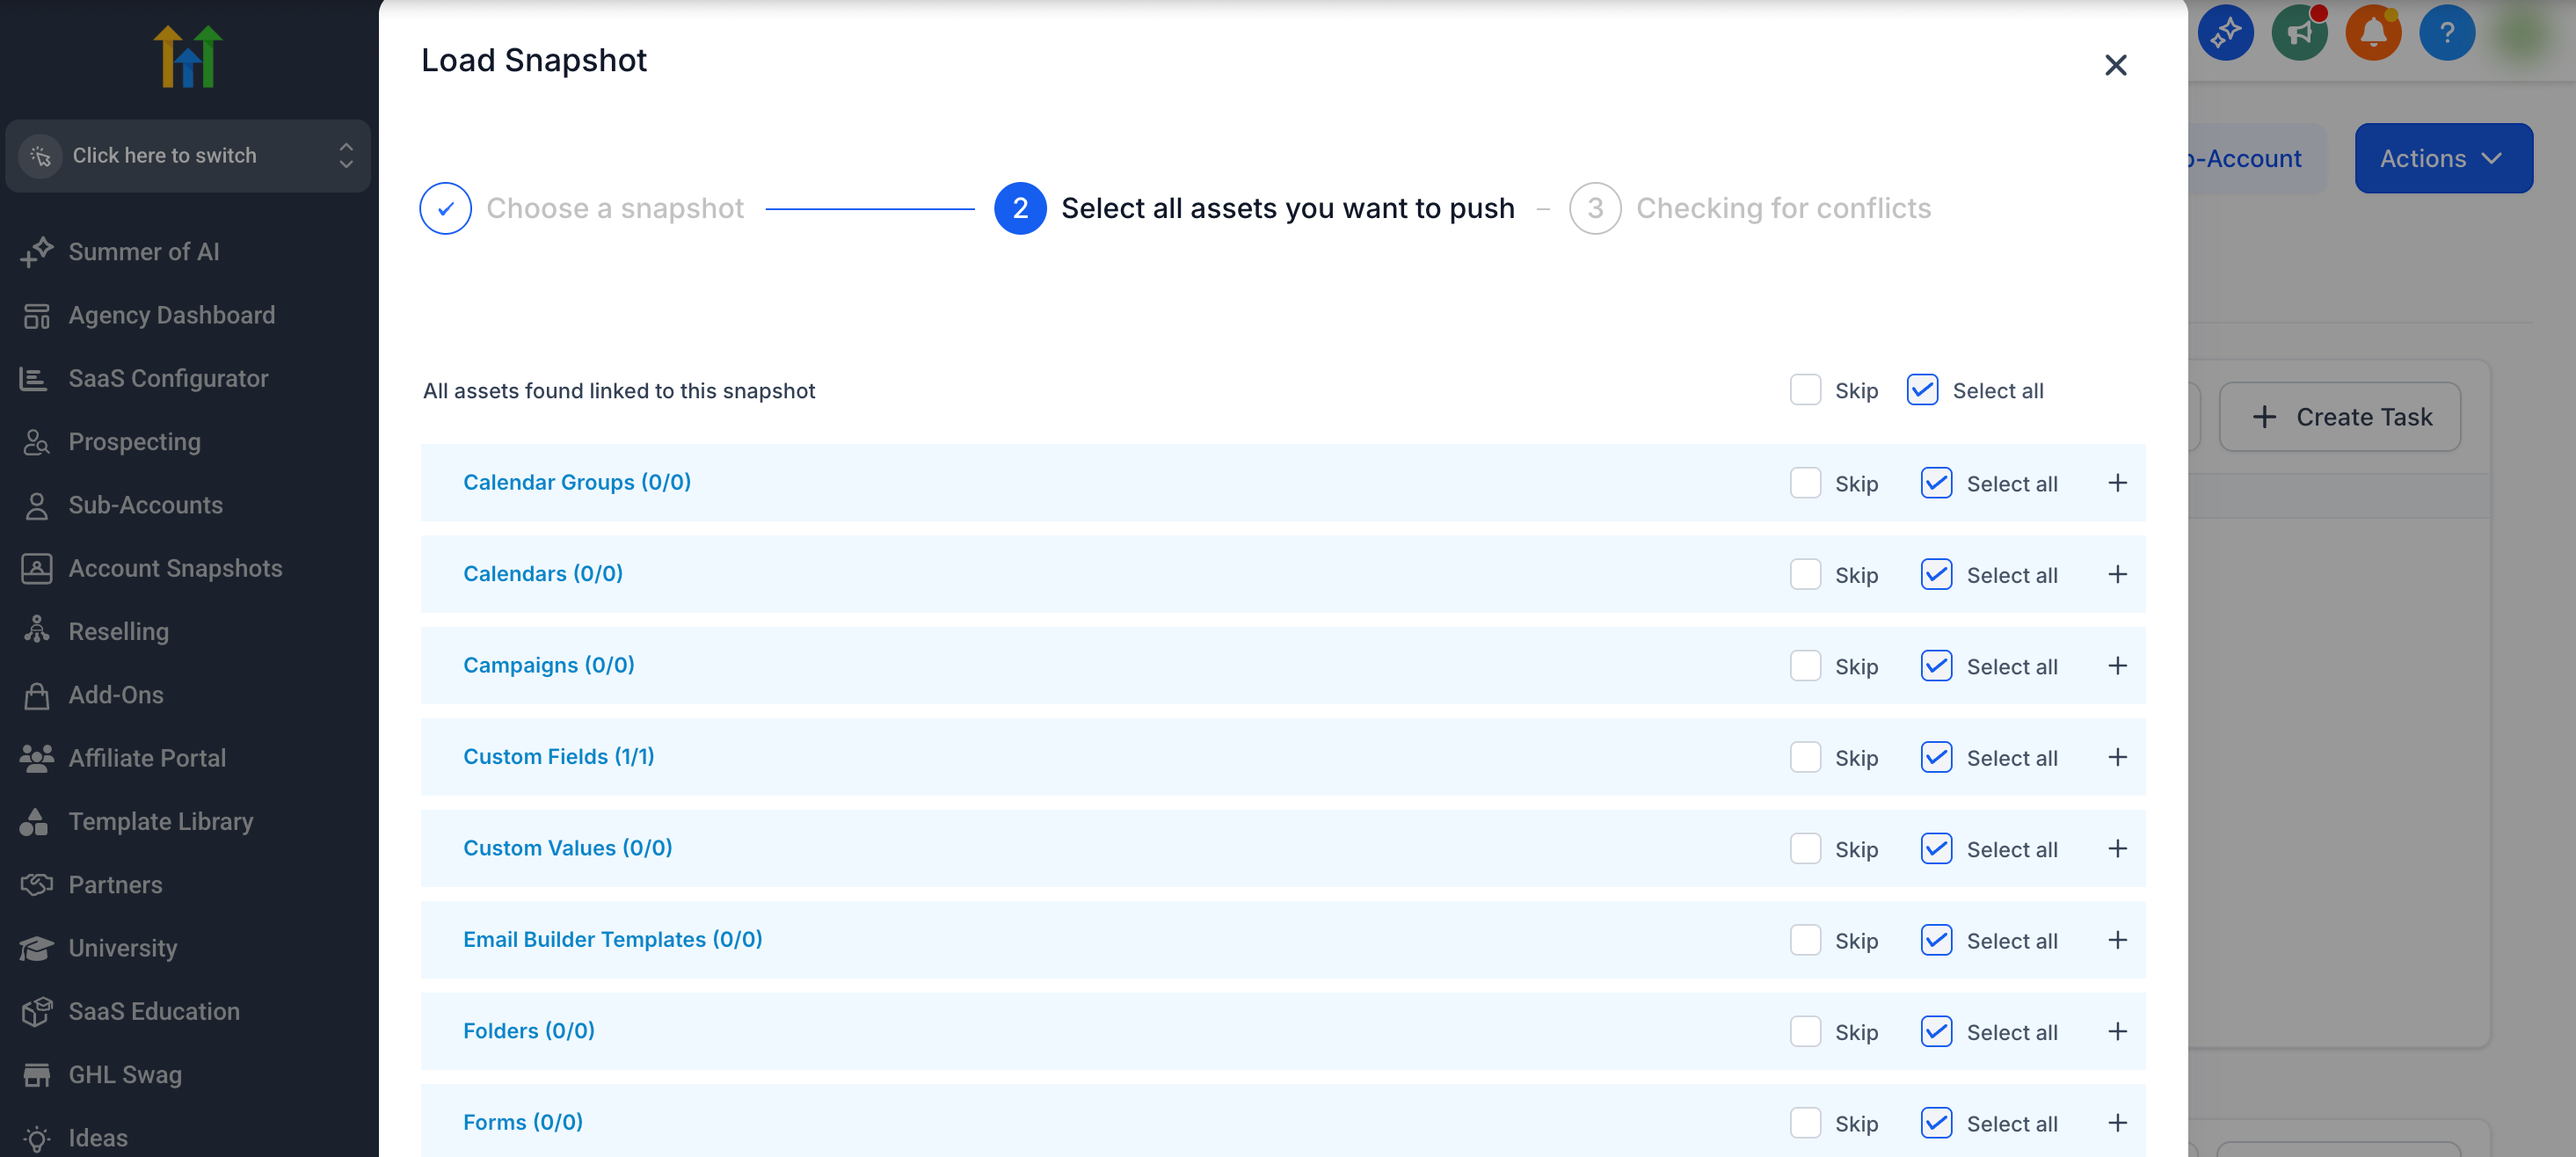
This is where a careful deployment pays off. If the target account already has some setup, you usually want to add what is missing rather than overwrite good work. Selecting assets deliberately keeps the deployment clean and predictable.
Step 5: Confirm and let it run
If any asset in the snapshot clashes with something already in the account, GoHighLevel flags it and asks whether to override or skip. Overriding replaces the existing asset with the snapshot version, so read these prompts rather than clicking straight through them.
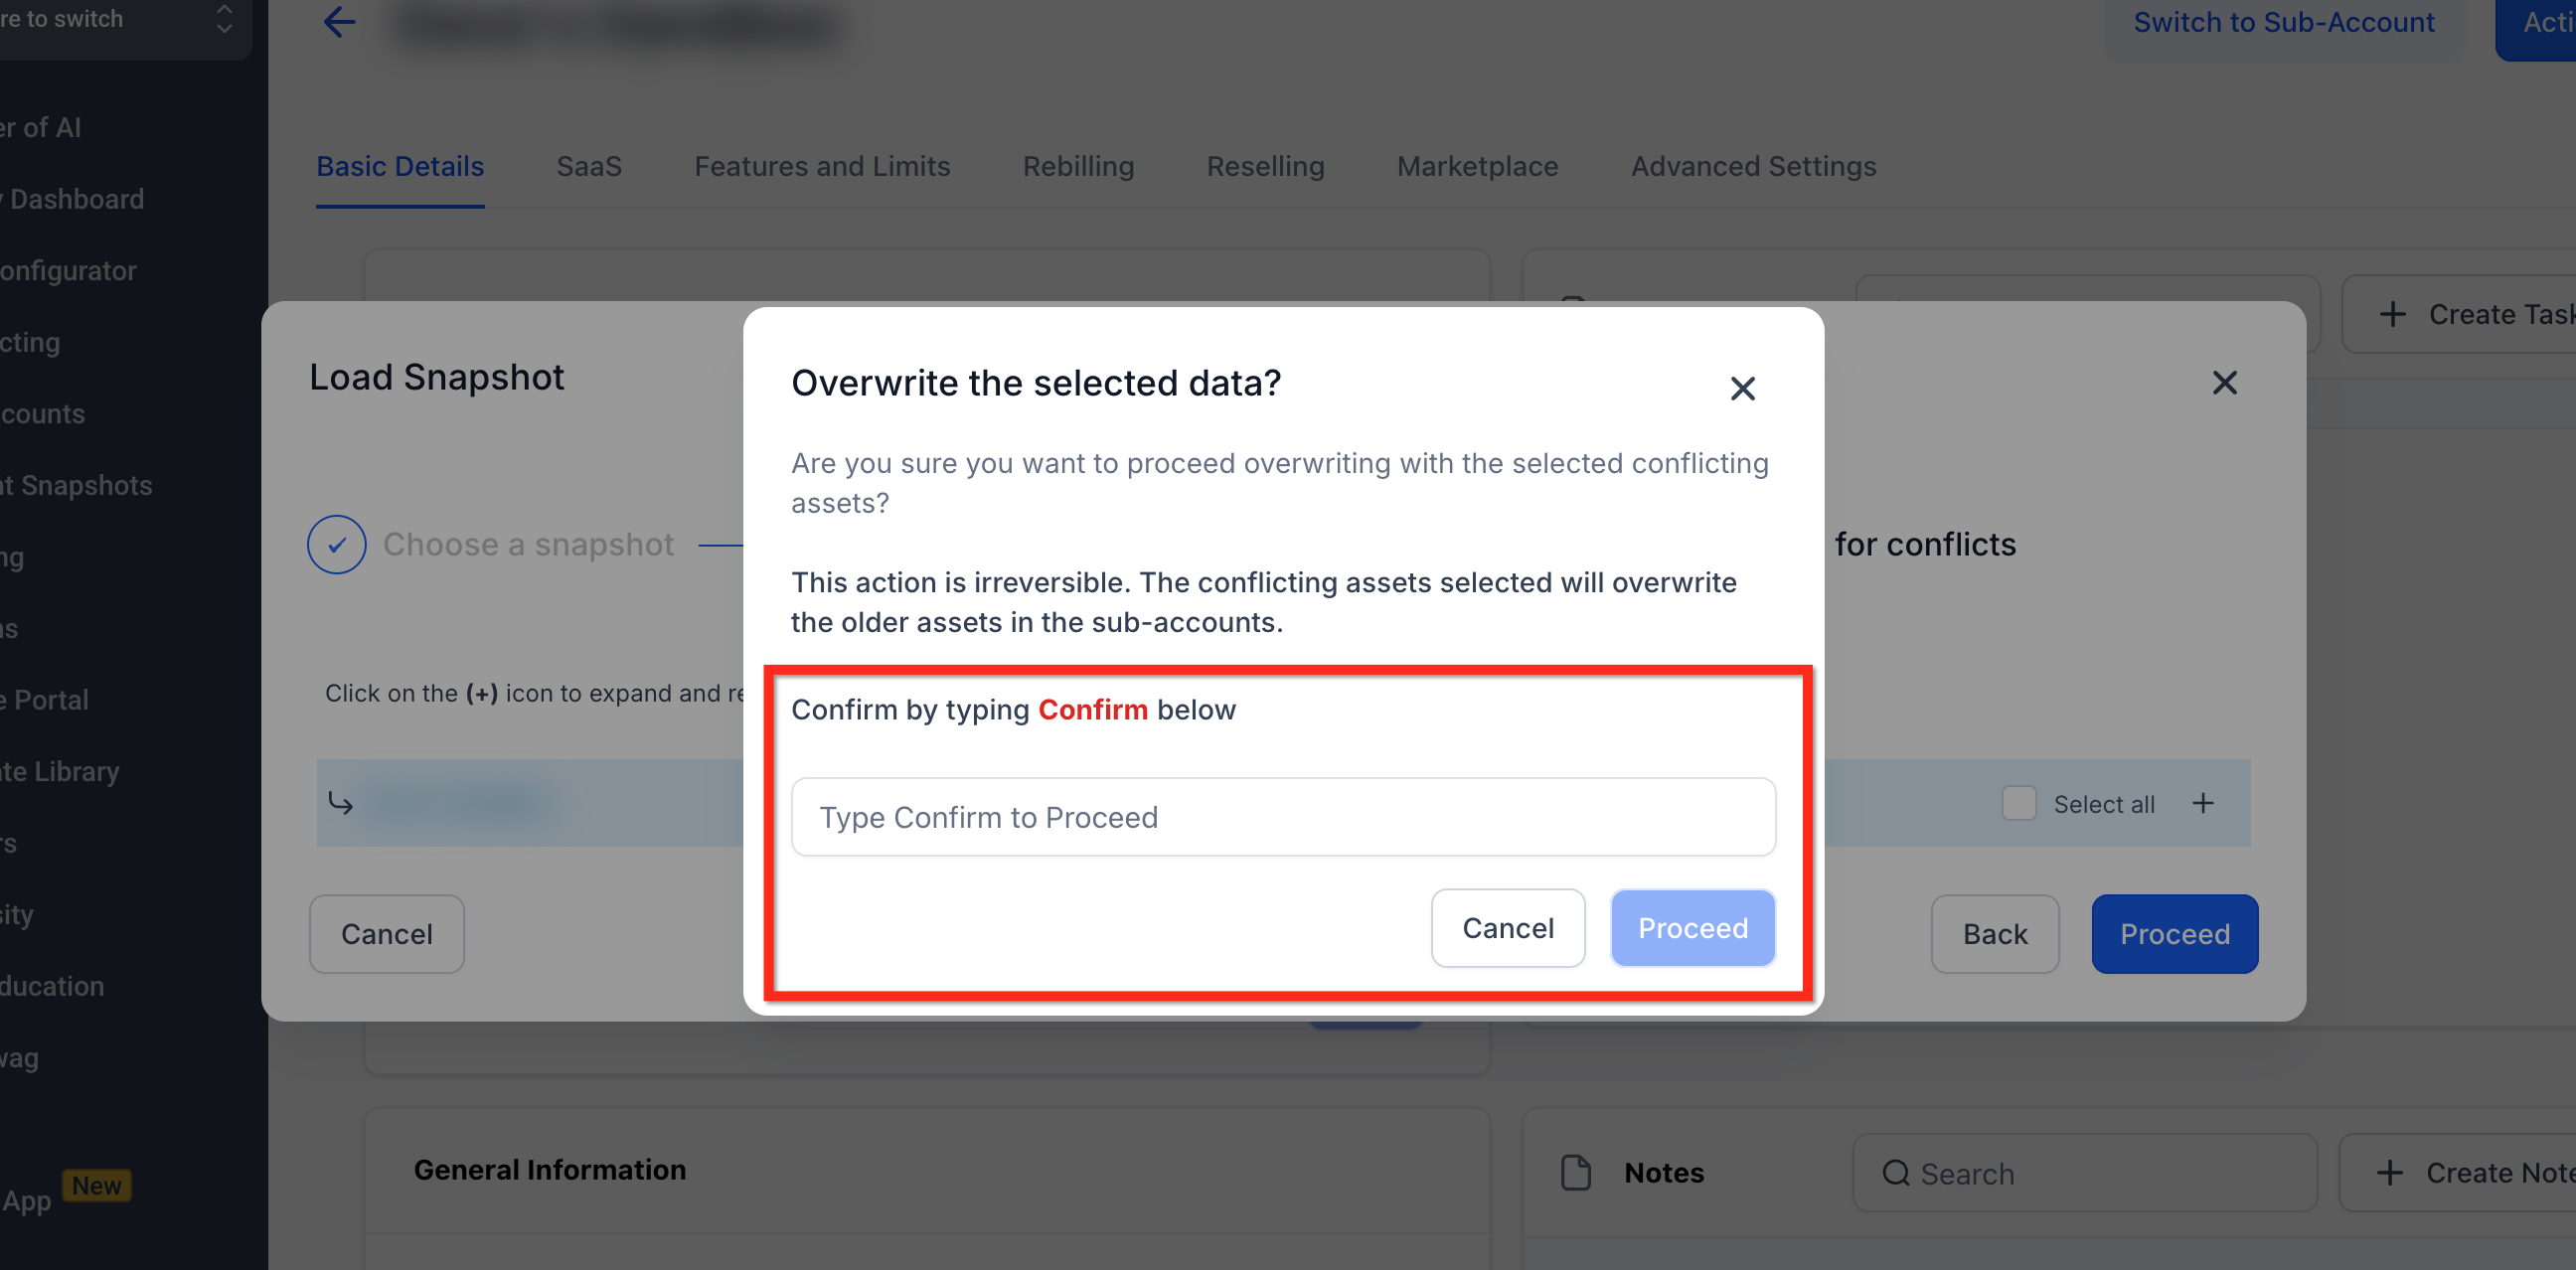
Because an overwrite cannot be undone, the final step asks you to type Confirm before it proceeds. Once you do, the push starts in the background. You will see a success message straight away, and an email lands when the transfer finishes. Larger snapshots with many funnels and workflows can take a little longer, so it is normal to wait a few minutes.
Deploying updates to an account you already set up
Deployment is not a one time event. When you improve a workflow or fix a funnel in your master account, you can refresh the snapshot and push the update to the accounts already using it. Load the snapshot the same way, then select only the assets you changed. Reviewing the conflict screen carefully here is essential, because this is exactly where an accidental override can wipe out custom work a client has added since the last push.
A few habits that keep deployments clean
Keep one master account per snapshot so your source stays tidy
Name assets clearly inside the snapshot, since those names travel with it
Test a new snapshot on a throwaway sub-account before using it on a paying client
Remember that contacts and conversations never transfer, so nobody loses their data
Re snapshot after big changes so your saved version never drifts from reality
Frequently Asked Questions
Does deploying a snapshot delete the contacts in the target account?
No. Snapshots only carry setup assets like workflows and funnels. Contacts, conversations and appointments stay untouched, so you can safely deploy into an account that is already live.
Can I load a snapshot into an account that already has data?
Yes. You choose which assets to push, and GoHighLevel warns you before overwriting anything that conflicts. Add only what is missing and skip the rest.
How long does a snapshot deployment take?
Usually a few minutes. Small snapshots feel almost instant, while large ones with many funnels and workflows take longer. You get an email once the transfer is complete.
Can I update accounts after the snapshot changes?
Yes. Refresh the snapshot in your master account, then reload it into the client account and select only the assets you changed. Review conflicts carefully so you do not overwrite client edits.
Can Wispcode build and deploy snapshots for me?
Absolutely. Wispcode can create a clean master snapshot for your offer and roll it out across every client account, so your onboarding becomes a repeatable few minute task instead of a full day of setup.
Need Expert Help with GoHighLevel?
New to GoHighLevel and ready to get started? Buy your GoHighLevel account here and launch with confidence.
Already know what you need and want our team to handle everything, from complete setup and customization to funnels, workflows, automations, CRM, and pipelines? Click here.