
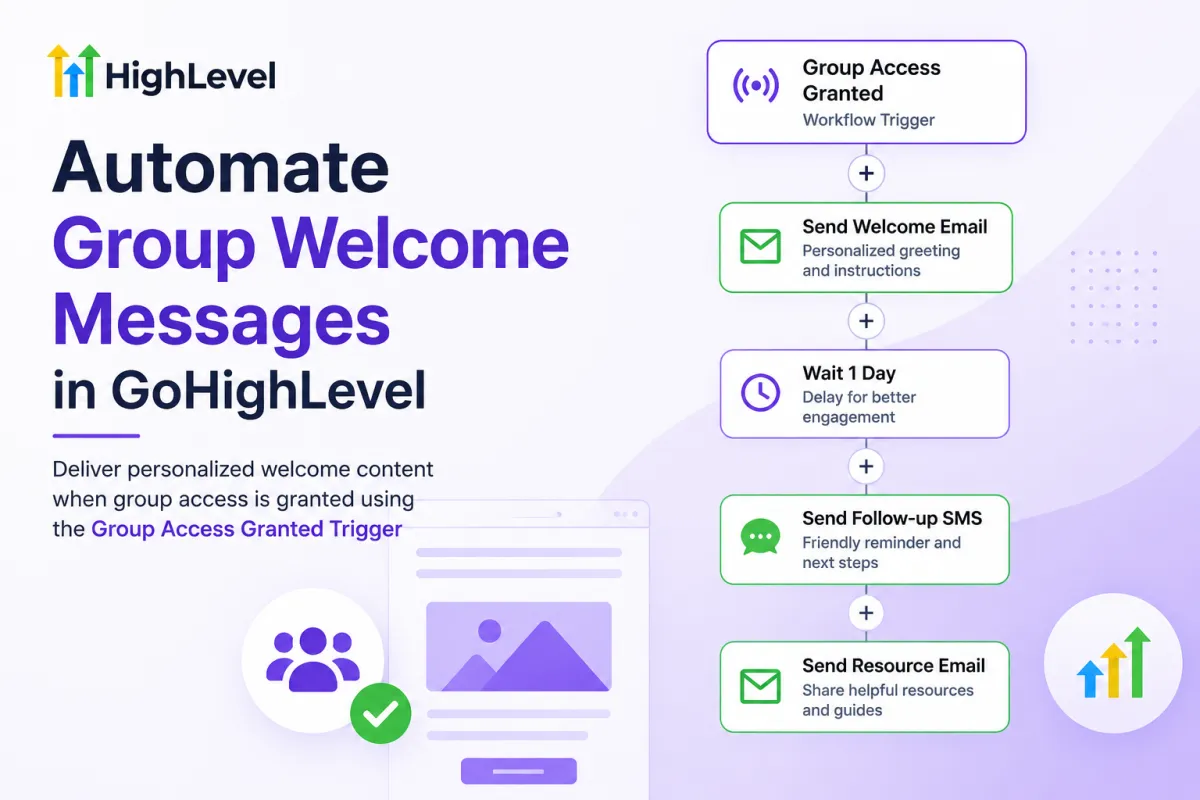
Automate Group Welcome Messages in GoHighLevel
How to Deliver Personalized Welcome Content When Group Access Is Granted Using the Group Access Granted Trigger in GoHighLevel
When a new member gets access to a community group, it is important to give them a good first experience. If they receive access without any welcome message or instructions, they may not know where to start or what they should do next.
GoHighLevel can help automate this process with the Group Access Granted workflow trigger. This trigger allows you to start a workflow when a member is granted access to a specific group in your GoHighLevel Community.
You can use this trigger to send a welcome email, share useful information, provide onboarding instructions, and follow up with the member after a few days.
In this guide, we will explain how to set up this type of automation in GoHighLevel.
What Is the Group Access Granted Trigger in GoHighLevel?
The Group Access Granted trigger starts a workflow when a member is given access to a Community group.
For example, suppose you have a Community with groups for beginners, advanced members, and VIP members. When someone is granted access to the VIP group, you can use this trigger to automatically start a workflow for that member.
The workflow can then send personalized content based on the group they have joined.
You could use it to send:
A welcome email
Instructions for getting started
Links to useful resources
Information about upcoming events
Community guidelines
Training information
Follow-up messages
This can save your team from manually welcoming every new member.
Why Use the Group Access Granted Trigger?
Manually welcoming every new community member can take a lot of time, especially when your community is growing.
Automation makes the process much easier. Once the workflow is configured, the welcome process can happen automatically whenever the selected access event occurs.
Another advantage is consistency. Every new member can receive the important information they need without your team having to remember to send it.
You can also make the experience more personal by using the contact's information in your messages.
For example, instead of sending:
"Welcome to the community."
You could send:
"Hi {{contact.first_name}}, welcome to our Advanced Marketing group. We're excited to have you here."
A small amount of personalization can make an automated message feel much more relevant.
How to Create the Workflow in GoHighLevel
Step 1: Open Workflows
First, log in to your GoHighLevel account and open the sub-account where your Community is located.
Go to Automation and then open Workflows.
Create a new workflow and choose a blank workflow if you want to build the automation from scratch.
Starting with a blank workflow gives you more control over the trigger, messages, delays, and other actions.
Step 2: Add the Group Access Granted Trigger
Inside the workflow builder, click Add Your First Trigger.
Search for Group Access Granted and select it.
This trigger is available under the Community-related workflow triggers in GoHighLevel.
The purpose of the trigger is simple. It tells the workflow to start when a member receives access to the selected Community group.

Step 3: Select the Appropriate Group
After selecting the trigger, configure it for the group you want to use.
For example, if your Community has a group called Advanced Marketing, you can set up the workflow for members who are granted access to that group.
This is an important step because many Communities have multiple groups.
You do not want someone who joins a beginner group to receive information intended for an advanced group.
Make sure you select the correct group before continuing with the workflow.

Step 4: Add a Welcome Email
Once your trigger is configured, add a Send Email action.
This email should welcome the member and give them the most important information they need.
You can include their first name, information about the group, instructions for getting started, and links to useful resources.
For example:
Subject: Welcome to the Advanced Marketing Group
Hi {{contact.first_name}},
Welcome to the Advanced Marketing group.
You now have access to the training, discussions, and resources available inside the group.
We recommend starting with the introductory resources and then checking the latest discussions.
If you have any questions, feel free to reach out or post your question inside the community.
We're happy to have you with us.
The exact content of your email will depend on your business and the purpose of the group.

Step 5: Give Members Clear Instructions
A welcome email should do more than simply say hello.
New members should know what they need to do next.
For example, you can give them a short list of steps:
Log in to the Community.
Open the group you have joined.
Read the Start Here information.
Review the available resources.
Introduce yourself to other members.
Check the latest discussions and upcoming events.
Keeping these instructions simple makes it easier for a new member to get started.
You do not need to include every detail in the first email. You can share additional information through follow-up messages.
Step 6: Add a Wait Action
After sending the welcome email, you can add a Wait action.
For example, you may want to wait one day before sending another message.

This gives the member enough time to read the first email and explore the group.
You can then send a second message that helps them continue with the onboarding process.
For example:
Hi {{contact.first_name}},
We wanted to check in and make sure you know where to get started.
If you haven't already, take a look at the Start Here section and review the resources available inside the group.
If you have any questions, you can post them in the community.
This type of follow-up can help members stay engaged instead of receiving access and then forgetting about the community.

Step 7: Add More Personalized Content
You can continue the workflow with additional messages depending on what your members need.

For example, you could send information about:
A training session
A live community event
A new resource
A popular discussion
A helpful guide
Community rules
Support options
The content should be relevant to the group the member has joined.
For example, members of a sales training group could receive sales resources, while members of a customer support group could receive support documentation.
This makes your automation more useful and prevents members from receiving unrelated information.
Example of a Simple Welcome Workflow
A basic workflow can be very simple.
The workflow starts when a member is granted access to the selected group.
The member then receives a personalized welcome email.
After two days, the workflow sends a getting-started message.
A few days later, another message can be sent to encourage the member to participate in the community.
You can add or remove steps depending on how your onboarding process works.
There is no need to create a complicated workflow if a simple sequence can provide the experience your members need.
Use Different Welcome Content for Different Groups
One useful way to improve your automation is to create different welcome experiences for different groups.
For example, a beginner group might receive information about basic resources and introductory training.
An advanced group might receive advanced training materials and information about expert-level discussions.
A VIP group could receive information about exclusive resources, private events, or special support.
This allows you to make your onboarding more relevant instead of sending the same message to everyone.
How to Personalize the Welcome Experience
Personalization does not always need to be complicated.
You can start by using the member's first name in the message.
You can also make the content relevant to the group they have joined.
For example:
"Hi {{contact.first_name}}, welcome to the SEO Training group."
This is more specific than a general message such as:
"Welcome to our community."
You can also recommend specific resources based on the purpose of the group.
The goal is to make the member feel that the message was created for their experience rather than being a completely generic automated email.
Important Things to Check Before Activating the Workflow
Before turning on the workflow, test everything carefully.
First, make sure the correct Community group is selected in the trigger.
Then use a test contact and grant that contact access to the group.
Check whether the workflow starts correctly.
You should also check the welcome email and make sure the personalization fields display correctly.
If your email contains links, open them and make sure they lead to the correct location.
Also check the waiting periods and make sure follow-up messages are scheduled as expected.
Testing the workflow before using it with real members can help prevent small mistakes from affecting your community members.
Common Mistakes to Avoid
Selecting the Wrong Group
One of the most common problems is configuring the workflow for the wrong group.
Always double-check the group selected in the trigger before publishing the workflow.
Sending Too Much Information
New members do not need to receive a huge amount of information immediately.
Start with the most important details and use follow-up messages for additional resources.
Forgetting to Personalize the Message
If you have useful contact information available, consider using it in your messages.
A simple first-name personalization can make an automated email feel more natural.
Not Testing the Workflow
Never assume that everything will work correctly just because the workflow looks correct in the builder.
Test it with a real test contact before activating it.
Sending Content Members Cannot Access
If you send a link to a resource, make sure the member has the required permissions to view it.
This is particularly important when your Community contains different groups or restricted content.
Can You Use a Magic Link in the Welcome Email?
GoHighLevel supports Magic Links for certain Community and course access experiences.
However, a Magic Link does not automatically give someone permission to access content. The member still needs to have the appropriate access or permissions.
If you decide to include a Magic Link or another access link in your welcome email, test it with a suitable test contact before sending it to real members.
Benefits of Automating Community Onboarding
Using the Group Access Granted trigger can provide several benefits.
Saves Time
Your team does not need to manually send a welcome message whenever someone receives group access.
Creates a Consistent Experience
Every member can receive the same important onboarding information.
Improves Member Engagement
Follow-up messages can encourage new members to explore the Community and participate in discussions.
Makes Onboarding More Personal
You can use contact information and group-specific content to create a more relevant experience.
Reduces Manual Work
Once the workflow is active and tested, the process can run automatically when the configured trigger event happens.
Conclusion
The Group Access Granted trigger is a useful option for businesses that use GoHighLevel Communities and want to automate their member onboarding process.
Instead of manually welcoming every new member, you can create a workflow that starts when access is granted to a specific group.
From there, you can send a personalized welcome email, provide instructions, share useful resources, and follow up with members over the next few days.
The most important part is to keep the experience simple and relevant. Give members clear instructions, send content that matches their group, and avoid overwhelming them with too many messages.
With a well-planned workflow, GoHighLevel can handle much of the initial welcome process automatically while giving new members a more organized and personalized experience.
Frequently Asked Questions
What is the Group Access Granted trigger in GoHighLevel?
The Group Access Granted trigger starts a workflow when a member is granted access to a Community group.
Can I send a welcome email when someone gets group access?
Yes. You can add a Send Email action after the trigger and create a personalized welcome message.
Can I create different welcome messages for different groups?
Yes. You can create separate workflows for different Community groups or configure your automation based on the group the member receives access to.
Can I add a delay before sending a follow-up message?
Yes. You can add a Wait action to give members time to read the first message before receiving additional onboarding content.
Should I test the workflow before activating it?
Yes. Testing is recommended to make sure the correct group, messages, personalization fields, links, and timing are working properly.
Does Group Access Granted automatically give someone access to a group?
No. The trigger responds to the event that access has been granted. It is used to start the workflow after the access event occurs.
Need Expert Help with GoHighLevel?
New to GoHighLevel and ready to get started? Buy your GoHighLevel account here and launch with confidence.
Already know what you need and want our team to handle everything, from complete setup and customization to funnels, workflows, automations, CRM, and pipelines? 5 Click here.