
GoHighLevel Login Automation for Better Member Engagement
How to Track Member Engagement and Trigger Personalized Actions Using the User Login Trigger in GoHighLevel
Introduction
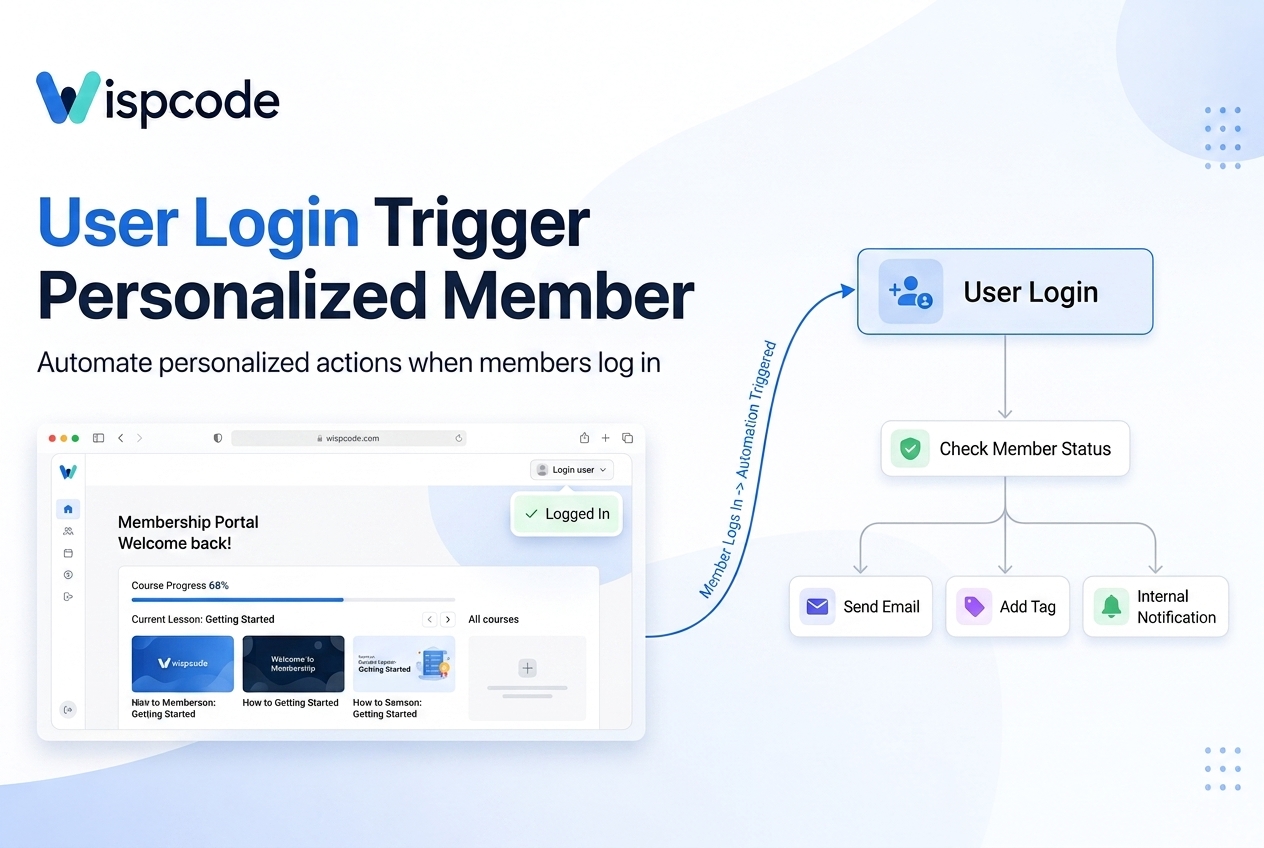
Every time a member logs into your course or membership area, GoHighLevel quietly records a small but valuable signal: activity. The GoHighLevel User Login trigger lets you turn that signal into action, starting a workflow the moment a member accesses your membership environment. Instead of manually checking who has logged in, you can let automation notice it for you and respond in a way that feels personal.
This matters because membership businesses, course creators, and coaches live and die by engagement. A member who never logs back in is likely to churn. Login-based automation gives you an early way, in real time, to notice activity and act on it, whether that means sending a helpful message, updating a tag, or alerting your team.
It's important to be upfront about one thing: a login is an activity signal, not proof of deep engagement. It tells you a member accessed the environment, not what they did once inside. In this guide, you'll learn what the User Login trigger does, how to set it up, and how to build a practical, personalized member engagement workflow around it.
What Is the User Login Trigger in GoHighLevel?
The User Login trigger is a workflow trigger inside GoHighLevel that starts a workflow whenever a contact logs into your membership area as a member. The "user" here means a membership user, someone who signed up for and has access to your course content, not a GoHighLevel "user" in the internal, team member sense.
The event that fires the workflow is simple: a member enters their credentials and successfully logs into the membership portal. That single event is enough to trigger the workflow, without requiring the member to take any further action.
This trigger is useful because it happens automatically, in real time, without a separate tracking system. It gives you a starting point for noticing member activity as it happens rather than relying on reports you check manually.
It's worth distinguishing this from other triggers. GoHighLevel also offers more specific triggers tied to lesson progress or video watch percentage, which reveal activity inside the content. The User Login trigger only confirms that access occurred, which makes it a broader, earlier signal.
Why Use Login Activity to Track Member Engagement?
Login activity is one of the simplest, most immediate engagement signals available. It fires the moment access happens, giving you a chance to respond while the member is still active.
Here are some practical ways login activity can support your engagement strategy:
Recognizing member activity. Identify who is actively returning versus going quiet.
Triggering timely follow-up. Start a relevant message while the member is still engaged.
Starting personalized workflows. Branch members into paths based on existing contact data.
Supporting member onboarding. Guide new members during their first few logins.
Sending relevant information. Use tags or fields to point members to matching resources.
Notifying a team member. Prompt a coach to check in on high-touch programs.
Creating a more responsive experience. Automation tied to real activity beats static messaging.
That said, login activity alone does not measure complete engagement. A member can log in and leave immediately. Treat it as one input among several, not a full picture.
How to Set Up the User Login Trigger in GoHighLevel
Setting up the trigger follows GoHighLevel's standard process for building a workflow:
Step 1: Open the Appropriate Sub Account
Navigate to the sub account tied to the membership or course area you want to track, especially if you manage several sub accounts for different clients.
Step 2: Go to Automation
Open the Automation section where workflows are built and managed. It's the same area used for every other workflow in GoHighLevel.

Step 3: Create a New Workflow
Start a new workflow with a clear, descriptive name, such as "Member Login Engagement," so it's easy to find later.

Step 4: Add the User Login Trigger
In the workflow builder, add a trigger and select "User Login" from the available options. This tells GoHighLevel to start the workflow the moment a member logs in.

Step 5: Configure Any Available Filters
You may be able to narrow the trigger to specific products or membership offers. Apply filters only if needed, since an unfiltered trigger fires for logins across every membership on the sub account.
Step 6: Save the Trigger
Confirm your configuration before building the workflow actions, locking in the trigger settings so you can move on.
Step 7: Add Your Workflow Actions
Build out the sequence of actions to run after a login occurs, whether that's a welcome email, a tag update, or an internal notification.
Interface options can vary by plan and version, so check the trigger's available filters directly inside your account rather than assuming.
How to Build a Personalized Member Engagement Workflow
Once the trigger is in place, the real value comes from the actions you attach to it. GoHighLevel supports several actions that work well here:
Send Email. Deliver a relevant message based on the member's stage.
Send SMS or other supported communication. Reach members through additional channels.
Add Tag. Mark the contact as recently active for later segmentation.
Update Contact Field. Record the most recent login date for reporting or future conditions.
Create Task. Assign internal follow-up for your team.
Send Internal Notification. Alert a staff member in real time.
Wait. Add a delay before the next action fires.
If/Else. Branch the workflow based on existing contact data.
Continue to another workflow. Hand the contact off to a more specific automation.
None of these actions can see what the member did inside the membership area. They only work with data already stored in the contact's record. Personalization comes from your existing data, not the login event itself.
How to Personalize Actions After a Member Logs In
Welcome or Recognize the Member
For new members, a welcome message triggered by a login reinforces that they're in the right place and reminds them of their next step.
Send Relevant Information
Use existing tags or custom fields to direct members toward content that matches their stage, rather than a generic message.
Create Different Workflow Paths
An If/Else action lets you split members into paths. Members tagged "new" might get onboarding guidance, while "returning" members get a different follow-up.
Notify a Team Member
A login from a member flagged as at risk of churning can trigger an internal task so a coach can reach out personally.
Add Delays
Because logins happen frequently, a Wait step or a condition checking whether a message was already sent recently helps prevent over-messaging.
Example: User Login Member Engagement Workflow
Here's a realistic structure you can adapt for your own membership business.
Trigger: User Login
Condition: Check whether the contact has a "new member" tag
Action: Send a welcome email with onboarding guidance
Wait: 24 hours
Action: Send a follow-up email, or create an internal task for a coach to check in
This example doesn't assume the member did anything beyond logging in. It uses the "new member" tag to decide what to send, and a delay to avoid overwhelming the member with messages from repeated logins.

What a User Login Can and Cannot Tell You
What a Login Can Indicate
A login reliably indicates that a member accessed the membership environment at a specific time. That makes it useful for spotting activity patterns and identifying inactive members.
What a Login Cannot Prove
A login does not prove the member watched a lesson, completed a course, purchased something, or found the content useful. It simply confirms access occurred. Combine it with other available signals, such as lesson progress or purchase triggers, rather than treating it as a complete measure of engagement.
Best Practices for Member Login Automation
Keep communication relevant to the member's stage.
Avoid sending a message after every single login.
Use conditions to prevent repetitive actions.
Use delays strategically.
Keep contact data and tags accurate.
Start simple, and avoid unnecessary complexity.
Test thoroughly before activating, and monitor execution afterward.
How to Test the User Login Workflow
Use a test contact rather than a live member.
Log in as that test account to trigger the event.
Confirm the workflow started.
Check that each action executed as expected.
Verify personalization (tags, fields, branching) behaved correctly.
Test each condition and branch, not just the default path.
Confirm delays paused the workflow as intended.
Review the execution history to confirm a successful run.
Fix any issues before activating the workflow live.
Common User Login Automation Mistakes
Treating every login as meaningful engagement rather than a simple activity signal.
Sending a message after every login, which can overwhelm members.
Assuming login data includes details it does not, such as lesson progress.
Using incorrect or outdated personalization fields.
Forgetting conditions, causing actions to repeat unnecessarily.
Skipping testing and activating the workflow directly.
Using this trigger when a more specific one would better match the use case.
Frequently Asked Questions
What does the User Login trigger do in GoHighLevel?
The User Login trigger starts a workflow whenever a contact logs into your GoHighLevel membership area as a member. It fires based on the login event itself, not on any specific action taken after logging in. This makes it useful for noticing activity in real time and starting relevant follow-up automation.
How do I create a workflow when a member logs in?
Open the relevant sub account, go to Automation, and create a new workflow. Add the User Login trigger, configure any available filters, and save it. Then add the actions you want to run afterward, such as sending an email, applying a tag, or notifying your team.
Can I send an automated message after a member logs in?
Yes. Once the User Login trigger fires, you can add actions like Send Email or Send SMS to deliver a message. It's best to use conditions and delays so members aren't messaged after every single login, which can feel repetitive or excessive.
Does the User Login trigger prove member engagement?
No. A login only confirms that a member accessed the membership environment. It does not prove they watched a lesson, completed content, or engaged deeply. Treat it as one activity signal, and combine it with other engagement data when available for a fuller picture.
How can I personalize actions based on member login activity?
Personalization comes from data already stored in the contact record, such as tags, custom fields, or membership status. Use If/Else conditions to branch members into different paths, and reference existing fields in your messages to make communication feel relevant rather than generic.
Conclusion
The GoHighLevel User Login trigger gives membership businesses, course creators, and coaches a simple, real-time way to notice when members are active and respond with relevant, personalized actions. Used well, it can support onboarding, renewed engagement, and internal follow-up without requiring manual tracking.
The key is remembering what a login actually represents: an activity signal, not a complete measurement of engagement. Combine it with other available signals, keep your personalization grounded in real contact data, and avoid over-messaging members every time they log in.
If you're new to this trigger, start with a simple workflow. A welcome message for new members or a basic activity tag is a good first step. Test it thoroughly with a test account before activating it for real members, then build in complexity as you learn what works.
Need Expert Help with GoHighLevel?
New to GoHighLevel and ready to get started? Buy your GoHighLevel account here and launch with confidence.
Already know what you need and want our team to handle everything, from complete setup and customization to funnels, workflows, automations, CRM, and pipelines? Click here.