
How to Automate Personalized Product Onboarding in GoHighLevel
How to Deliver Personalized Product Onboarding When Access Is Granted Using the Product Access Granted Trigger in GoHighLevel
Introduction
Giving a customer access to a course or digital product is only the beginning. What happens immediately afterward can shape how confidently they start using what they purchased.
A customer may have access to the right product but still wonder: Where do I start? What should I do first? Where can I find my content?
This is where automated product onboarding becomes valuable.
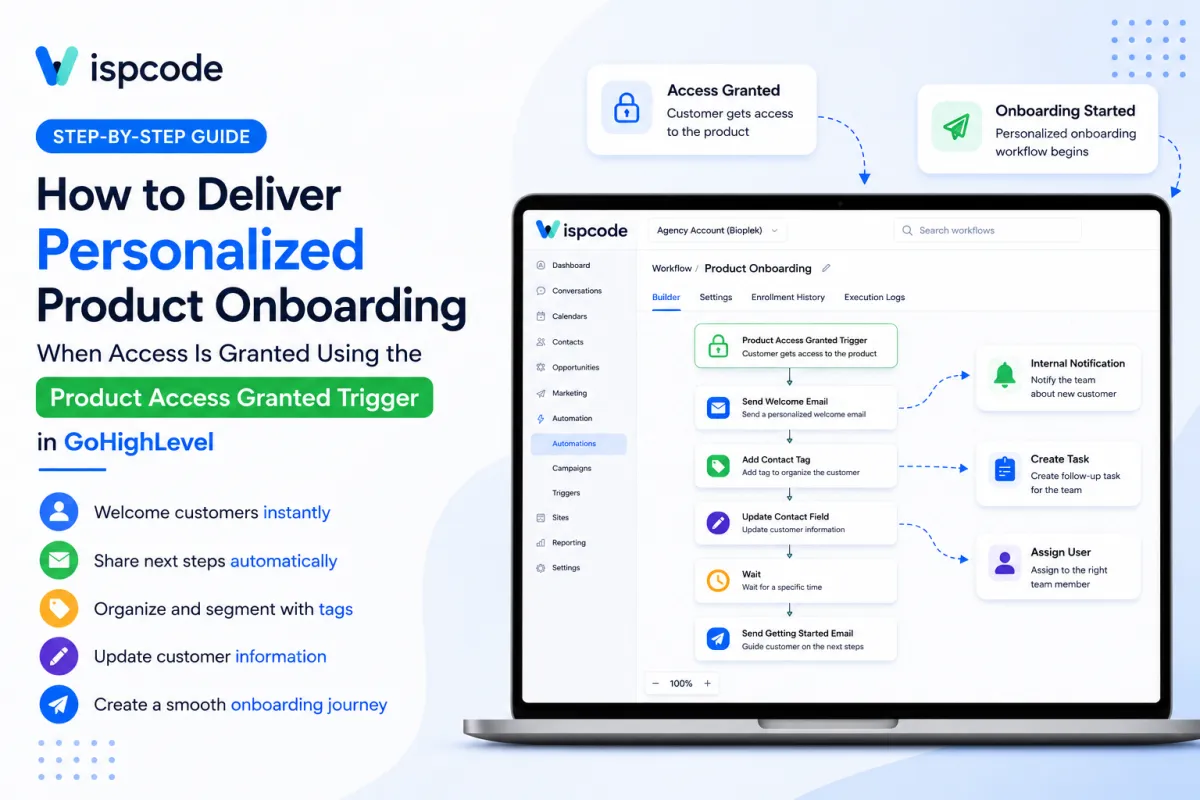
In GoHighLevel, the Product Access Granted workflow trigger can start an automation when a customer is granted access to a product. From there, you can send onboarding communication, update CRM information, add tags, introduce delays, and create different paths based on the customer or product.
HighLevel currently lists Product Access Granted as a Courses workflow trigger. Its official documentation describes it as a trigger that activates when access to a specific product is granted.
This guide explains how to use the trigger to create a practical, personalized onboarding experience without overcomplicating your workflow.
What Is the Product Access Granted Trigger?
The Product Access Granted trigger tells GoHighLevel to start a workflow when a contact receives access to a product.
The basic automation looks like this:
Product Access Granted → Welcome Message → CRM Update → Wait → Follow-Up
For example, imagine you sell an online course called Digital Marketing Fundamentals. When a customer is granted access, your workflow can automatically send a welcome email explaining what they purchased and what they should do first.
You can also filter the trigger by product. This is important when your business sells multiple courses, programs, or digital products because each product can have its own onboarding experience.
Rather than building one generic sequence for everyone, you can make the communication relevant to the product the customer actually received.
Why Product Access-Based Onboarding Matters
A good onboarding experience removes uncertainty.
When access is granted, customers should quickly understand what they have received and what action they should take next. Automating this process helps create a consistent experience while reducing repetitive manual work.
Start the Journey at the Right Moment
The Product Access Granted trigger connects the onboarding process directly to the access event.
Instead of manually checking who received access and then sending instructions, the workflow can begin automatically when the qualifying event occurs.
Personalize Different Products
A beginner course may require a completely different introduction from an advanced program.
With product filtering, you can create product-specific onboarding workflows or routes. HighLevel specifically identifies product-specific responses and automated onboarding as use cases for this trigger.
Keep CRM Information Organized
Your onboarding workflow does not have to be limited to emails. You can also use workflow actions to organize the contact record, such as adding tags or updating contact fields.
This gives your team better visibility into the customer's relationship with the product.
How to Set Up Product Access Granted in GoHighLevel
Step 1: Create a Workflow
Open Automation → Workflows in your GoHighLevel account and create a new workflow.
Starting from scratch is useful when you want complete control over the onboarding sequence.
Give the workflow a descriptive name, such as:
ONB – Digital Marketing Fundamentals
A consistent naming system becomes especially useful when your account contains dozens of workflows.
Step 2: Add the Trigger
Inside the workflow builder, select Add New Trigger.
Search for:
Product Access Granted
Select the trigger and configure its settings.
HighLevel's current workflow documentation confirms that Product Access Granted is available as a workflow trigger under the Courses category.

Step 3: Select the Product
Configure the trigger so it applies to the appropriate product.
For example:
Trigger: Product Access Granted
Product: Digital Marketing Fundamentals
This makes the workflow specific to that product rather than allowing unrelated product-access events to start the same onboarding sequence.

Step 4: Save and Test
Save the trigger configuration and test the workflow with appropriate sample data before publishing it.
HighLevel's official documentation recommends testing the workflow before enabling it.
Testing is particularly important when your workflow sends customer-facing messages because an incorrect filter or personalization setting can affect the customer's first experience.
Build the Personalized Onboarding Sequence
Once the trigger is configured, add the actions that should happen after access is granted.
A simple structure could be:
Product Access Granted
↓
Send Welcome Email
↓
Add Contact Tag
↓
Update Contact Field
↓
Wait
↓
Send Getting Started Email
Each step should have a clear purpose.

1. Send a Welcome Email
The first message should answer the customer's most immediate questions.
Tell them:
What they have access to
Where they can access it
Where they should begin
What their first step should be
Where to get help if necessary
Keep this message focused. Your first onboarding email does not need to explain the entire product.
The goal is simple: help the customer take the next step.
2. Add a Contact Tag
You can add a tag to help organize customers associated with the product.
For example:
Customer – Digital Marketing Fundamentals
Tags can help with segmentation and future workflow logic.
However, avoid creating unnecessary tags. Use a consistent naming system and only create tags that serve a real operational purpose.
3. Update a Contact Field
You can also update a contact field as part of the onboarding process.
For example:
Product Status = Active
Or you might maintain a field that identifies the customer's product category.
This creates structured CRM information that can be used by other processes when appropriate.
4. Add a Wait Step
Do not necessarily send every onboarding message immediately.
Use a Wait action to give the customer time to process the first message and take action.
For example:
Welcome Email → Wait → Getting Started Email
HighLevel workflows support wait steps and other workflow logic, so you can create a more structured sequence instead of sending every message at once.
Use Magic Links for Course Onboarding
If you are using HighLevel Courses, Magic Links can make access easier for customers.
HighLevel's current documentation states that learner Magic Links can be used with Courses triggers, including Product Access Granted. The link signs the intended customer in and directs them toward content they already have permission to access.
There is an important distinction:
A Magic Link does not grant course access.
The customer must already have the appropriate permissions. The Magic Link provides authentication and access to content the customer is already permitted to view.
When used in an onboarding email, this can reduce unnecessary login friction.
For example:
Product Access Granted → Welcome Email → Learner Magic Link
The customer can then use the link to access their permitted course content.
Create Product-Specific Onboarding
Suppose your business offers three products:
Starter Marketing Course
Advanced Marketing Course
Agency Growth Program
Sending the same onboarding email to every customer is rarely ideal.
Instead, create product-specific workflows.
Starter Course
The onboarding could focus on:
Welcome → How to access the course → Start Module 1
Advanced Course
The onboarding could focus on:
Welcome → Course access → Recommended starting point → Implementation guidance
Agency Program
The onboarding could focus on:
Welcome → Program access → First onboarding step → Additional instructions
The Product Access Granted trigger gives you the starting point for these product-specific journeys.
Add Conditional Logic When Necessary
Sometimes product alone is not enough to determine the onboarding path.
In those situations, you can use If/Else logic to create different routes based on available contact information or other workflow conditions.
For example:
Product Access Granted
↓
If/Else: Customer Type
→ Beginner → Beginner Onboarding
→ Advanced → Advanced Onboarding
→ None → Standard Onboarding
HighLevel workflows support If/Else conditions, allowing you to create different paths within an automation.
However, do not add conditional branches simply to make a workflow look advanced. If separate workflows are easier to understand and maintain, use separate workflows.
A Practical Product Onboarding Example
Consider an online education company selling Agency Growth Accelerator.
The company wants every new customer to receive a consistent onboarding experience.
The workflow could be:
Trigger
Product Access Granted
Filter: Agency Growth Accelerator
Action 1: Welcome Email
Send a personalized message confirming that the customer can begin the program.
Action 2: Add Tag
Customer – Agency Growth Accelerator
Action 3: Update Contact Field
Product Status = Active
Action 4: Wait
Allow time for the customer to review the welcome information.
Action 5: Getting Started Email
Send instructions explaining the recommended first step.
The complete structure is:
Product Access Granted
↓
Send Welcome Email
↓
Add Contact Tag
↓
Update Contact Field
↓
Wait
↓
Send Getting Started Email
This is simple, easy to troubleshoot, and sufficient for many product onboarding scenarios.
Best Practices for Personalized Product Onboarding
Keep the First Message Short
Do not overwhelm customers with every instruction at once.
Focus on the immediate next step.
Use Clear Workflow Names
A name such as:
ONB – Product Access – Agency Growth Accelerator
is easier to understand than:
Workflow 17
Clear naming becomes increasingly important as your automation library grows.
Test Before Publishing
Test the trigger and the complete workflow using a realistic contact.
Check that:
The correct product triggers the workflow.
The correct message is sent.
Personalization works correctly.
Tags are applied correctly.
Contact fields are updated correctly.
Wait steps behave as intended.
Course access works as expected.
HighLevel recommends testing the workflow before publishing it.
Avoid Duplicate Onboarding Messages
Review your existing course or membership communication before adding another welcome sequence.
If customers are already receiving a default welcome communication, adding another automated welcome message without planning the customer journey can create unnecessary duplication.
The goal is one clear onboarding experience, not multiple overlapping messages.
Common Mistakes to Avoid
Using the Wrong Product Filter
Always verify the product selected in the Product Access Granted trigger.
A wrong filter can start the wrong onboarding workflow.
Confusing Access With Authentication
A Magic Link helps authenticate a customer, but it does not independently grant product access. Verify that the appropriate permissions have already been assigned.
Overcomplicating the Workflow
You do not need ten branches to create a personalized onboarding experience.
Start with the simplest useful journey:
Access Granted → Welcome → Guidance → Follow-Up
Add more logic only when there is a real business reason.
Skipping Testing
An onboarding workflow directly affects the customer's first product experience. Always test it before turning it on.
FAQs based on this topic:
1. What is the Product Access Granted trigger in GoHighLevel?
It's a workflow trigger that automatically starts an automation the moment a contact is granted access to a specific product, such as a course or digital offer, allowing you to launch onboarding communication without manual intervention.
2. Can I create different onboarding workflows for different products?
Yes. The trigger supports product-specific filtering, so you can build separate onboarding sequences for each product; for example, a beginner course could get a basic orientation flow, while an advanced course jumps straight into implementation steps.
3. What actions can I include after the Product Access Granted trigger fires?
You can add actions like Send Email, Send SMS, Update Contact Field, Add Contact Tag, Send Internal Notification, and Wait steps, letting you build a full onboarding sequence with welcome messages, timed follow-ups, and internal team alerts.
4. What's a common mistake to avoid when setting up this trigger?
Selecting the wrong product filter is a frequent issue, it can cause the workflow to fire for unintended products. It's also important to test with sample data before publishing to confirm the trigger, filter, and actions all behave as expected.
5. Why should I automate onboarding instead of sending welcome messages manually?
Manual onboarding depends on someone remembering to reach out, which is inconsistent and doesn't scale. Automating it ensures every customer gets timely, relevant instructions the moment they gain access, reducing confusion, support requests, and repetitive manual work for your team.
Conclusion
Automating onboarding around the Product Access Granted trigger turns a customer's first moments after purchase into a guided, consistent experience rather than a gap that depends on manual follow-up. By pairing the trigger with product-specific filters, businesses can tailor onboarding to each offer instead of relying on one generic sequence for everyone. Thoughtful use of actions like welcome emails, timed waits, and internal notifications helps customers understand what they've received and what to do next. Testing the workflow before publishing and avoiding overlapping automations keeps the experience clean and free of confusion. Ultimately, this trigger gives GoHighLevel users a simple but powerful way to make onboarding feel personal, timely, and scalable.
Need Expert Help with GoHighLevel?
New to GoHighLevel and ready to get started? Buy your GoHighLevel account here and launch with confidence.
Already know what you need and want our team to handle everything, from complete setup and customization to funnels, workflows, automations, CRM, and pipelines? Click here.