

GoHighLevel Drip Action: Step-by-Step Guide
How to Create Timed Message Sequences Using the Drip Action in GoHighLevel
Introduction
Sending the right message is important, but controlling when contacts reach that message can be just as important.
If hundreds or thousands of contacts enter a workflow at once, allowing all of them to reach an SMS, email, task, or other action simultaneously may create unnecessary volume. The "Drip action" in GoHighLevel gives you more control by releasing contacts in batches at scheduled intervals.
Instead of sending everyone forward at once, you can define "how many contacts move forward in each batch and how often the next batch is released".
This makes Drip useful for high-volume outreach, database re-engagement, task distribution, and other workflows where controlled pacing matters.
In this guide, you'll learn what the GoHighLevel Drip action does, how to configure it, how it differs from the Wait action, and how to use it effectively.
What Is the Drip Action in GoHighLevel?
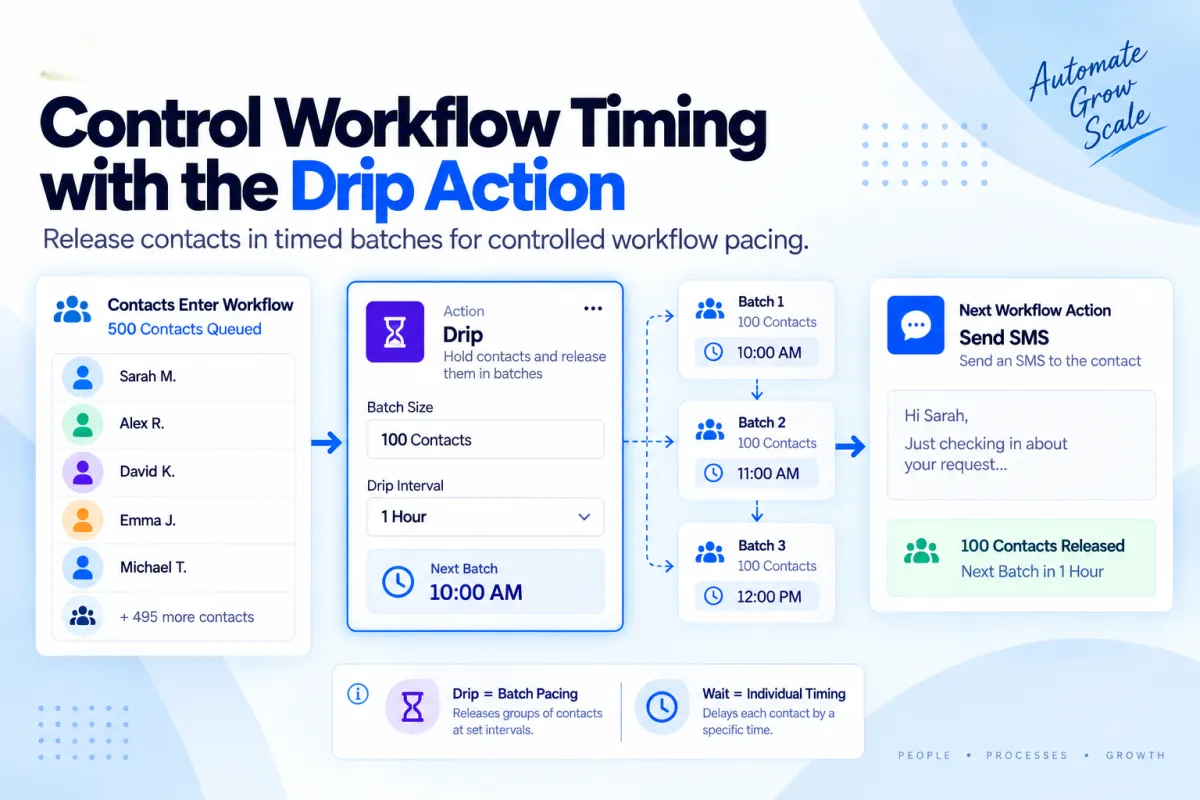
The "Drip action" is a GoHighLevel workflow action that controls how quickly contacts progress to the next step.
When contacts reach a Drip step, they wait in a queue. GoHighLevel then releases them in batches according to two main settings:
Batch Size: The number of contacts released in each batch.
Drip Interval: The amount of time between batches.
For example, you could configure:
Batch Size: 100 contacts
Drip Interval: 1 hour
If 1,000 contacts are waiting, they will progress in batches of up to 100, rather than all moving to the next action together.
The Drip action can be placed before actions such as Send Email, Send SMS, task creation, or other workflow steps.
Why Use the Drip Action?
The main purpose of Drip is controlled workflow pacing.
For example, imagine you have 2,000 leads ready for an SMS campaign. Sending all 2,000 contacts to the messaging action at once may also produce a concentrated wave of replies.
Instead, you could create:
2,000 Contacts → Drip → 100 Contacts Every Hour → Send SMS
This gives your team a more manageable flow of contacts and potential responses.
Drip can also help when downstream workflow actions create operational work. If contacts eventually reach the task-creation step, pacing their progression can prevent many tasks from appearing at once.
Drip Action vs. Wait Action
Drip and Wait both affect timing, but they serve different purposes.
A "Wait action" pauses a contact for a specified amount of time or until configured conditions are met.
A "Drip action" controls how many queued contacts are released at a time.
For example:
Send Email 1 → Wait 2 Days → Send Email 2
This is a Wait use case because each contact needs a delay between messages.
Compare that with:
1,000 Contacts → Drip: 100 Every Hour → Send Email
This is a Drip use case because you are controlling how quickly a larger audience reaches the email action.
A simple way to remember the difference is:
Wait = individual timing
Drip = batch pacing
In some workflows, using both gives you better control.
How to Set Up the Drip Action in GoHighLevel
Step 1: Open Your Workflow
Go to:
Automation → Workflows
Open an existing workflow or create a new one.
Configure the appropriate trigger that determines how contacts enter the workflow. Then decide where you need to control contact progression.
For example:
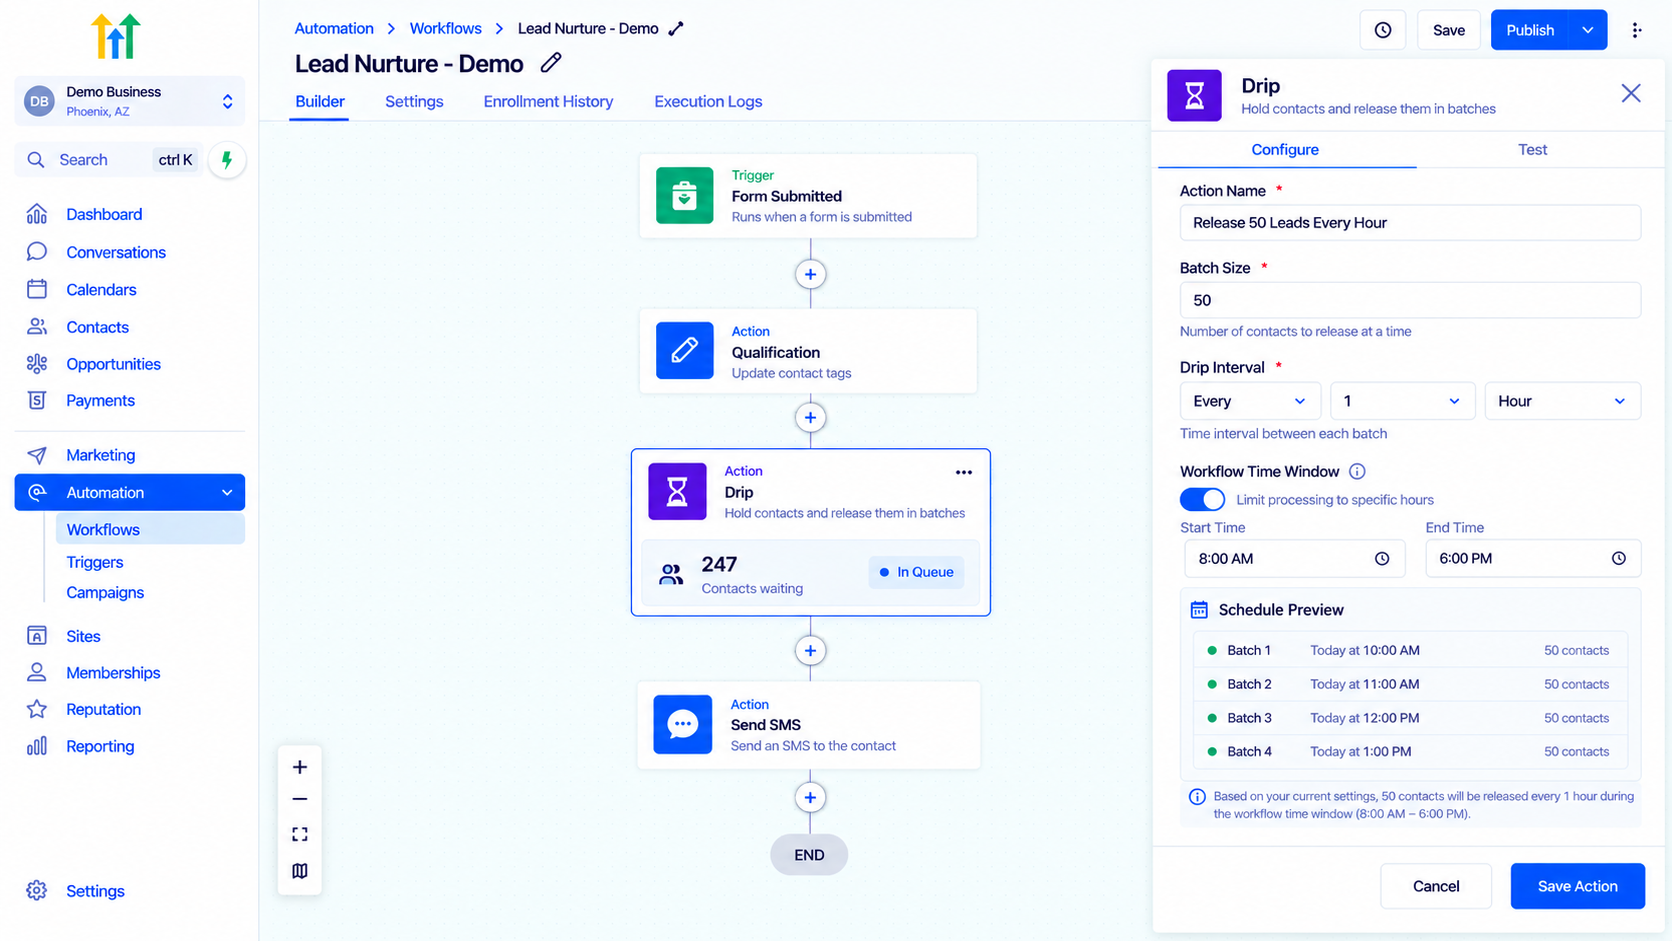
Form Submitted → Qualification → Drip → Send SMS
Because Drip controls access to the following action, its position in the workflow matters.
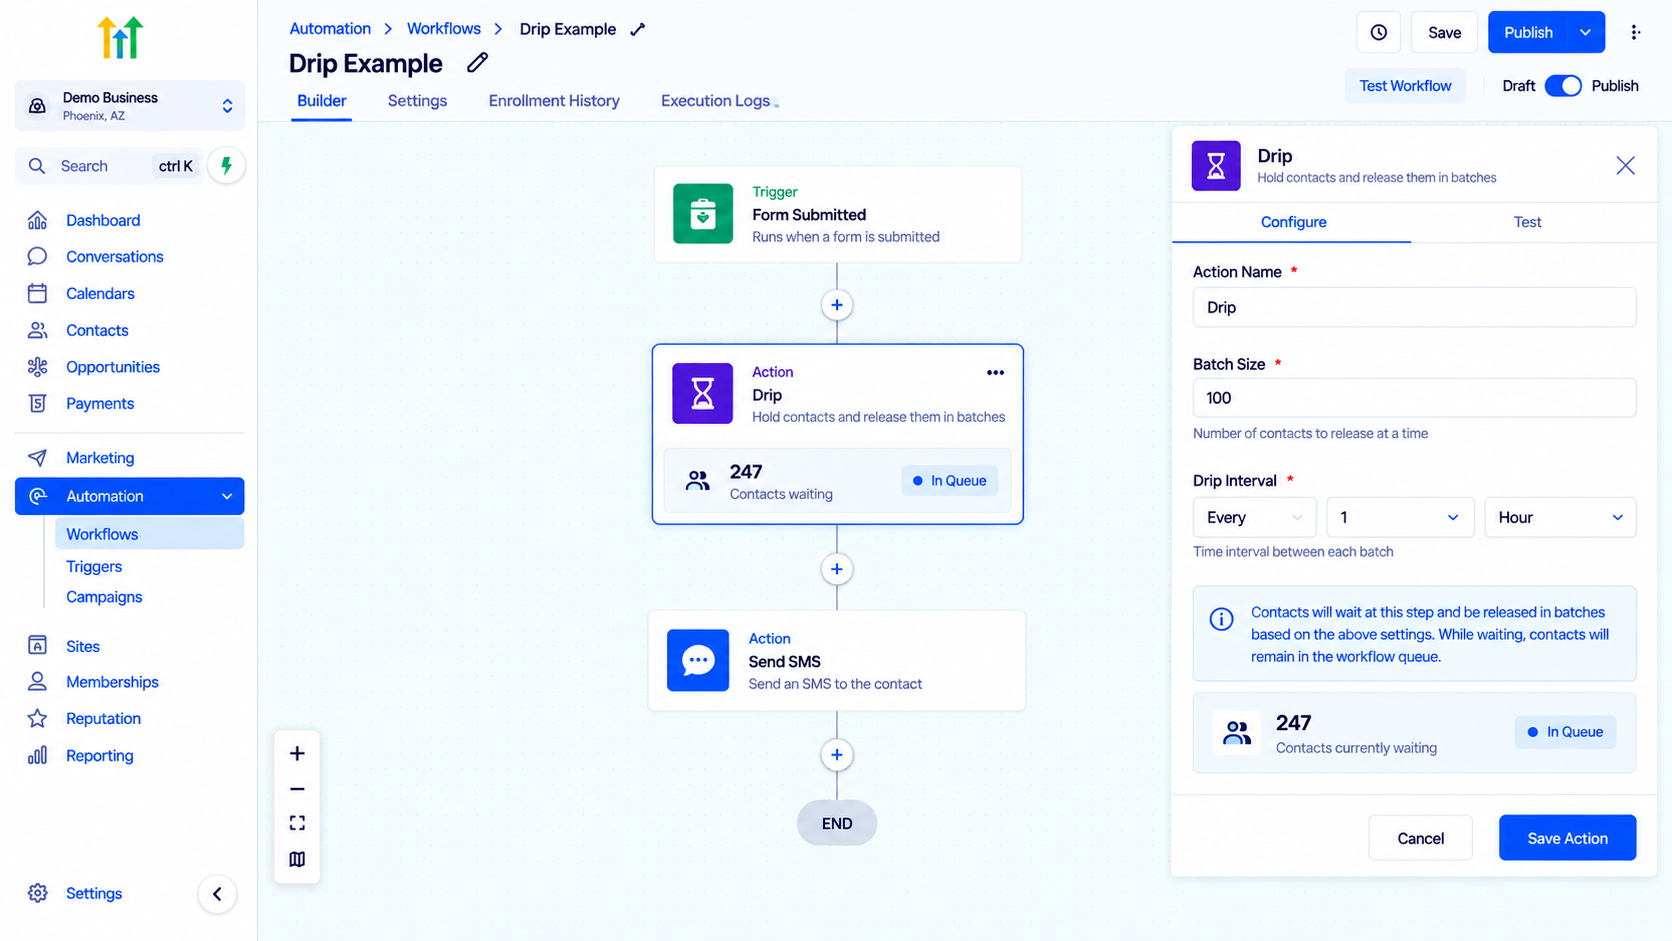
Step 2: Add the Drip Action
Click the + icon where you want to control contact flow.
Search for "Drip" and select the action.
If your goal is to pace SMS delivery, place Drip before "Send SMS". If you want to pace contacts before an email, place it before "Send Email."
Give the action a clear name, such as:
Release 100 Leads Every Hour
A descriptive name makes larger workflows easier to understand and troubleshoot.
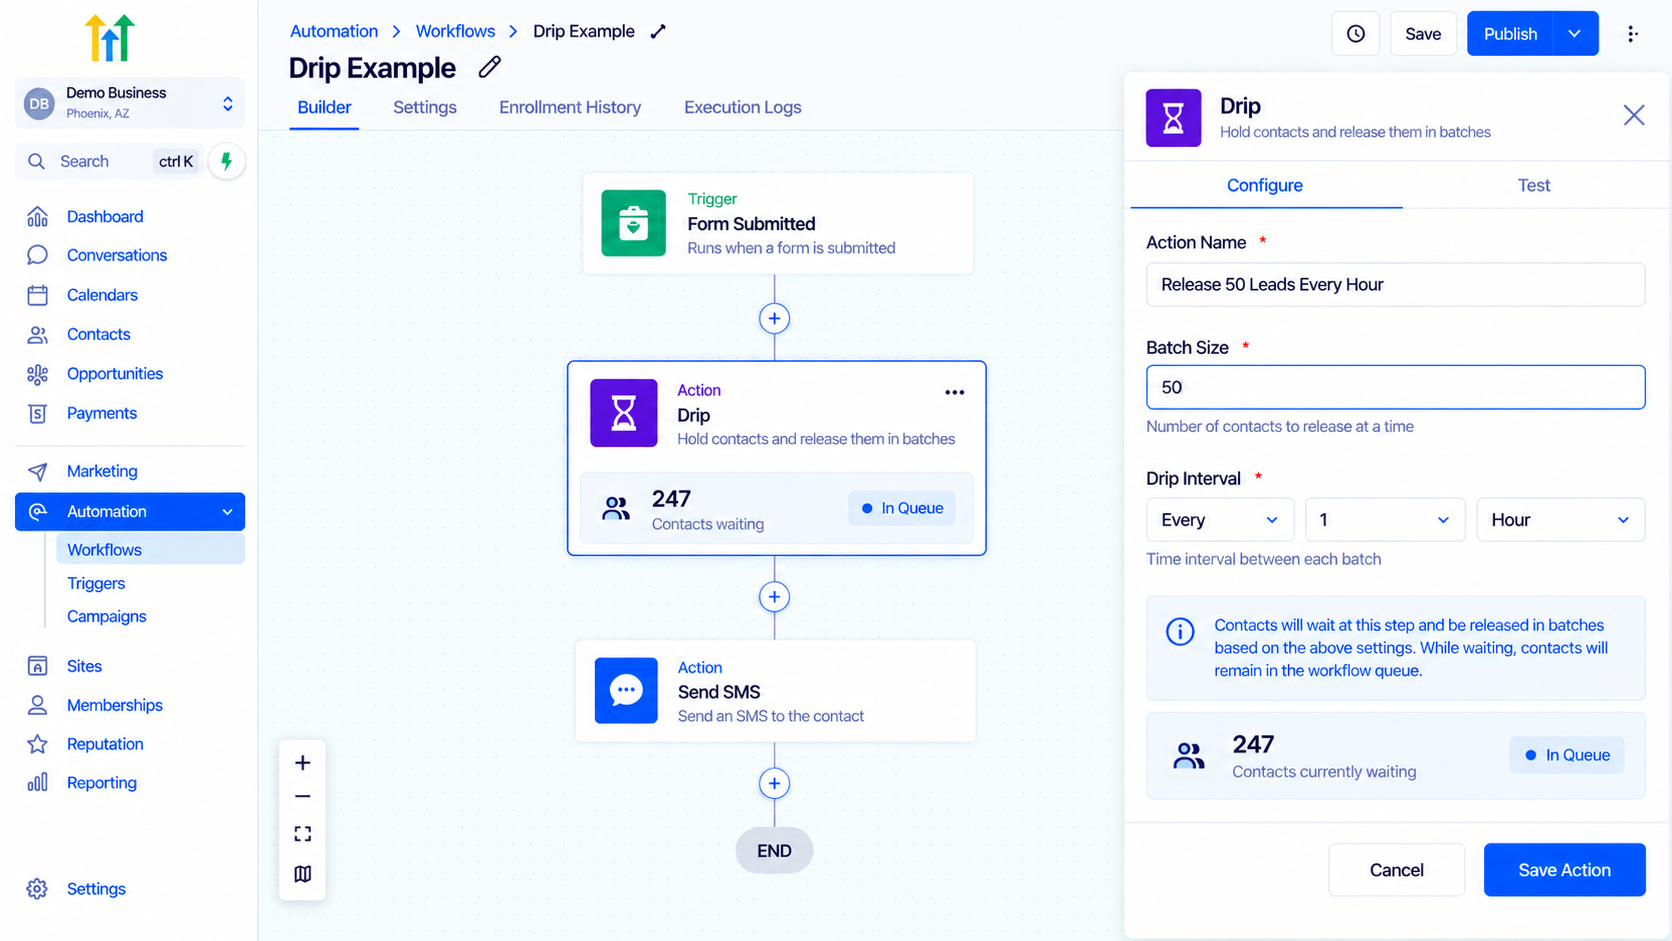
Step 3: Set the Batch Size
Next, configure the "Batch Size."
Batch Size determines how many contacts can progress each time the Drip releases a group.
For example:
Batch Size = 50
means that up to 50 queued contacts can move to the next workflow step in a batch.
Choose a batch size based on your campaign and operational capacity rather than simply selecting a large number.
If the next step is likely to generate customer responses or internal tasks, smaller batches may be easier to manage.
Step 4: Set the Drip Interval
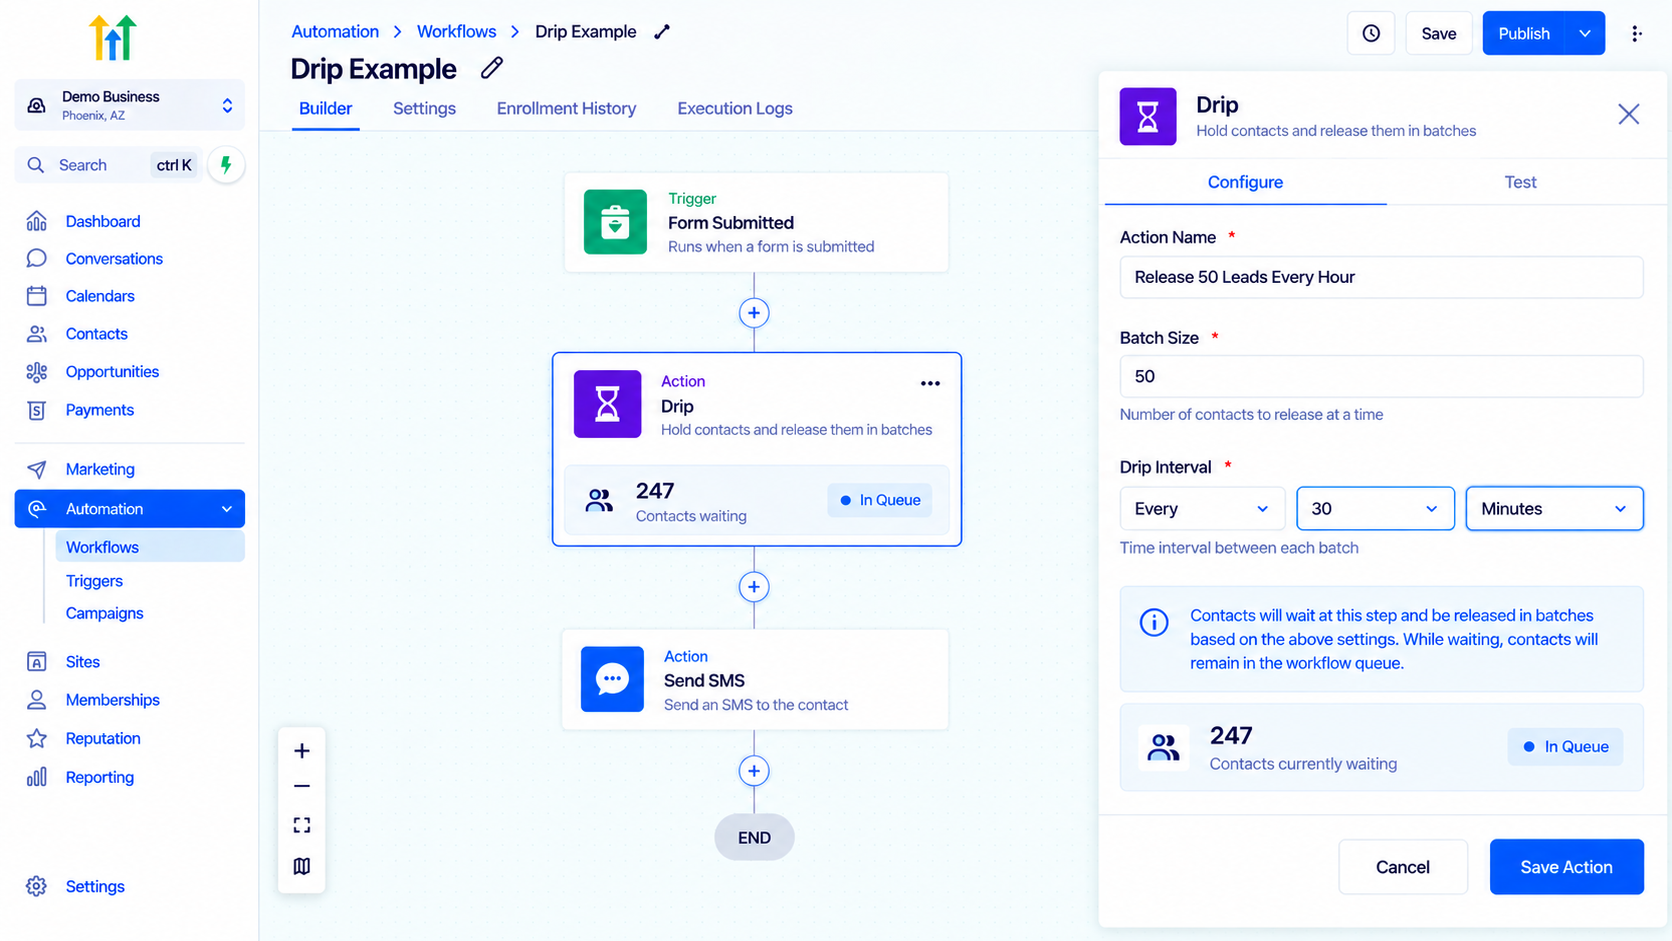
The "Drip Interval" controls how much time passes between batches.
For example:
Batch Size: 50
Drip Interval: 30 minutes
This configuration releases batches of up to 50 contacts according to the selected interval.
Your ideal interval depends on the purpose of the workflow. A sales team handling replies manually may prefer smaller, more widely spaced batches than a workflow that performs a simple internal update.
Step 5: Review the Schedule
GoHighLevel provides a schedule preview when configuring the Drip action.
Use this preview to check when upcoming batches are expected to progress. This is particularly helpful when your workflow also uses a "Workflow Time Window", because allowed processing hours can affect when a batch actually moves forward.
Review the projected timing before publishing the workflow.
Step 6: Add the Next Action
After Drip, add the action you want contacts to reach.
For example:
Workflow Trigger
↓
Drip: 100 Contacts Every Hour
↓
Send SMS
Remember that Drip does not send the message itself. It controls when contacts progress to the Send SMS, Send Email, or other action that follows it.
Step 7: Test and Publish
Before using the workflow with a large audience, test it with sample contacts.
Confirm that contacts enter correctly, reach the Drip step, and then progress to the intended next action.
Also review your batch size, interval, time-window settings, and any actions that occur after Drip.
Once the workflow behaves as expected, publish it.
Practical Ways to Use the Drip Action
1. Pace a Large SMS Campaign
One of the most practical uses is controlling how quickly contacts reach an SMS action.
For example:
Leads Enter Workflow
↓
Drip: 100 Every 30 Minutes
↓
Send SMS
This spreads contact progression instead of allowing the entire audience to reach the message action together.
2. Control Email Outreach
The same approach works with email.
You could create:
Qualified Leads → Drip → Send Email
This is useful when you want contacts to reach an email action in controlled groups rather than one large wave.
3. Re-Engage an Existing Database
Suppose you want to contact a large database of older leads.
Releasing smaller batches can make incoming responses easier for your team to manage.
For example:
Old Leads → Drip → Re-Engagement SMS → Sales Follow-Up
Rather than creating a sudden spike in responses, contacts progress according to the batch schedule.
4. Pace Internal Tasks
Drip is not limited to emails and SMS.
You can place it before workflow actions that create internal work. For example, if a workflow generates follow-up tasks for sales representatives, Drip can control how quickly contacts reach that task action.
This reinforces an important point: "Drip controls contact progression, not just message delivery".
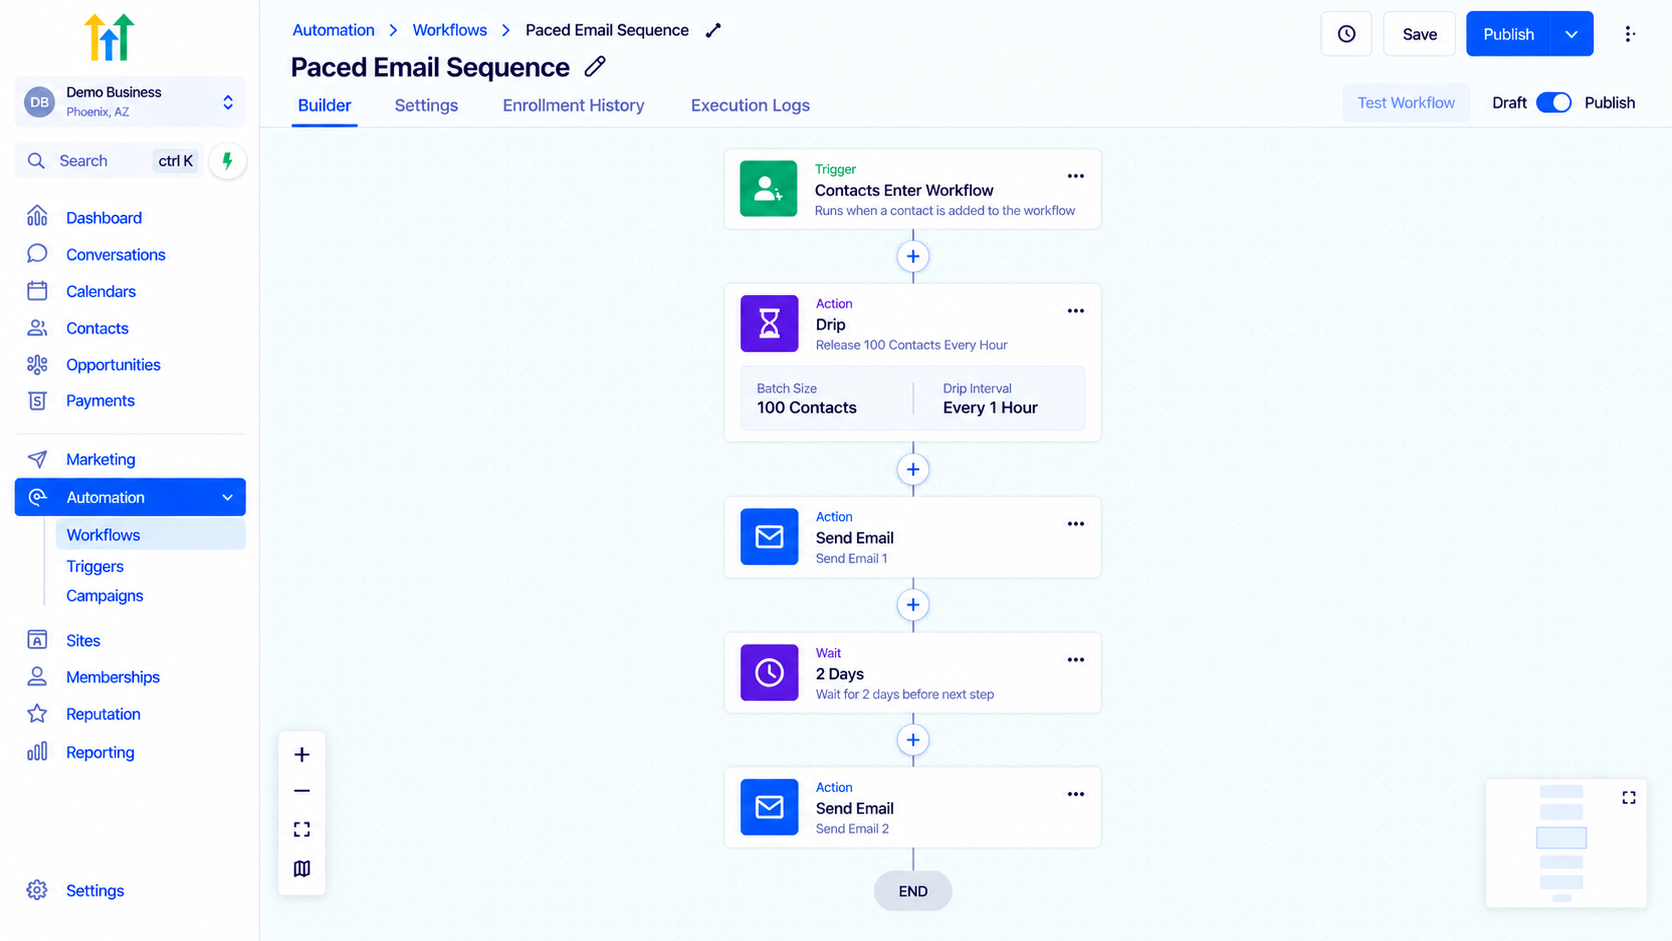
5. Combine Drip and Wait
For more advanced sequences, Drip and Wait can work together.
For example:
Contacts Enter
↓
Drip: 100 Contacts Every Hour
↓
Send Email 1
↓
Wait 2 Days
↓
Send Email 2
Here, Drip controls how quickly contacts initially reach Email 1. Wait then controls the delay between Email 1 and Email 2 for each contact.
This is often the clearest way to build a paced message sequence.
How Workflow Time Windows Affect Drip
If your workflow has a Workflow Time Window, it can affect the timing of Drip batches.
For example, suppose a batch is expected to progress later in the evening, but your workflow is configured to operate only during certain hours. The contact may remain waiting until the next allowed processing period.
This is why you should review both:
Drip settings + Workflow Time Window
when exact timing matters.
The Drip schedule preview can help you identify these timing changes before the workflow goes live.
Monitoring Contacts in a Drip
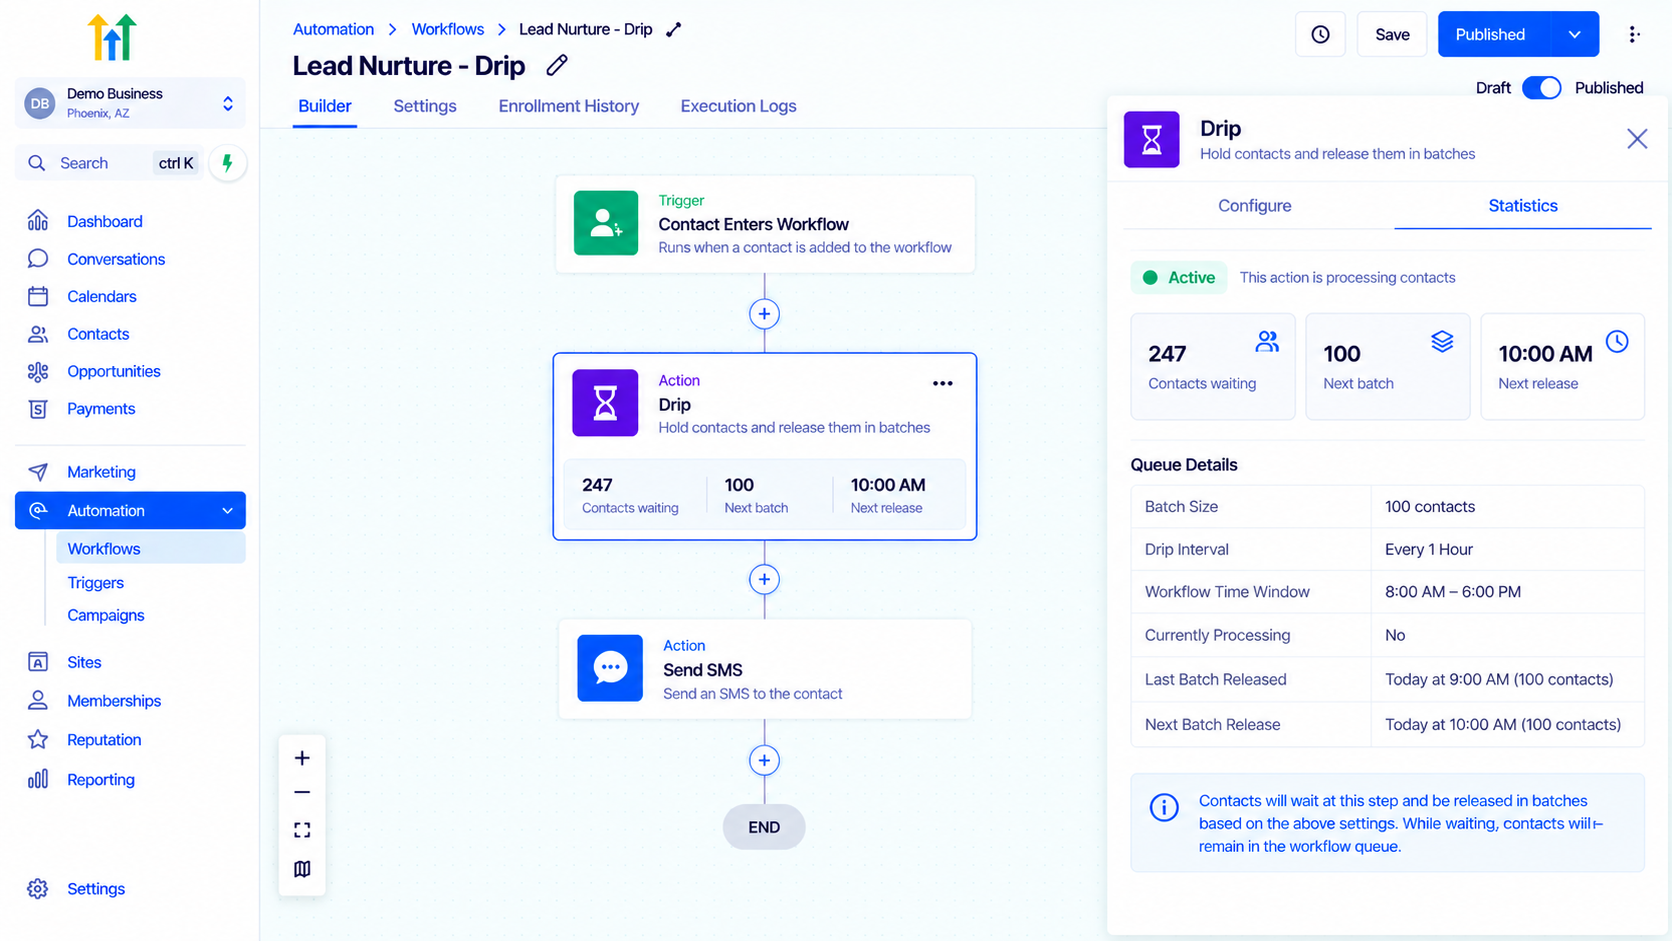
GoHighLevel provides statistics for the Drip action so you can monitor contacts waiting at that step.
You can review information such as contacts currently waiting, upcoming batch timing, and expected progression.
This is useful when troubleshooting.
If a contact appears to be "stuck," first check whether they are simply waiting for their scheduled batch rather than assuming the workflow has failed.
Monitoring the Drip queue is especially useful in larger campaigns where contacts may remain at the action for an extended period.
Editing an Active Drip
Be careful when changing Drip settings while contacts are already waiting.
Contacts already progressing through the Drip may continue under the settings that applied when they entered, while newer contacts can follow the updated configuration.
Because of this, changing the batch size or interval may not instantly change the schedule for every contact already in the queue.
If you modify an active Drip, review the action statistics and test the updated behavior before assuming all queued contacts are using the new settings.
Using Draft Mode with Drip
If you move a published workflow containing queued Drip contacts back to "Draft", those contacts can be paused while the workflow is inactive.
When the workflow is published again, the Drip can resume its pacing rather than simply releasing the entire waiting audience at once.
This helps preserve the purpose of the Drip configuration when you temporarily pause a workflow for editing or maintenance.
Best Practices for GoHighLevel Drip Workflows
A good Drip workflow should be simple enough that you can immediately understand what is being paced and why.
Choose your batch size based on the number of contacts your team and downstream automation can realistically handle. If outreach is likely to generate replies, consider the team's ability to respond when choosing your pacing.
Place Drip immediately before the action you want to control whenever possible. This makes the workflow easier to read.
Use "Wait" rather than Drip when you need an individual contact to pause between messages.
Also review Workflow Time Windows, because they can affect when scheduled batches actually progress.
Most importantly, test with a small audience first. A short test can reveal incorrect placement, unexpected timing, or downstream actions that do not behave as intended.
Common Mistakes to Avoid
Confusing Drip With Wait
Drip releases contacts in batches. Wait delays individual contacts.
Choosing the wrong action can produce a workflow that behaves very differently from what you intended.
Placing Drip After the Message
If you want to pace contacts before an SMS, the Drip action must come "before" Send "SMS".
Placing it afterward will not control how quickly contacts reach that message.
Choosing an Oversized Batch
If nearly your entire audience fits into one batch, you may lose the pacing benefit.
Choose a batch size that matches the purpose of the workflow.
Forgetting Workflow Time Windows
A Drip interval does not always tell the entire timing story. Workflow Time Windows can affect when contacts are allowed to progress.
Assuming Drip Sends Messages
Drip itself does not send an SMS or email. It only controls when contacts move to the next workflow action.
Frequently Asked Questions(FAQ's)
1. What does the Drip action do in GoHighLevel?
The "Drip action" releases contacts through a workflow in controlled batches instead of moving everyone forward at once.
2. What is the difference between Drip and Wait?
"Drip" controls groups of contacts, while "Wait" pauses individual contacts for a set time or condition.
3. Can I use Drip before SMS and email actions?
Yes. You can place Drip before Send SMS or Send Email to control how quickly contacts reach those actions.
4. Can Drip and Wait be used together?
Yes. Drip can control the initial batch pacing, while Wait can create delays between later messages.
5. Does the Drip action send messages itself?
No. Drip only controls contact progression. You still need a "Send SMS", "Send Email", or another workflow action after it.
Conclusion
The "Drip action" in GoHighLevel helps you control how quickly contacts progress through an automation.
By setting a batch size and Drip interval, you can release contacts in smaller groups instead of allowing a large audience to reach the next workflow action simultaneously. This can be useful for SMS campaigns, email outreach, database re-engagement, task distribution, and other high-volume processes.
The most important distinction is simple:
"Drip controls batch pacing. Wait controls individual timing."
For example, use Drip when you want 100 contacts to reach an SMS action every hour. Use Wait when you want each contact to receive the second message two days after the first.
When both types of timing are required, you can combine them in the same workflow.
By choosing sensible batch sizes, placing Drip before the action you want to control, reviewing your Workflow Time Window, and testing before launch, you can build cleaner and more manageable GoHighLevel automation sequences.
Need Expert Help with GoHighLevel?
New to GoHighLevel and ready to get started? Buy your GoHighLevel account here and launch with confidence.
Already know what you need and want our team to handle everything, from complete setup and customization to funnels, workflows, automations, CRM, and pipelines? Click here.