

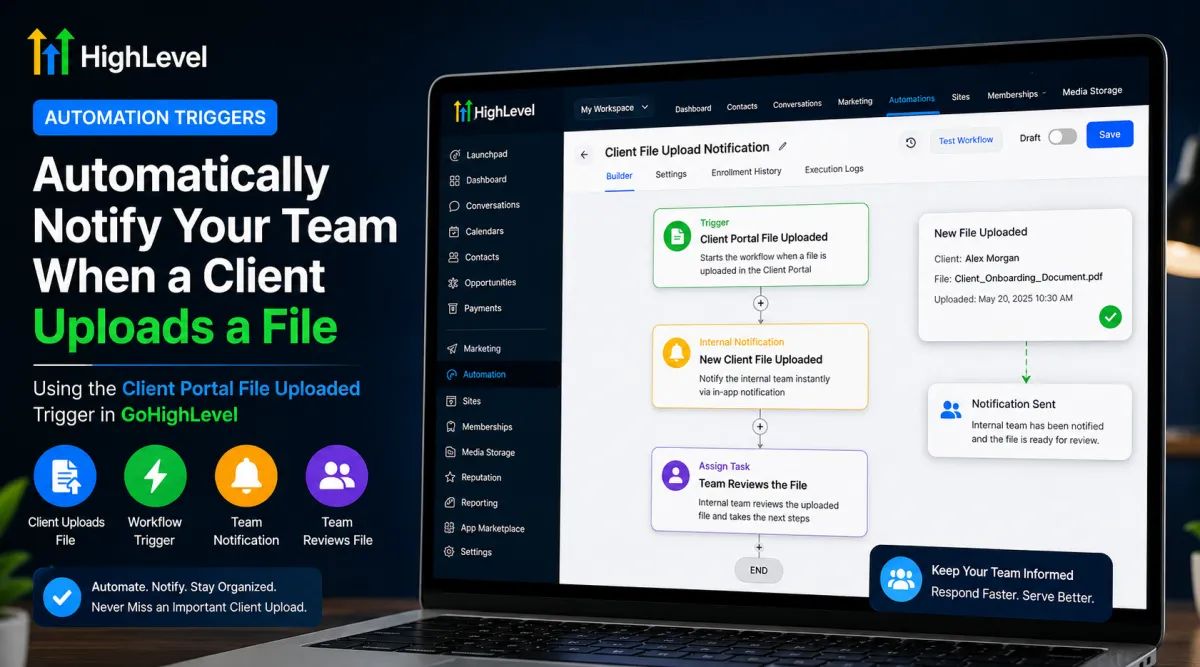
Automatically Notify Your Team When a Client Uploads a File in GoHighLevel
How to Automatically Notify Your Team When a Client Uploads a File Using the Client Portal File Uploaded Trigger in GoHighLevel
When clients need to submit documents, waiting for someone to repeatedly check the Client Portal can create unnecessary delays. A team member may not realize that a new file has arrived until much later, especially when several clients are submitting documents at the same time.
GoHighLevel can automate this process with the Client Portal File Uploaded Trigger. It allows a workflow to start when a contact uploads a file through the Client Portal, making it possible to notify the appropriate team member and begin the next step without relying on manual monitoring.
What Is the Client Portal File Uploaded Trigger in GoHighLevel?

The Client Portal File Uploaded Trigger in GoHighLevel is a workflow trigger designed to detect when a contact uploads a file through the Client Portal's file-sharing/document-upload experience.
The important point is that this trigger is specifically tied to a client upload through the Client Portal. It should not be confused with other GoHighLevel triggers related to forms, documents and contracts, attachments, or other submission methods.
Once the client completes the upload, the event can start a GoHighLevel workflow. The uploaded file is associated with the contact's CRM record and can be accessed by the team through the contact's documents area.
In simple terms:
Trigger = Client uploads a file through the Client Portal.
Actions = What your workflow does after that upload occurs.
Conditions/logic = Optional rules that determine what happens next.
Keeping these three concepts separate makes the automation much easier to understand and troubleshoot.
How the Automation Works
The basic workflow logic is straightforward:
Client uploads file → GoHighLevel detects the upload → Workflow starts → Internal team receives notification → Team reviews the file or takes the next appropriate action.
The trigger only starts the workflow. It does not automatically notify your team unless you configure an appropriate notification action after the trigger.
For example, an agency might ask a client to upload identification, onboarding documents, project assets, or other required files. As soon as the client completes the upload through the Client Portal, the workflow can send an internal notification to the person responsible for reviewing the submission.
This removes the need for employees to constantly check whether something new has arrived.
How to Set Up the Workflow

1. Create or Open a Workflow
Go to your GoHighLevel Workflows area and create a new workflow or open an existing workflow where you want to handle Client Portal uploads.
The workflow should represent a specific business process, such as document review or client onboarding.
2. Add the Client Portal File Uploaded Trigger
At the beginning of the workflow, add a new trigger and select Client Portal File Uploaded.
This establishes the event that will enroll a contact into the workflow.
GoHighLevel provides trigger settings or filters where applicable. Configure only the options that are relevant to your process rather than adding unnecessary restrictions.
3. Add an Internal Notification Action
Next, add an action beneath the trigger that notifies the appropriate team member.
For this use case, an internal notification is often the most useful next step because the purpose is to make the team aware that a new client file has arrived.
Keep the notification clear and actionable. Where the available workflow information supports it, include useful client or upload-related information so the recipient understands what needs attention.
4. Add Additional Workflow Logic if Needed
The notification does not have to be the final step.
Depending on your process, additional workflow actions can be used after the upload. For example, you might create a task for document review, update relevant contact information, add a tracking tag, or continue into another stage of an existing business process.
The key is to add only the logic that genuinely supports your workflow.
5. Test and Publish the Workflow
Before relying on the automation, test it with a suitable contact who has access to the Client Portal.
A live upload from the Client Portal is particularly useful because it verifies the actual trigger event as well as the actions that follow it. Once the workflow behaves as expected, publish it so it can respond to live uploads.
Example: Internal Team File Notification

Imagine an agency is onboarding a new client. The client receives instructions to submit required documents through the Client Portal.
Without automation, an employee might need to open the portal or contact record repeatedly to see whether the documents have arrived.
With a Client Portal File Uploaded workflow, the process becomes:
Client uploads the required file → Trigger fires → Internal notification is sent → Assigned team member knows a file is ready → Team reviews the submission.
This is a simple automation, but it solves a very practical problem: the team no longer has to depend on manual checking to discover that a client has submitted something.

Best Practices
Keep Notifications Actionable
Tell the recipient why they are receiving the notification and what they should do next. Avoid creating vague alerts that require the team member to investigate what happened.
Avoid Unnecessary Duplicate Notifications
A workflow should provide useful visibility, not overwhelm the team. Review your automation carefully if multiple workflows could respond to the same client upload.
Test Before Going Live
Use a test contact and perform an actual Client Portal upload. Confirm that the workflow enrolls the contact and that the configured notification reaches the intended recipient.
Review the Process Regularly
Your client onboarding or document-review process may change over time. Periodically check whether the workflow still sends notifications to the correct people and whether its additional actions remain useful.
Common Mistakes to Avoid
One common mistake is assuming that any file upload will activate this trigger. The event is specifically designed for files uploaded by contacts through the Client Portal's relevant upload experience.
Another mistake is confusing the trigger with other document-related automation. For example, the Client Portal File Uploaded trigger is different from triggers concerned with document or contract lifecycle events.
It is also easy to assume that triggering the workflow means someone has reviewed the file. It does not. The trigger only starts the workflow; your configured actions determine what happens afterward.
Finally, avoid publishing the workflow without testing the complete client upload process.
Conclusion
The Client Portal File Uploaded Trigger in GoHighLevel provides a practical way to automate what happens after a client submits a file through the Client Portal. Instead of relying on employees to manually monitor incoming documents, a workflow can immediately notify the appropriate team member and continue with the next configured step.
For agencies, consultants, coaches, and service businesses that regularly collect client documents, this small automation can make file-handling processes more responsive, consistent, and easier to manage.
Frequently Asked Questions
1. What is the Client Portal File Uploaded Trigger in GoHighLevel?
The Client Portal File Uploaded Trigger starts a GoHighLevel workflow when a contact uploads a file through the Client Portal’s file-upload experience. The uploaded file is associated with the contact’s CRM record.
2. Does the trigger work for files uploaded through the Client Portal?
Yes. The trigger is specifically designed for files submitted by contacts through the Client Portal. A file uploaded through a different process should not be assumed to activate this trigger.
3. What happens after the Client Portal File Uploaded trigger fires?
The trigger starts the workflow. What happens next depends on the actions you configure, such as sending an internal notification, creating a task, updating contact information, or continuing with additional workflow logic.
4. Can I automatically notify my team when a client uploads a file?
Yes. You can place an appropriate internal notification action after the Client Portal File Uploaded trigger. This allows the relevant team member to know that a client has submitted a file and that it may need review.
5. Does sharing a file with a client trigger this workflow?
No. Sharing a file from the CRM to the Client Portal is a different action. The Client Portal File Uploaded trigger is intended to respond when the contact uploads a file through the Client Portal.
6. Where can the uploaded file be found in GoHighLevel?
Client-uploaded files are available on the contact record under Documents → Received → Client Portal. This gives the team a central place to access files submitted through the portal.
Need Expert Help with GoHighLevel?
New to GoHighLevel and ready to get started? Buy your GoHighLevel account here and launch with confidence.
Already know what you need and want our team to handle everything, from complete setup and customization to funnels, workflows, automations, CRM, and pipelines? Click here.