

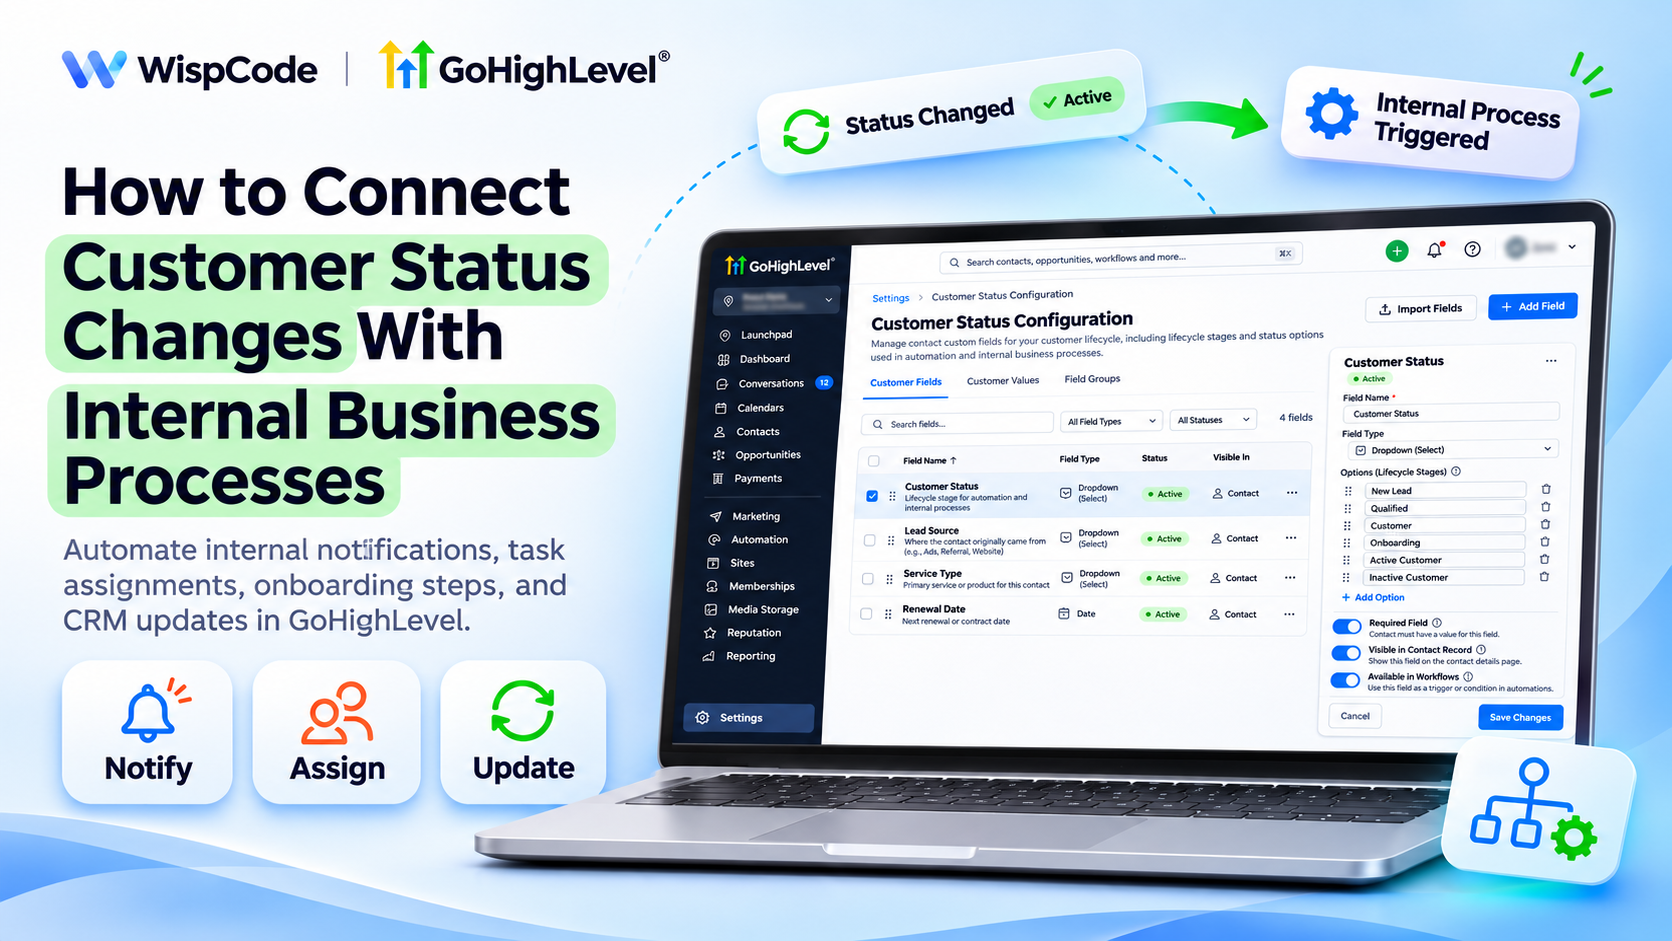
How to Automate Customer Status Changes in GoHighLevel
How to Connect Customer Status Changes With Internal Business Processes
A sales representative marks a lead as a paying customer, but the onboarding team never receives an update. Days later, the customer is still waiting for their welcome email, account setup, and next steps.
The problem isn't always poor communication. It's disconnected internal processes.
GoHighLevel helps businesses connect customer status changes with automated workflows, internal notifications, task assignments, and CRM updates.
With the right configuration, teams can coordinate responsibilities automatically whenever a customer moves to a new stage.
How Customer Status Automation Works in GoHighLevel
Customer status automation connects CRM updates with specific business activities.
GoHighLevel workflows use triggers to detect changes in contact information, opportunity status, or pipeline stages.
For example, when an opportunity changes to Won, a workflow can notify the onboarding team and create a follow-up task.
Businesses can also use custom contact fields to track lifecycle stages such as New Lead, Active Customer, or Inactive Customer.
The important distinction is that contact lifecycle fields, opportunity statuses, and pipeline stages represent different CRM information.
Choose the one that accurately reflects your business process.
What You Need Before Creating the Workflow
Before starting, ensure you have:
Access to the appropriate GoHighLevel sub-account.
A defined customer lifecycle with clear status meanings.
A configured sales or onboarding pipeline.
Team members with appropriate CRM permissions.
Relevant custom fields or contact tags.
Internal notification and task assignment requirements.
A consistent process for updating customer records.
These requirements help ensure status changes trigger the correct internal actions.
How to Connect Customer Status Changes With Internal Processes in GoHighLevel
Follow these six steps to create a reliable customer status automation.
Step 1: Define Your Customer Lifecycle Stages
Start by identifying the stages customers move through during their relationship with your business.
For example, a service company might use:
New Lead
Qualified
Customer
Onboarding
Active Customer
Inactive Customer
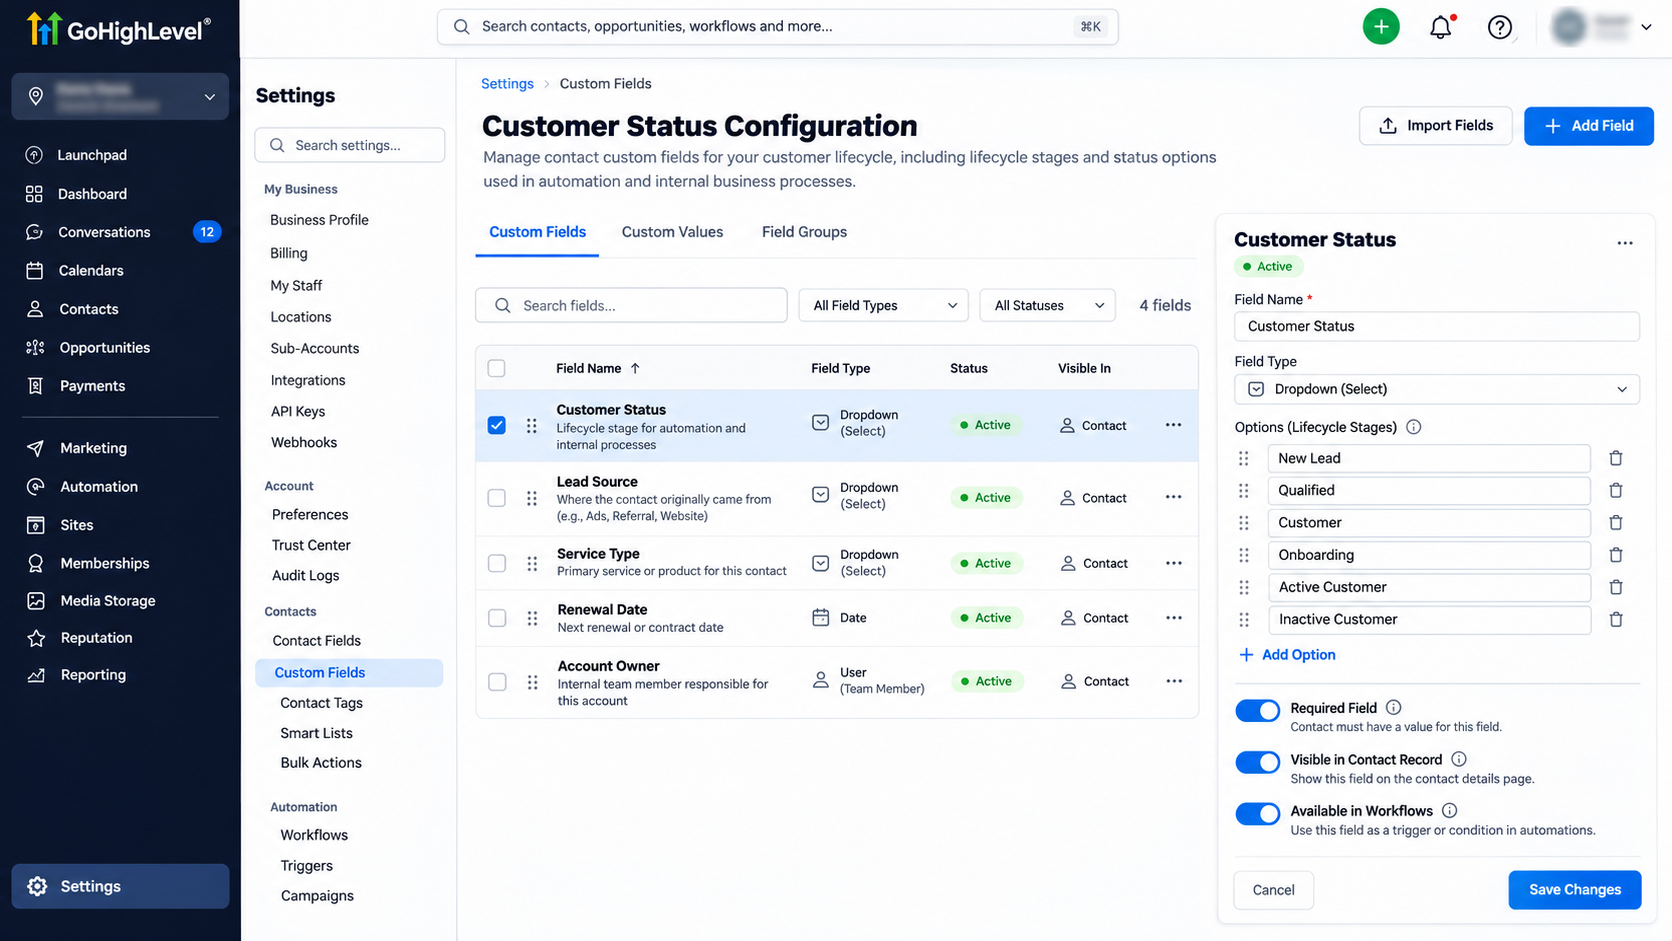
You can represent these stages using a custom contact field or an appropriately configured pipeline.
Navigate to Settings → Custom Fields to create a contact-level Customer Status field if needed.
Use consistent values so employees and workflows interpret each status correctly.
Step 2: Create a Customer Status Workflow
Navigate to Automation → Workflows → Create Workflow.
Select Start from Scratch.
Name your workflow "Customer Lifecycle Automation."
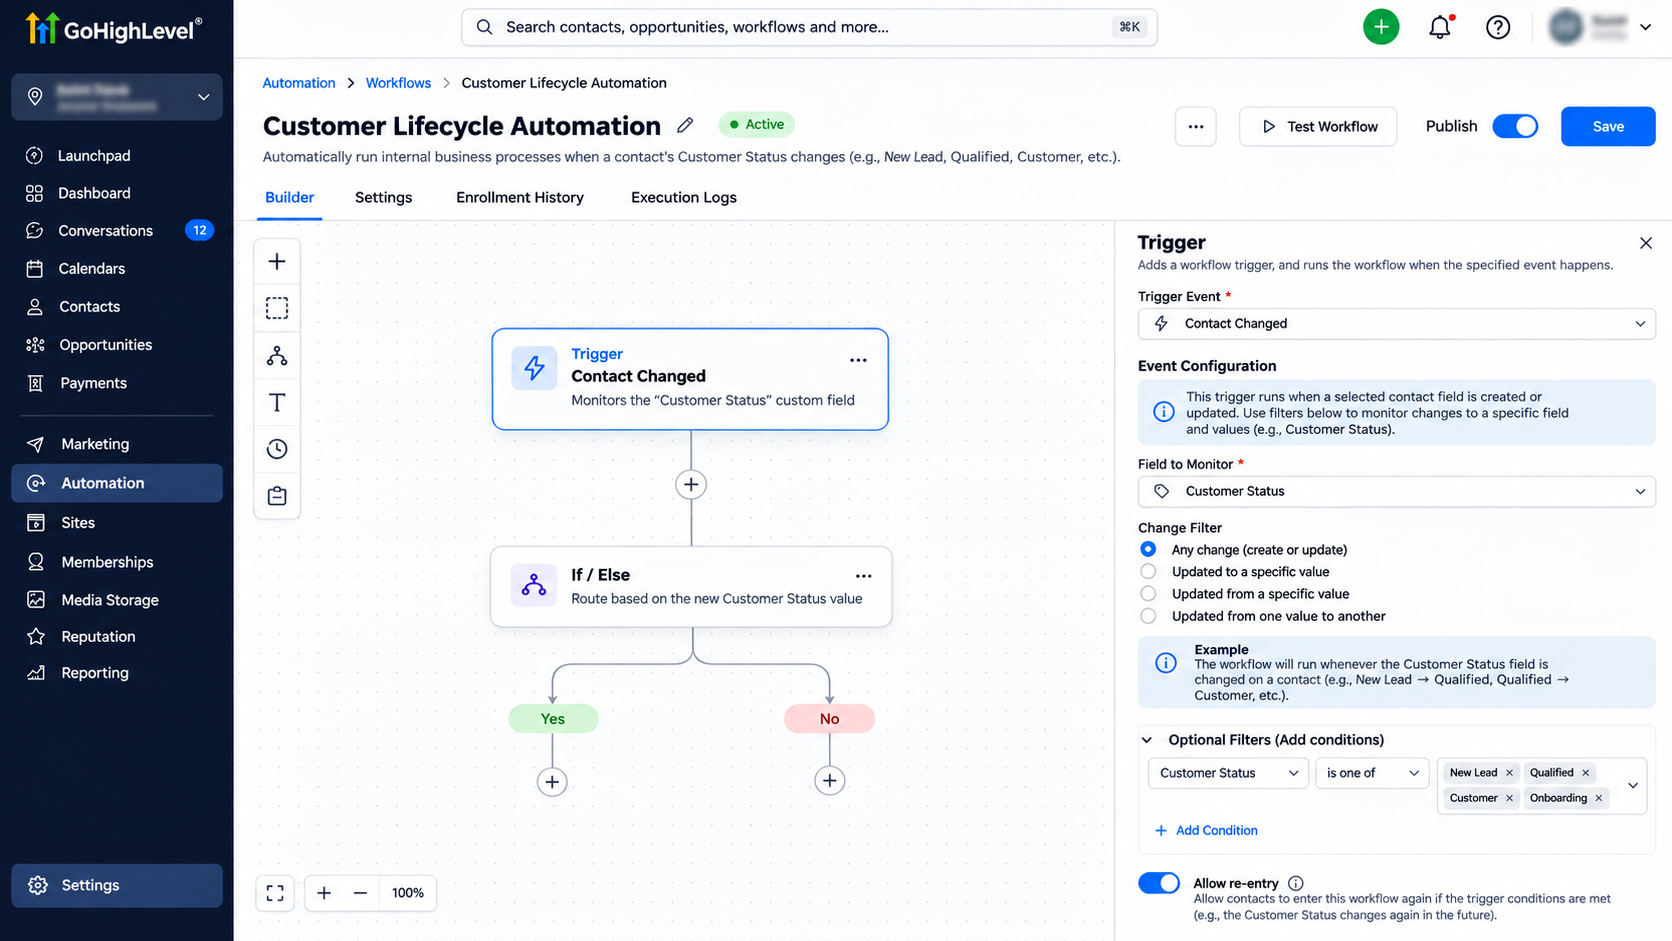
Click Add New Trigger and select Contact Changed.
Configure the trigger to monitor your Customer Status custom field, using the available field filters.
Alternatively, choose Opportunity Status Changed when automation should begin after an opportunity becomes Won or Lost.
Save the trigger configuration.
Step 3: Add Conditions for Different Customer Statuses
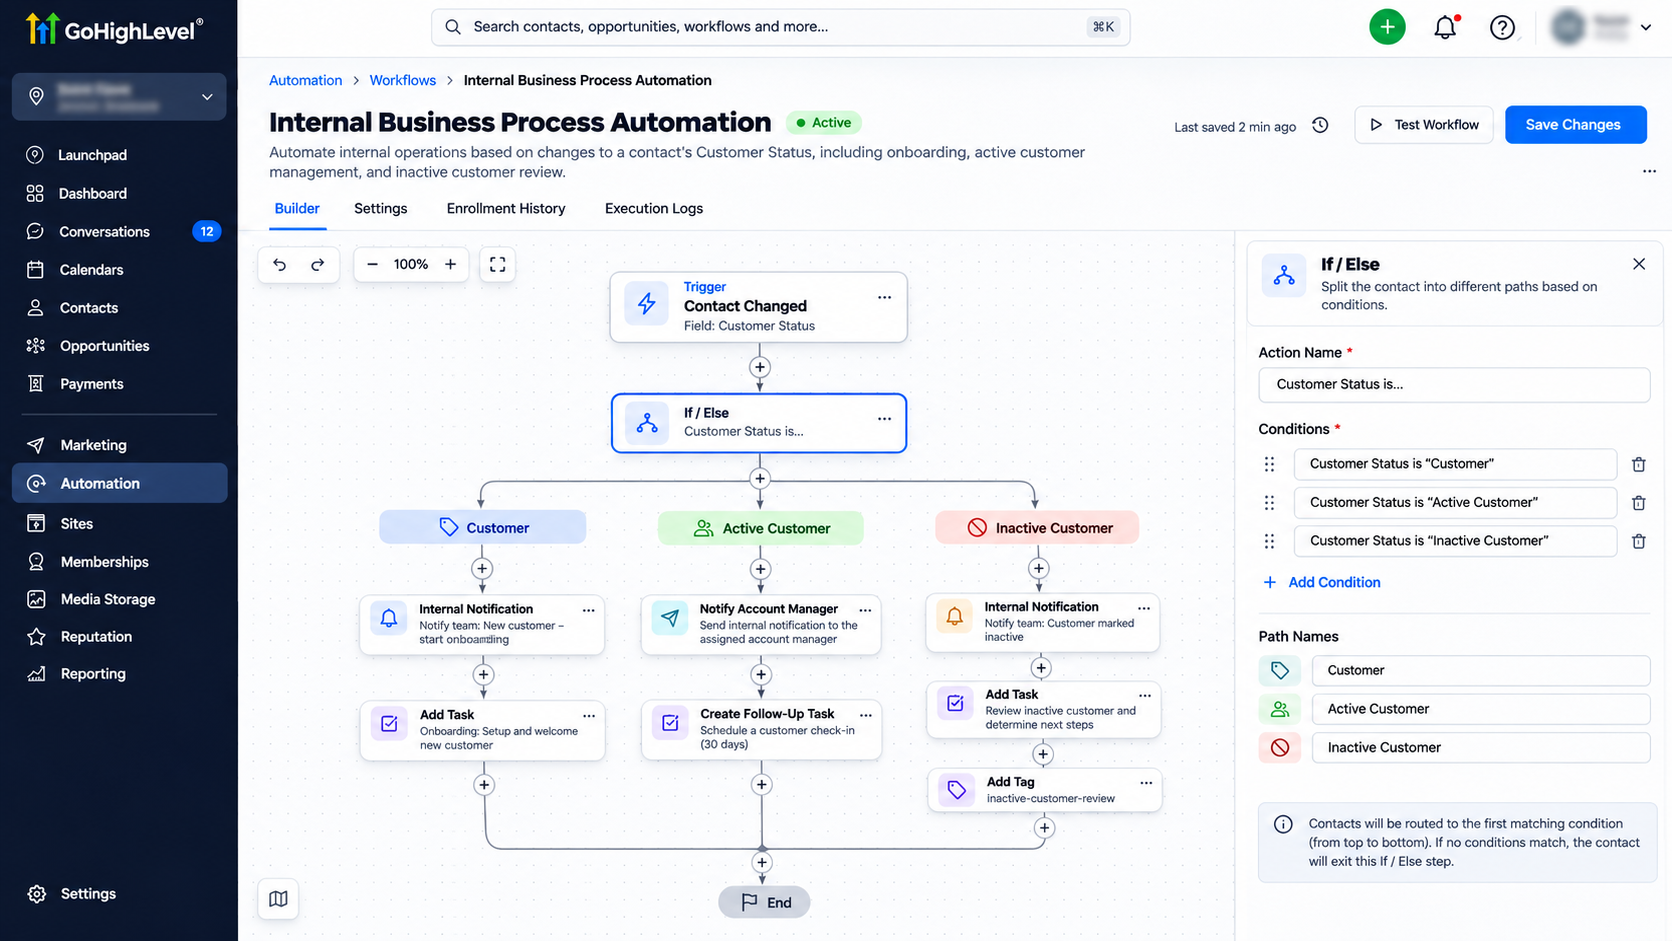
Click the plus icon beneath your trigger and add an If/Else action.
Configure branches based on the Customer Status field.
For example:
Customer: Begin onboarding activities.
Active Customer: Notify the account management team.
Inactive Customer: Create a task for the responsible employee to review the account.
Check the exact field values and configure a fallback path for unmatched records.
This ensures different customer statuses lead to appropriate internal processes rather than triggering identical actions.
Step 4: Automate Internal Notifications and Tasks
Add an Internal Notification action beneath the relevant status branch.
Choose the responsible employee or team and configure an available notification channel.
For example, when a lead becomes a customer, notify the onboarding manager.
Next, add an Add Task action.
Create a task such as "Prepare New Customer Onboarding" and assign it to the appropriate team member.
Include relevant details, responsibilities, and a realistic deadline.
This allows employees to receive clear instructions without relying on manual updates.
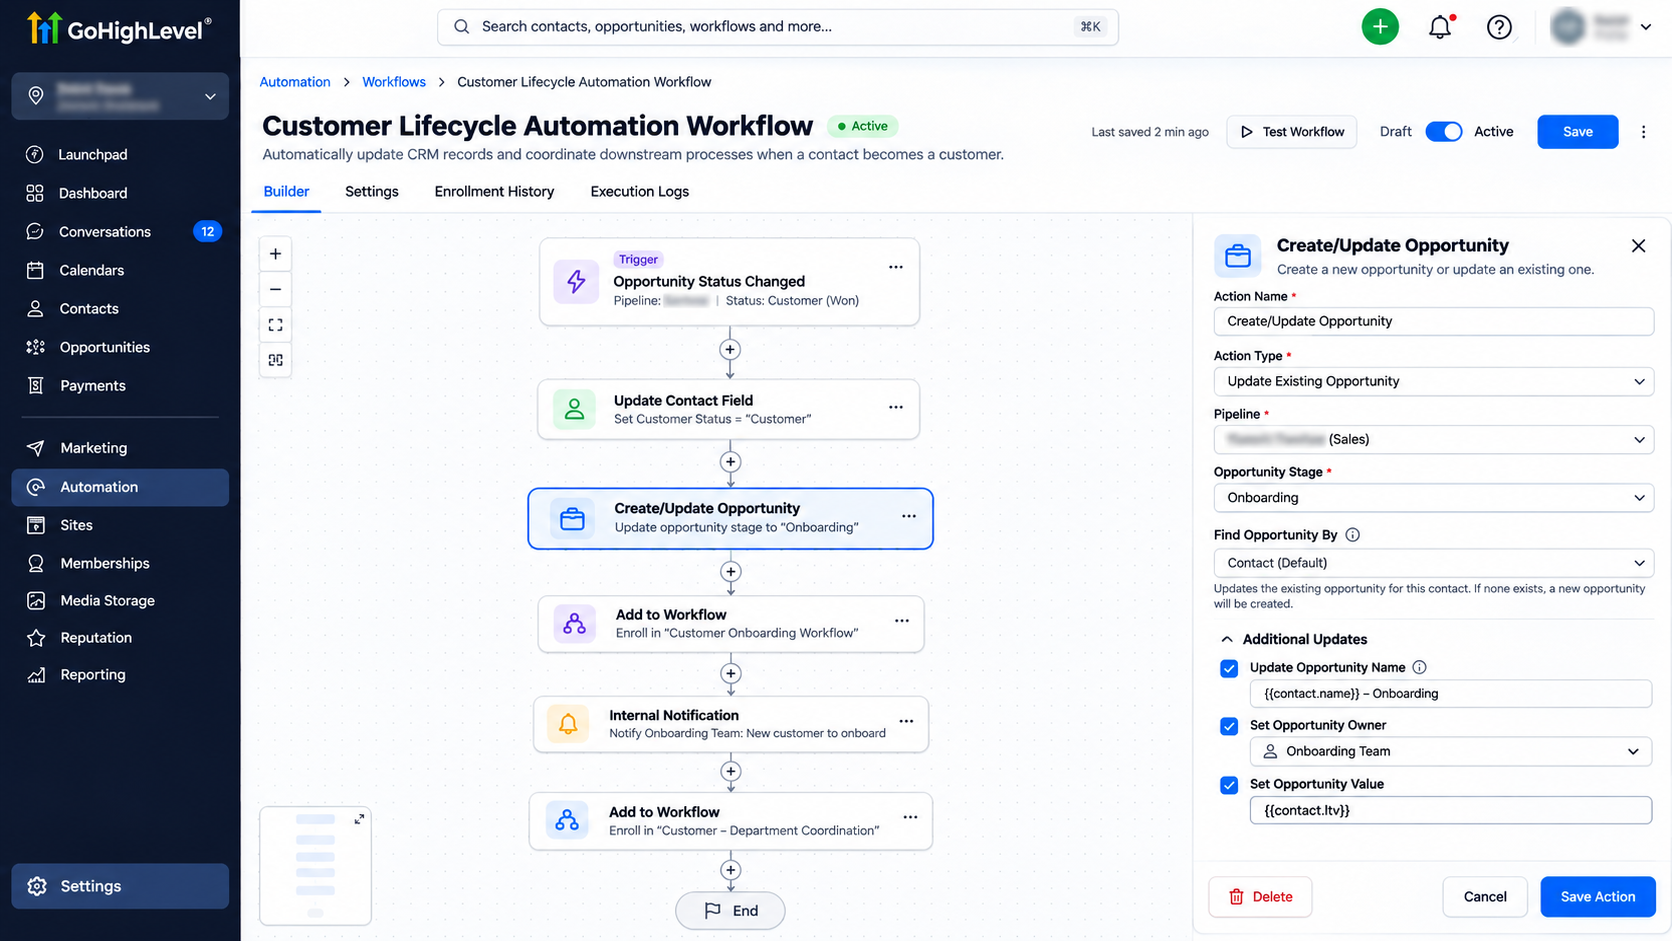
Step 5: Update CRM Records and Pipeline Stages
Use the Create/Update Opportunity action where applicable to manage the relevant opportunity.
For example, when a customer enters onboarding, the workflow can update the associated opportunity within the designated pipeline.
Use Update Contact Field to maintain appropriate contact-level information.
Ensure the workflow updates the intended record and does not create unnecessary duplicate opportunities.
If your process requires separate departmental workflows, use Add to Workflow to connect the next automation.
Step 6: Save, Publish, and Monitor the Workflow
Review the complete workflow before activation.
Confirm that every status branch connects to the intended actions.
Save your changes and publish the workflow.
Use Execution Logs to review workflow activity, identify failed actions, and investigate unexpected behavior.
Remember that a completed workflow does not necessarily confirm that an employee finished the assigned task.
Test Your Customer Status Automation
Create a test contact and update its Customer Status field.
Verify that the correct workflow branch executes and the relevant employee receives a notification.
Check task creation, opportunity updates, and assigned responsibilities.
Test each customer lifecycle status separately, including repeated status changes.
Common Problems and How to Fix Them
Workflow not triggering: Verify publication status, trigger filters, and field updates.
Incorrect workflow branch: Check customer status values and If/Else conditions.
Missing notifications: Review recipients, notification channels, and user settings.
Duplicate tasks: Check workflow re-entry and repeated status updates.
Incorrect pipeline updates: Verify opportunity selection, pipeline configuration, and stage mapping.
Best Practices for Customer Status Automation
Keep customer statuses clearly defined and avoid unnecessary complexity.
Assign one responsible owner to each internal process.
Review workflow execution regularly and update automations whenever business procedures change.
Use consistent CRM fields to maintain accurate customer information.
Conclusion
Connecting customer status changes with internal business processes helps teams reduce manual coordination, improve accountability, and deliver more consistent customer experiences.
GoHighLevel workflows make it possible to automate notifications, task assignments, and CRM updates based on meaningful lifecycle changes.
Need help connecting your CRM with internal operations? WispCode provides GoHighLevel workflow automation, CRM configuration, and business process optimization solutions tailored to your company's needs.
Frequently Asked Questions (FAQs)
1. Can GoHighLevel automatically detect customer status changes?
Yes. The Contact Changed workflow trigger can detect supported contact field updates, including configured custom fields.
2. Can customer status changes trigger internal notifications?
Yes. GoHighLevel workflows can notify employees through supported internal notification channels.
3. Can GoHighLevel automatically create tasks for employees?
Yes. The Add Task action can create internal follow-up tasks and assign responsibilities.
4. Can different customer statuses trigger different workflows?
Yes. You can configure If/Else branches or separate workflows for different lifecycle events.
5. How can I prevent duplicate customer automation tasks?
Use appropriate trigger filters, workflow re-entry settings, and conditions that check whether the required actions have already occurred.
Need Expert Help with GoHighLevel?
New to GoHighLevel and ready to get started? Buy your GoHighLevel account here and launch with confidence.
Already know what you need and want our team to handle everything, from complete setup and customization to funnels, workflows, automations, CRM, and pipelines? Click here.