

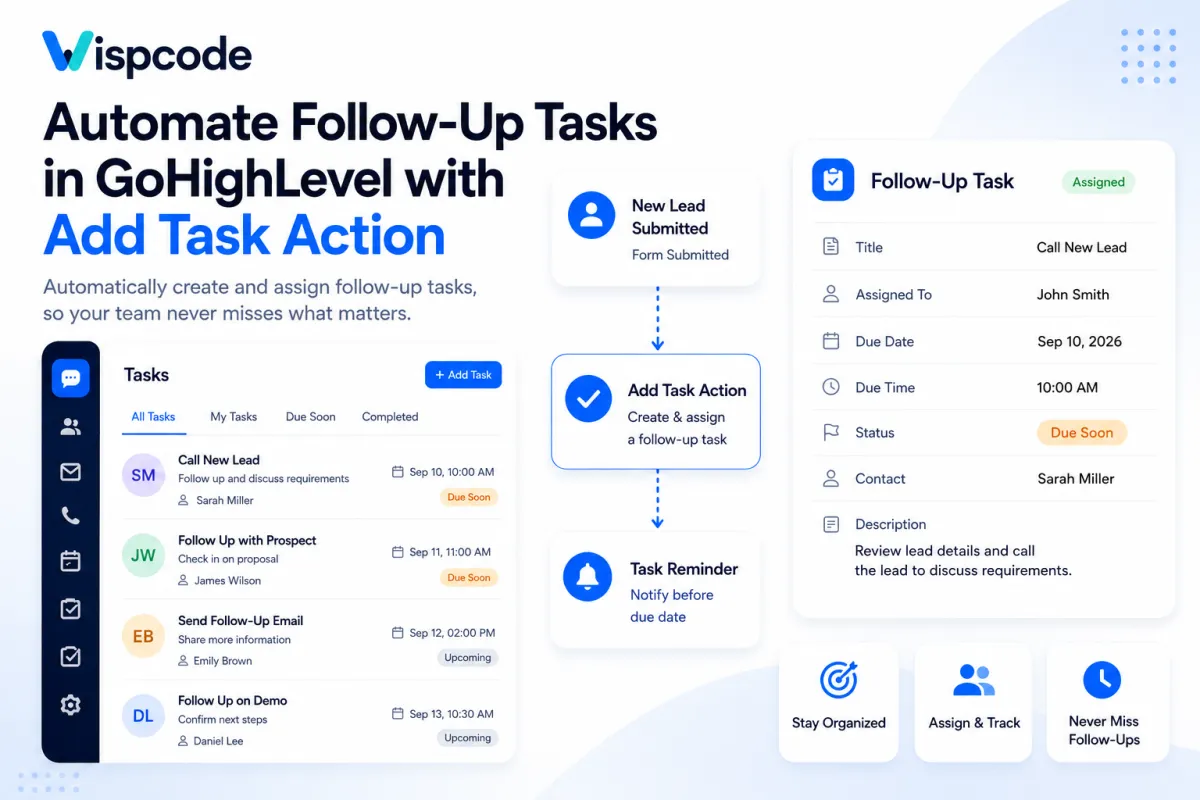
Create Follow-Up Tasks Automatically in GoHighLevel: Step by Step Guide
How to Create and Assign Follow-Up Tasks Automatically Using the Add Task Action in GoHighLevel
Introduction
Following up with leads sounds simple, until your team has dozens or hundreds of contacts moving through different stages of the sales process.
A lead fills out a form. Someone needs to call them. Another lead books an appointment. A sales representative needs to check in two days later. A prospect asks for more information, and someone needs to follow up before the opportunity goes cold.
Without automation, these follow-ups often depend on someone remembering to create a task manually.
That is where the Add Task action in GoHighLevel becomes useful. It allows you to automatically create a task inside a workflow, assign it to a specific user, and give it a defined due date. If the workflow is associated with a contact, the task can also be associated with that contact.
In this guide, you'll learn how to use the Add Task action to build reliable follow-up systems in GoHighLevel, along with practical examples, configuration tips, and common mistakes to avoid.
What Is the Add Task Action in GoHighLevel?
The Add Task action is a workflow action that automatically creates a task when a contact reaches that step of your automation.
Instead of relying on a team member to remember:
"I need to call this lead tomorrow."
GoHighLevel can create the task automatically based on the workflow's trigger and configuration.
The Add Task action lets you define:
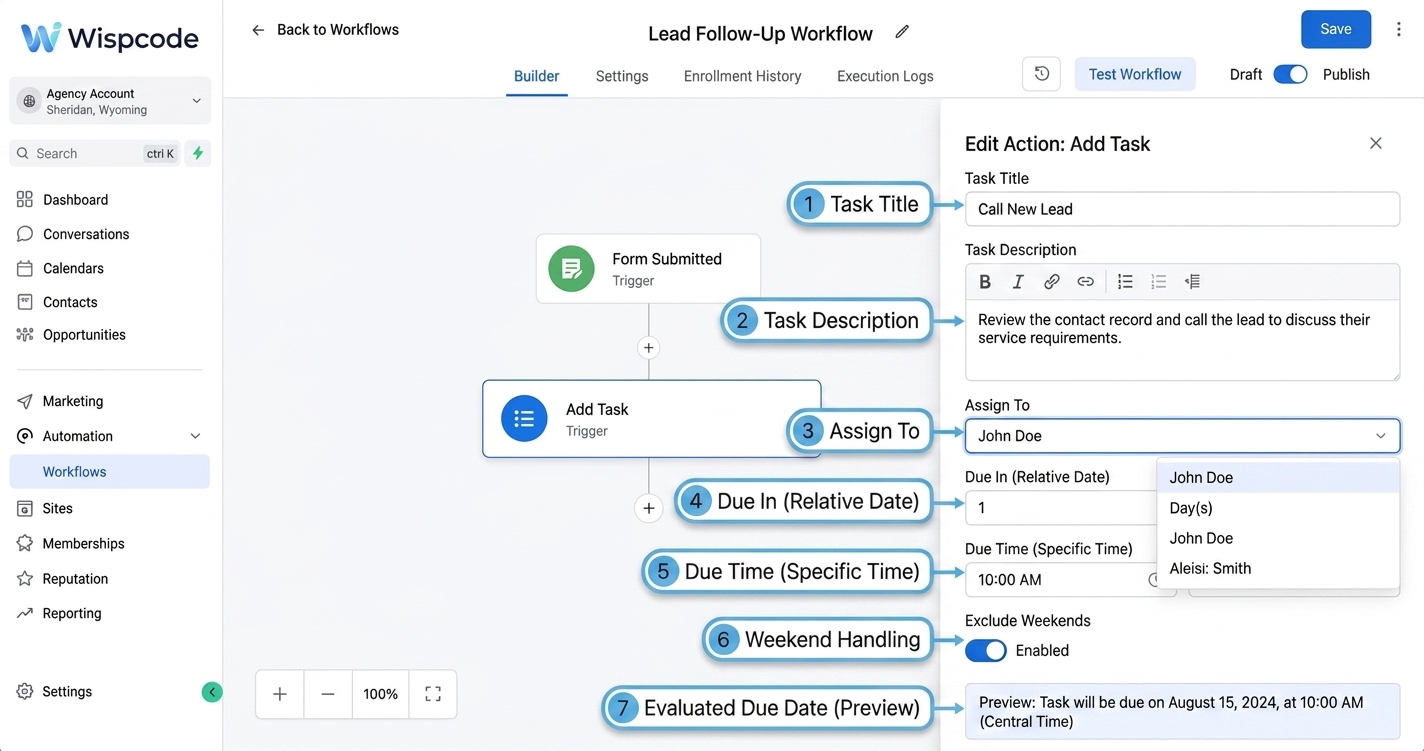
Task title
Task description
Assigned user
Due-in period
Due time
Weekend handling
The current GoHighLevel documentation also provides a due-date preview so you can review the evaluated date and time before relying on the automation.
For example, you could create a workflow that starts when a new lead submits a form and automatically creates:
Task: Call New Lead
Assigned To: Sales Representative
Due In: 1 day
Due Time: 10:00 AM
The sales representative then has a clearly defined follow-up task instead of relying on memory.
Why Automate Follow-Up Tasks?
Automated tasks are particularly useful when a business has repeatable follow-up processes.
Without automation, a team member might have to:
Open the contact record.
Create a task.
Enter the task title.
Choose an assignee.
Select a due date.
Add instructions.
Remember to complete the follow-up.
That process may only take a minute, but repeating it hundreds of times creates unnecessary administrative work.
With a workflow, the task can be created automatically after the event that requires follow-up.
This creates a more consistent process and makes it easier for your team to see what needs attention.
GoHighLevel's task management also provides filtering and sorting options, including filters for assignee, status, and due date.
How to Create an Automated Follow-Up Task in GoHighLevel
Let's build a simple example.
Example Scenario
Imagine a business receives leads through a website form.
The desired process is:
Form Submitted → Create Follow-Up Task → Sales Rep Calls Lead
The task should be assigned automatically and become due the following day.
Step 1: Create or Open a Workflow
From your GoHighLevel sub-account, open Automation → Workflows.
Create a new workflow or open an existing workflow where you want to automate the follow-up.
Your workflow needs a trigger because workflow actions execute after a workflow is initiated by a trigger.
For this example, you could use a form-submission trigger.
The basic structure would be:
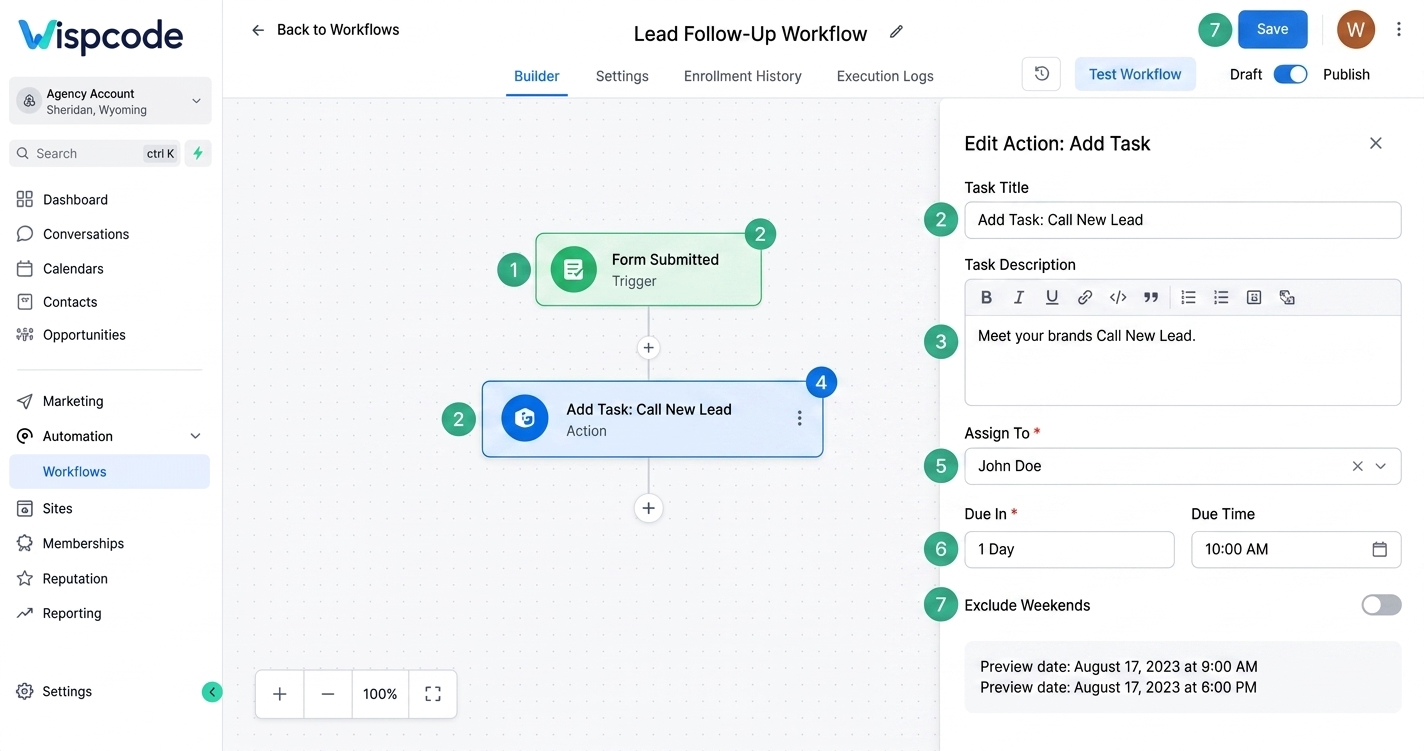
"Form Submitted → Add Task"
Step 2: Add the Add Task Action
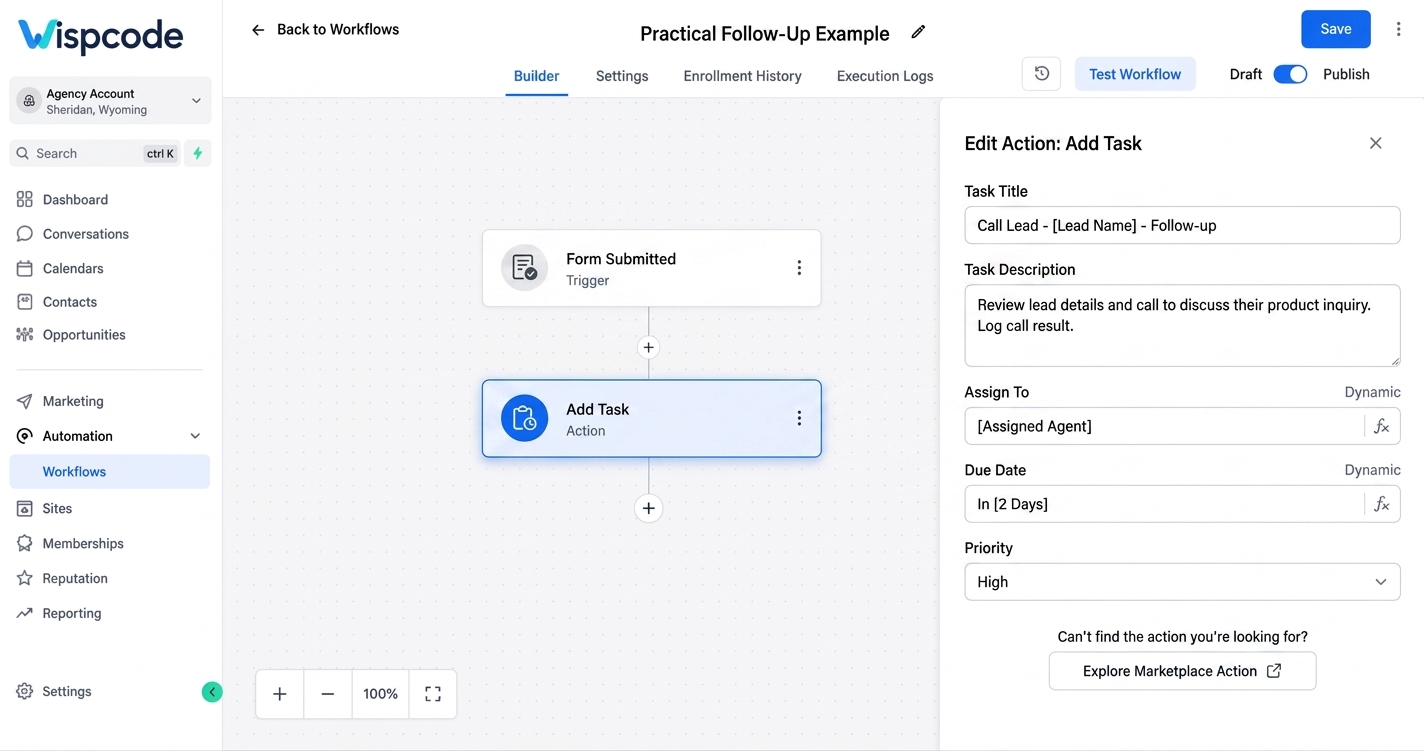
Inside the Workflow Builder, add a new action.
Search for and select Add Task.
This opens the task configuration panel.
GoHighLevel's current Add Task action provides several fields that determine what task will be created and who receives it.
Step 3: Give the Task a Clear Title
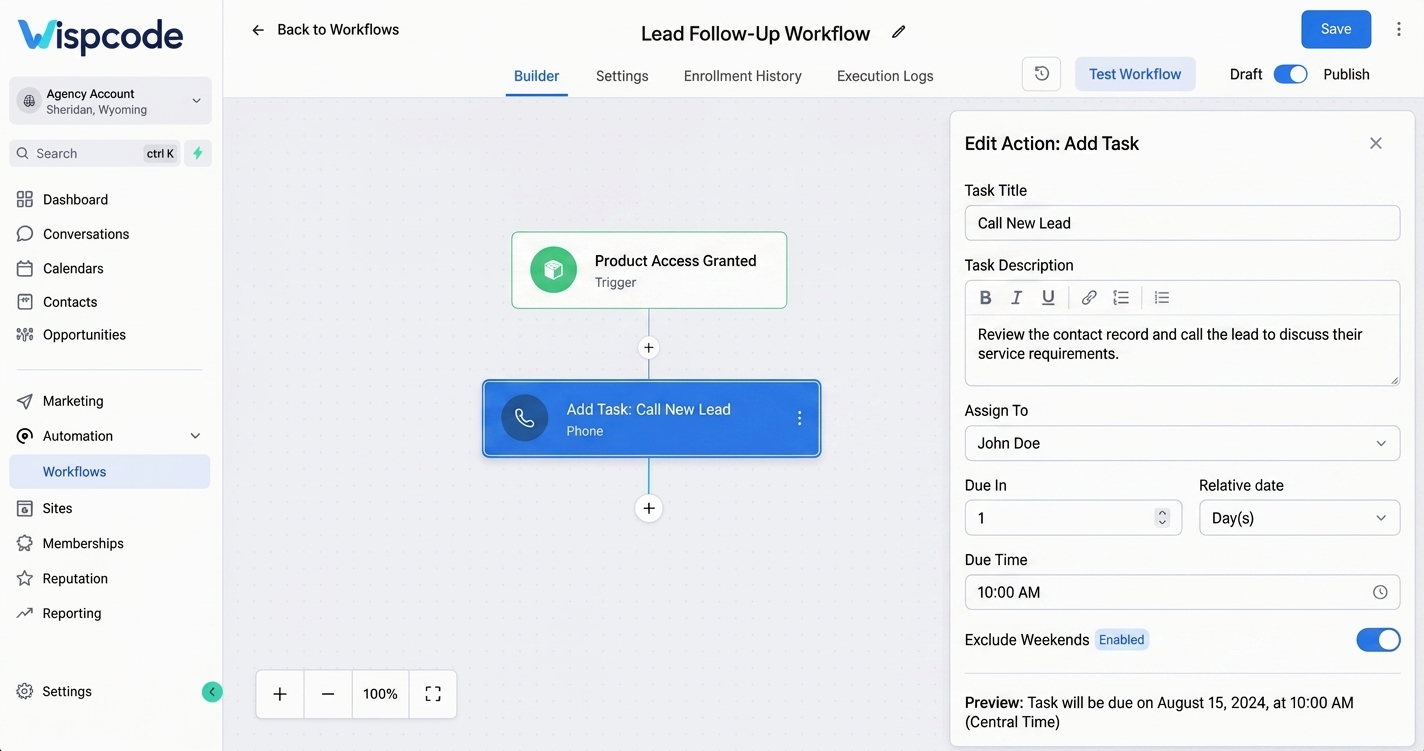
The Title tells the assigned user what needs to be done.
Avoid vague titles such as:
Follow Up
Instead, use a title that communicates the action clearly.
For example: "Call New Lead"
Or:
"Follow Up With New Website Lead"
A useful task title should make sense when the salesperson sees it in their task list without having to open additional information.
Step 4: Add a Useful Description
The Description field gives the assigned user additional context.
For example:
"Review the contact record and call the lead to discuss their service requirements."
You can use the description to explain what the employee should do, what information they should review, or what outcome you're expecting.
GoHighLevel's current documentation states that the Add Task description supports rich text formatting, which is useful when you need to provide more structured instructions.
Step 5: Assign the Task to a User
The Assign To field determines who receives the task.
Select the appropriate user from the available users in the sub-account.
For example: "Assign To → John"
This is one of the most important parts of the setup. Creating a task without a clear owner can make it much harder for a team to know who is responsible for the follow-up.
GoHighLevel's documentation identifies Assign To as a required field for the Add Task action.
Step 6: Set the Due Date
Next, configure Due In.
This determines when the task should be due.
For example: "Due In → 1 Day"
You can configure the task for different periods, such as days, weeks, months, or years. The action also supports Now for immediate tasks.
For a new-lead workflow, you might choose:
"Due In: 1 Day"
This means the workflow automatically creates a follow-up task with the configured deadline.
Step 7: Set a Specific Due Time
The Due Time field allows you to specify a particular time of day.
For example:
"Due Time → 10:00 AM"
This can make your follow-up process more predictable.
Instead of simply creating a task that is due sometime the next day, your team can work from a defined schedule.
Step 8: Consider Skipping Weekends
GoHighLevel also provides an option to Exclude Weekends when calculating the task's due date.
This is useful for businesses that operate primarily Monday through Friday.
For example, if a follow-up is created late in the week and your process requires the next business day rather than a weekend date, enabling this option can help keep the deadline aligned with your working schedule.
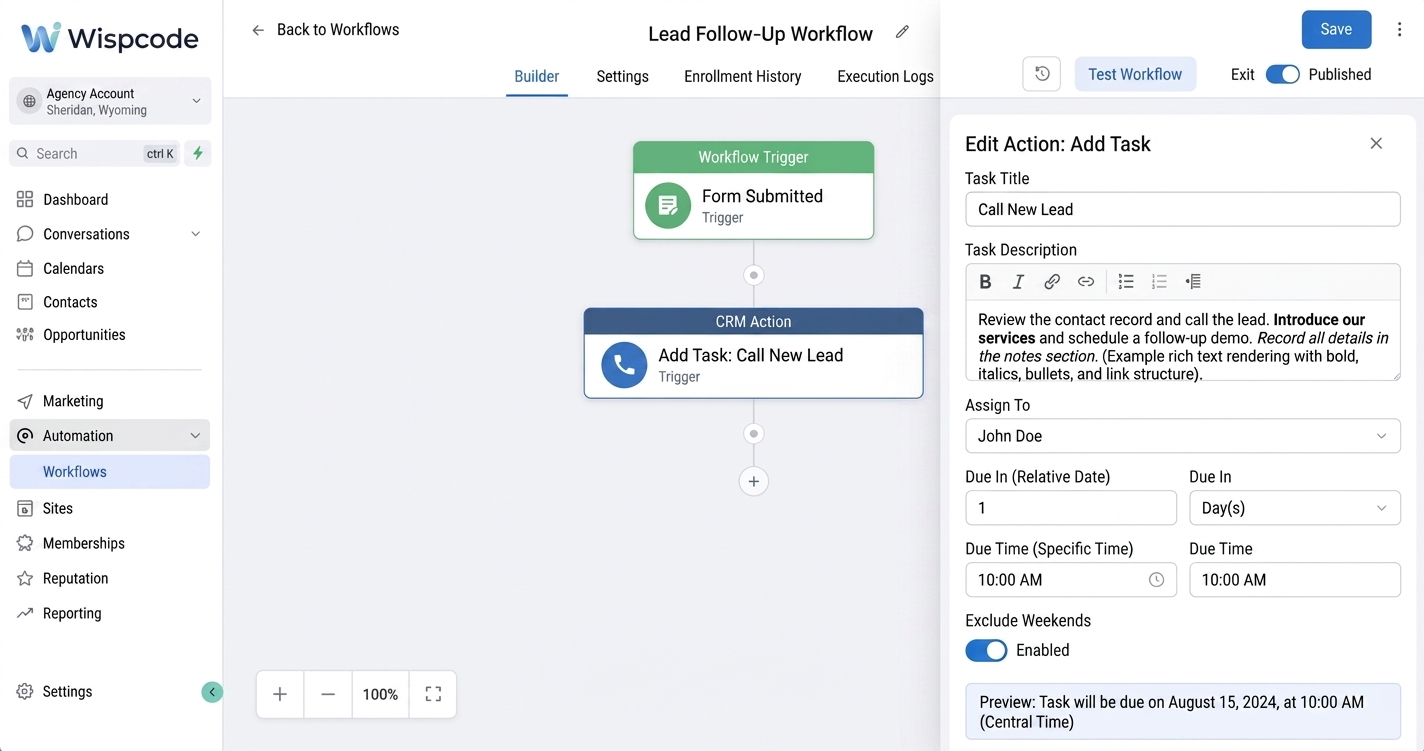
Step 9: Review the Due Date Preview
Before completing the action, check the Due Date Preview.
GoHighLevel provides a live preview of the evaluated due date and time, helping you verify that the configuration matches your intended schedule.
This small step can prevent timing mistakes from reaching your live workflow
.
A Practical Follow-Up Workflow Example
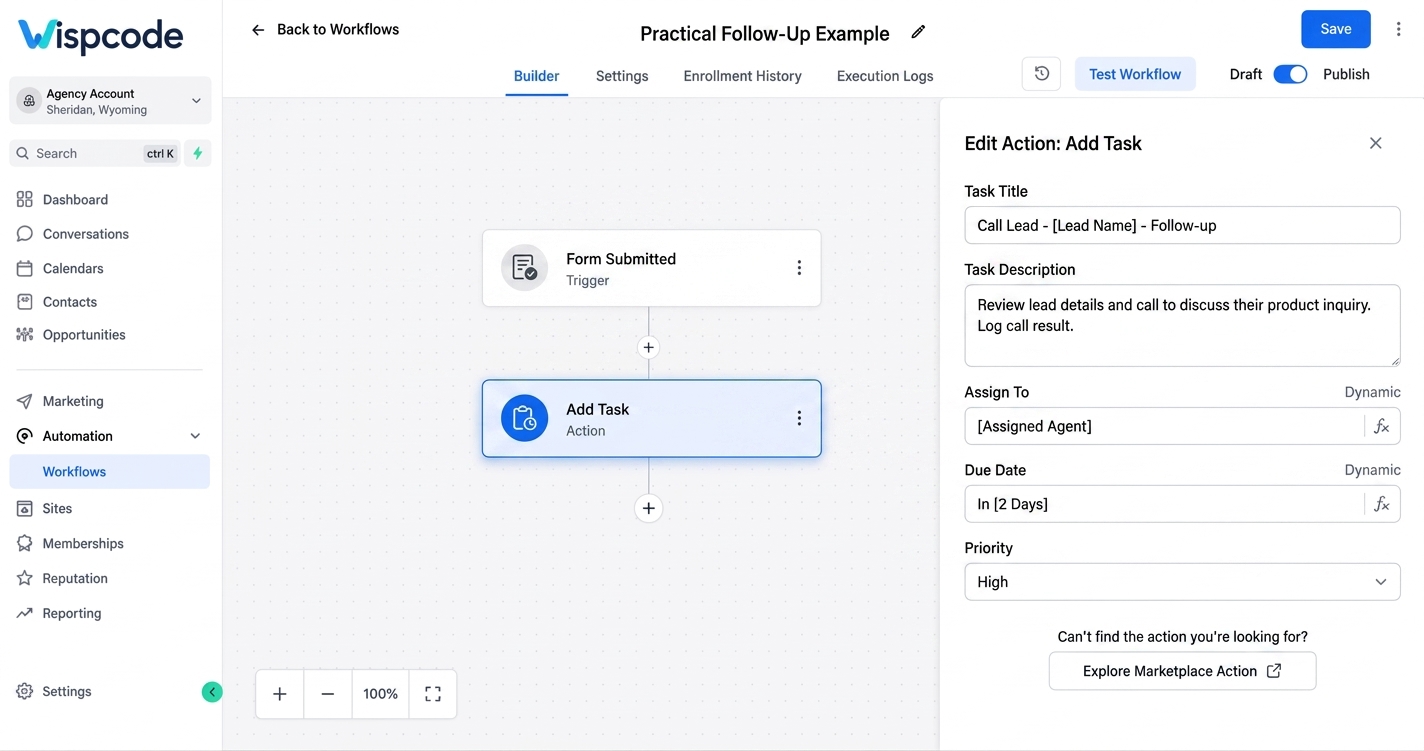
Here's a simple automation for a lead-generation process:
Trigger: New Lead Form Submitted
↓
Action: Add Task
Title: Call New Lead
Description: Contact the lead and discuss their requirements.
Assign To: Sales Representative
Due In: 1 day
Due Time: 10:00 AM
Exclude Weekends: Enabled
The result is straightforward.
Whenever the workflow is triggered, GoHighLevel creates the follow-up task according to those settings.
If the workflow has an associated contact, the task is automatically associated with that contact. If there is no contact associated with the workflow, GoHighLevel can create a contact-less task instead.
Follow-Up Tasks for Different Business Scenarios
The Add Task action isn't limited to lead calls.
You can use it in many workflow processes where a human needs to take a specific action.
New Lead Follow-Up
Trigger: Lead submits a form
Task: Call the new lead
This is useful when your sales process requires a personal conversation after an online inquiry.
Appointment Follow-Up
A business could create a task after an appointment-related event so a team member knows they need to perform a specific follow-up.
For example:
Task: Follow up with appointment lead
The exact workflow trigger and conditions should match the business's appointment process.
Sales Opportunity Follow-Up
When an opportunity reaches a particular point in a sales process, you can use a workflow to create a task for the responsible team member.
For example:
Task: Contact prospect regarding proposal
This helps turn a sales-stage event into a clear human action.
Customer Onboarding
Tasks can also support internal onboarding processes.
For example:
Task: Contact new customer and confirm onboarding requirements
Instead of expecting an employee to remember the next step, the workflow can create the task automatically when the appropriate event occurs.
Combining Add Task With Wait Actions
You don't always have to create a task immediately.
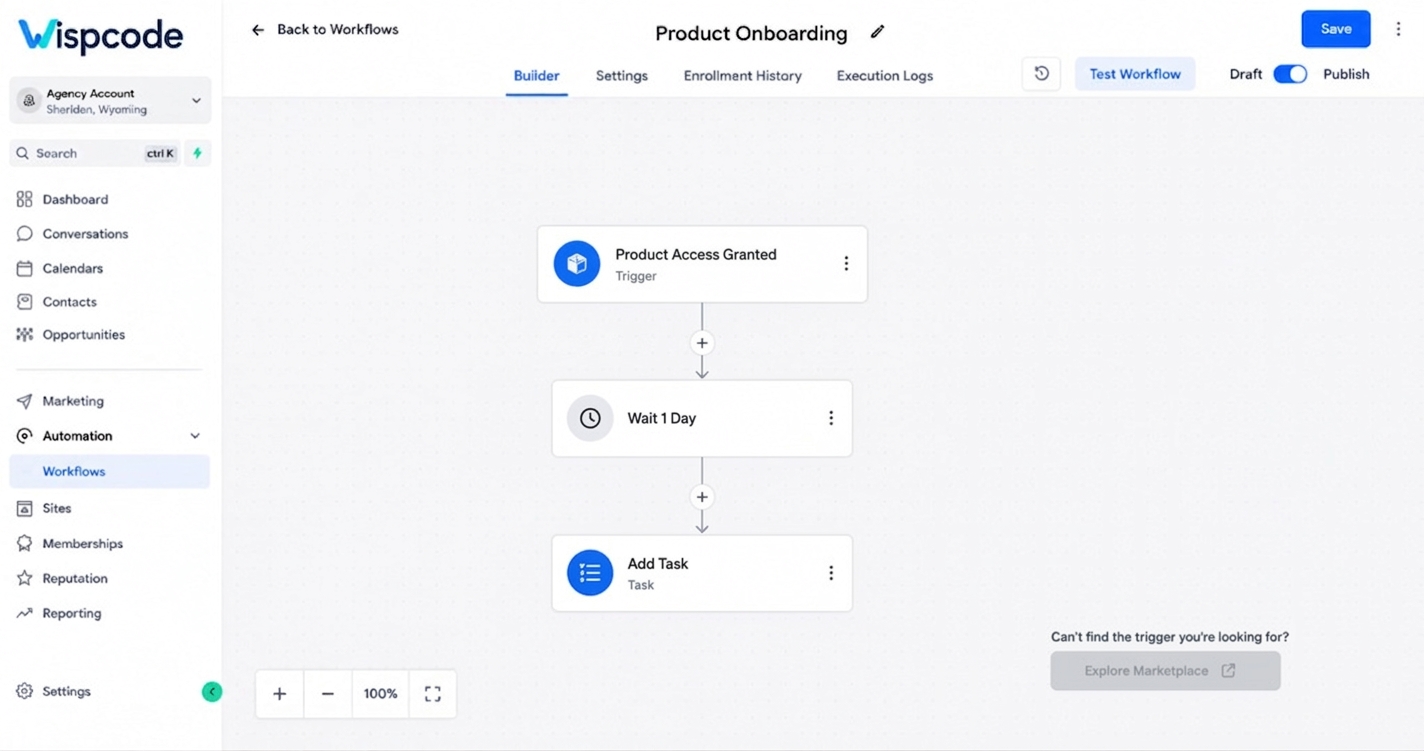
GoHighLevel's Wait action can pause a workflow for a defined period or until a specified condition or timing point before continuing.
For example:
Form Submitted
↓
Wait 1 Day
↓
Add Task: Call Lead
This structure is useful when the follow-up should happen after a delay rather than immediately after the trigger.
The important distinction is:
Wait controls when the workflow continues.
Add Task creates the task that a team member needs to complete.
Using both together gives you more control over when internal follow-up work is generated.
Use Task Reminders for Additional Follow-Up Automation
GoHighLevel also provides a Task Reminder workflow trigger.
This trigger can start another workflow based on timing around a task's due date. For example, you can configure automation to run before or after the task's due date.
A simplified process could look like:
Lead Enters Workflow
↓
Add Task
↓
Task Approaches Due Date
↓
Task Reminder Trigger
↓
Internal Notification
This can help create an additional layer of accountability around important tasks.
Keep in mind that the Task Reminder trigger requires the task to have a due date. Also, creating the task does not automatically mean the assigned user receives a notification—you need to configure notification actions when you want additional automated notifications.
Best Practices for Automated Follow-Up Tasks
1. Keep Task Titles Action-Oriented
A good task title tells the user what to do.
Use:
Call New Lead
Instead of:
New Lead
The first describes an action. The second only describes a record or situation.
2. Give the Assignee Enough Context
Don't make your sales representative search through the entire workflow to understand the task.
Use the description to explain the required action and relevant context.
3. Choose Due Dates Carefully
An automated task is only useful if its deadline makes sense.
Consider whether the task should be due immediately, the next day, or later in the sales process.
4. Avoid Creating Duplicate Tasks
Be careful when designing workflows that can run more than once for the same contact.
If the same event can repeatedly enter the workflow, you may unintentionally create multiple follow-up tasks.
Review your workflow's trigger and re-entry behavior before publishing.
5. Test Before Publishing
Always test the workflow with a controlled contact before relying on it for live leads.
Confirm:
The workflow triggers correctly.
The task is created.
The task has the correct title.
The description is correct.
The correct user is assigned.
The due date is correct.
The task is associated with the expected contact when applicable.
Common Mistakes to Avoid
Creating Tasks Without Clear Ownership
A follow-up task should have a clear responsible user. Review the Assign To setting carefully.
Using Vague Task Names
"Follow up" doesn't tell the salesperson what kind of follow-up is required.
Make the title specific and action-oriented.
Forgetting the Due Date
The due date is central to task-based follow-up. It also matters if you're using the Task Reminder trigger, because that trigger requires a task with a due date.
Ignoring Weekend Settings
If your team doesn't normally work weekends, review whether Exclude Weekends should be enabled.
Assuming Task Creation Sends a Notification
Creating a task and notifying a team member are not necessarily the same thing.
If you want a separate notification, configure an appropriate workflow notification action. GoHighLevel specifically notes that Task Reminder does not automatically notify the assigned user unless notification actions are added.
Frequently Asked Questions (FAQ'S)
1.What does the Add Task action do in GoHighLevel?
The Add Task action creates a task during a workflow and allows you to define its title, description, assignee, and due-date settings.
2.Can I automatically assign a task to a team member?
Yes. The Add Task action includes an Assign To field where you select the user who should receive the task.
3.Can I set a task to be due a certain number of days later?
Yes. The Due In setting lets you define a period such as days, weeks, months, or years. You can also configure a specific due time.
4.Can GoHighLevel skip weekends when creating an automated task?
Yes. The Add Task action includes an Exclude Weekends option for calculating the due date.
5.Can a workflow create a task without a contact?
Yes. GoHighLevel supports contact-less tasks when a workflow does not have an associated contact. When a contact is available, the task is automatically associated with that contact.
Conclusion
The Add Task action in GoHighLevel is a simple but powerful way to turn automated events into clearly defined human follow-up activities.
Instead of expecting your team to remember every call, check-in, or internal action, you can let workflows create those tasks automatically at the right point in your process.
A well-designed setup can be as simple as:
Trigger → Optional Wait → Add Task → Task Reminder/Notification
The key is not to automate tasks just for the sake of automation. Build them around real business processes, give each task a clear owner, use specific instructions, choose sensible due dates, and test the workflow before putting it into production.
When configured properly, automated follow-up tasks help your team spend less time managing reminders and more time actually following up with the people who matter.
Need Expert Help with GoHighLevel?
New to GoHighLevel and ready to get started? Buy your GoHighLevel account here and launch with confidence.
Already know what you need and want our team to handle everything, from complete setup and customization to funnels, workflows, automations, CRM, and pipelines? Click here.